Page Contents
Typical problems with the Minox EC
Of the four Minox EC cameras I have bought recently, only one was fully functional from the start. The other three had electrical problems and one of them also had a massive mechanical fault.
The good news is that I was able to get them all working again. The electrical problems were even relatively easy to fix. But once the Minox EC is working again, it’s a great camera. Here you can find out what it can do and how to get the most out of it.
Please read our Legal Disclaimer before proceeding.
Skills and tools required
You need a little manual dexterity, but not a lot. Basic knowledge of soldering is helpful. If you have never soldered before, you can learn the necessary skills in just a few minutes. You also may need a measuring device that can measure electrical resistance. The simplest multimeter versions (for 10 $) are sufficient for this. You will also need a small Phillips screwdriver (a cheap model will do). Tool list:
- soldering iron, solder, flux
- multimeter
- screwdriver PH0000
- glass fiber pen or eraser
- sanding paper 600 grit
- contact spray
- Q-tips
- See also here.
Check the Minox EC
Shutter
First check the function of the shutter. You can find out how to do this here. With all my Minox EC cameras, the shutter was fine, so I won’t go into the shutter any further here.
Power supply
The most important check of the Minox EC is the power supply. It is not enough to measure a suitable battery with a voltage tester and be happy if it shows 6 V. Even old batteries that are practically empty can still have a voltage of 6 V and still not deliver any current. I have described here how to check the correct power supply of the Minox EC.
If the Minox EC does not display any power (red LED in the viewfinder), there are two possible reasons for this. The battery may be flat or the electrical connection between the battery and the camera may be faulty.
If the shutter test described above shows the same behavior with the battery inserted as without the battery, this also indicates a problem with the power supply.
I once also had the unexpected effect that the camera remained switched on all the time, even when it was folded. I only noticed this when the new battery was empty after just a few days since the last use.
Flash connectors
The third test is optional and concerns the flash. If the power supply is OK, place the flash on the camera. Then slide the camera switch to the right (towards the flash symbol) and switch on the flash or plug in a flash bulb. A battery must be inserted in the camera and flash. The flash must then light up when the camera is triggered. I once had the unexpected effect that the flash kept firing as soon as I put it on the camera. I will come back to this later.
Tutorial Minox EC operation
There is also a nice video from Mostly Vintage Cameras on youtube that shows the operation of the Minox EC in detail.
Here is a flow chart of the entire test procedure (except for the lightning contacts). The tests themselves are explained in detail below. The order of the tests is technically arbitrary, but we start with the tests that can be carried out most quickly:
Minox EC power connection
Three of my four Minox EC had problems with the power connection. The connections in the battery compartment were always to blame. This can easily be explained by the long idle times. Even the latest ECs are at least 30 years old. If the previous owner left the battery in the camera for a long period of time, electrolyte will have leaked out of the battery at some point. These substances are corrosive and can corrode or short-circuit the soldered connections. Current can then no longer flow from the battery into the camera circuit.
I am therefore assuming in this section that you have detected a problem with the power supply during testing. See above Power Supply and Shutter test.
Battery contacts
I assume that you have ruled out a problem with the battery, see above. So it can only be the camera. I would start the test as follows.
The battery contacts can be dirty. You have probably already checked this. But even if the contact springs look bare, the conductivity may be gone. It is best to rub them carefully with a glass fiber pen or an eraser. Finally, apply some contact spray to a Q-tip and moisten the contact springs and the battery contact surfaces with it.
Check whether the camera is now working. If not, continue here.
Wire connections
Here we check the solder connection of the minus battery contact with the wire that goes into the camera. In most cases, this is where the problem lies.
We leave the positive contact unchecked as I have never had a problem with it. This can be explained by the fact that with old batteries in the device, the electrolyte usually leaks out at the negative terminal.
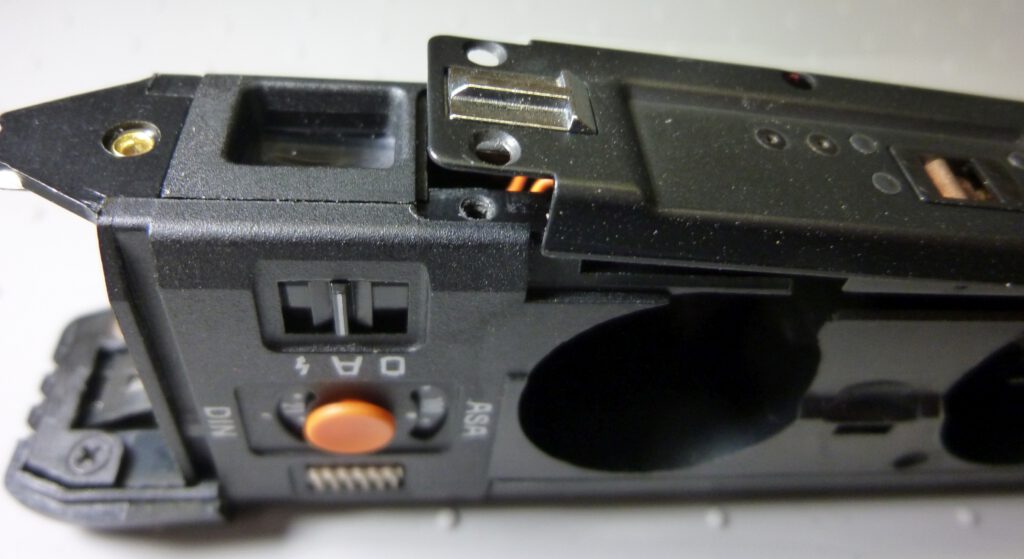
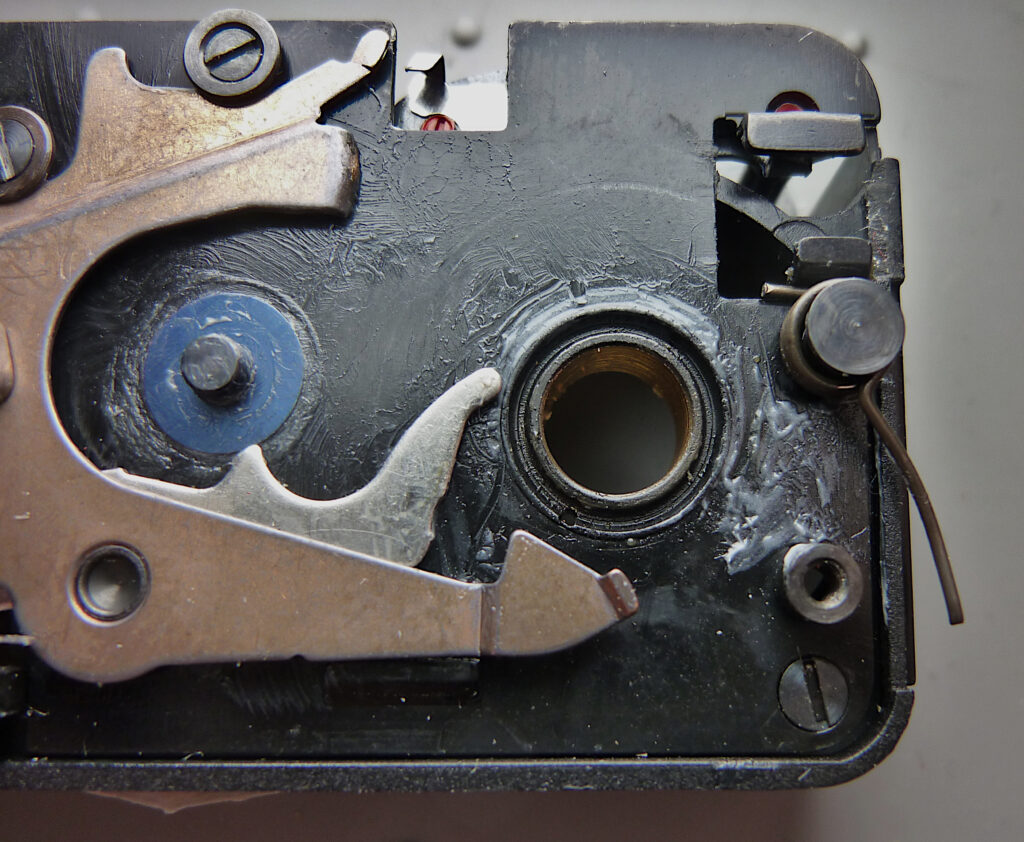
We can easily reach the soldering point of the negative pole. To do this, loosen the two screws next to the contact lug of the negative pole, see picture below on the left.
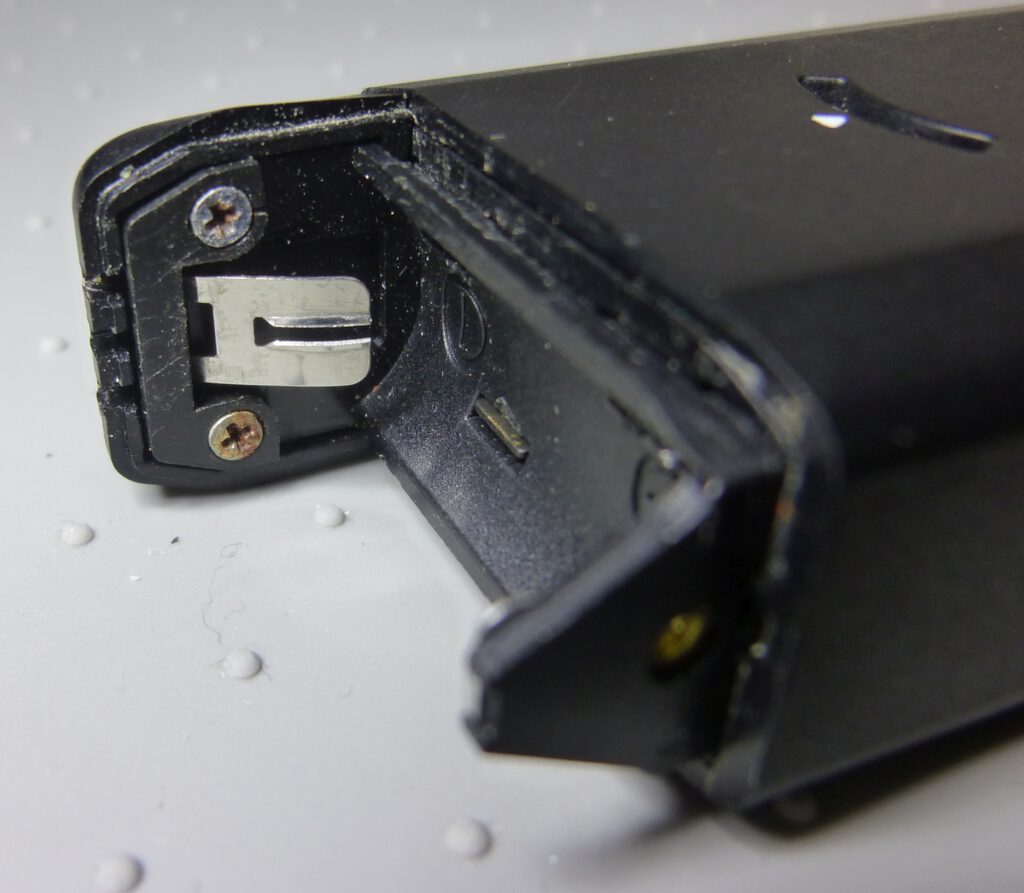
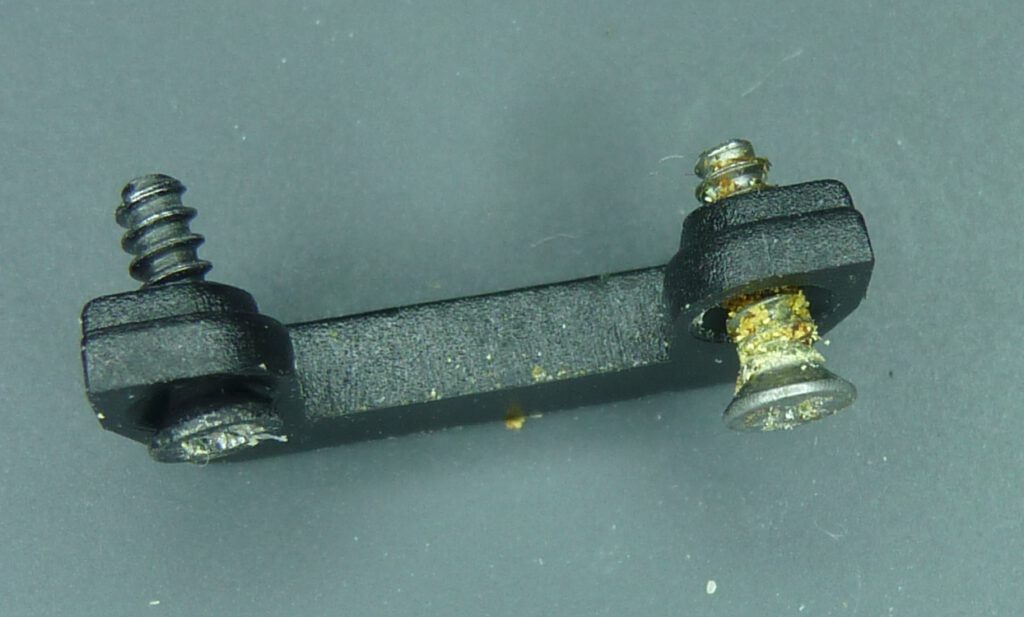
You can already assume from the rust on screws that corrosion has taken place in this area, see picture above on the right.
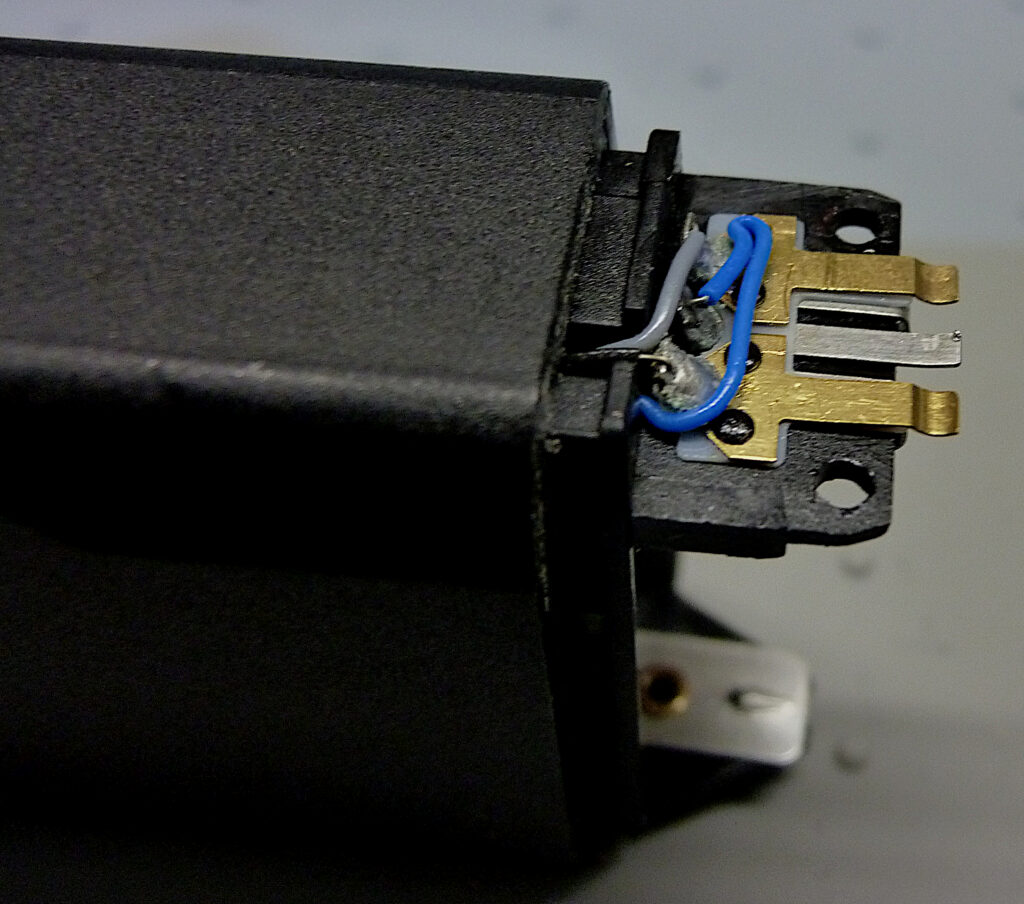
Now you can remove the two small parts of the front and rear cover. The area then should look like this, see picture on the left.
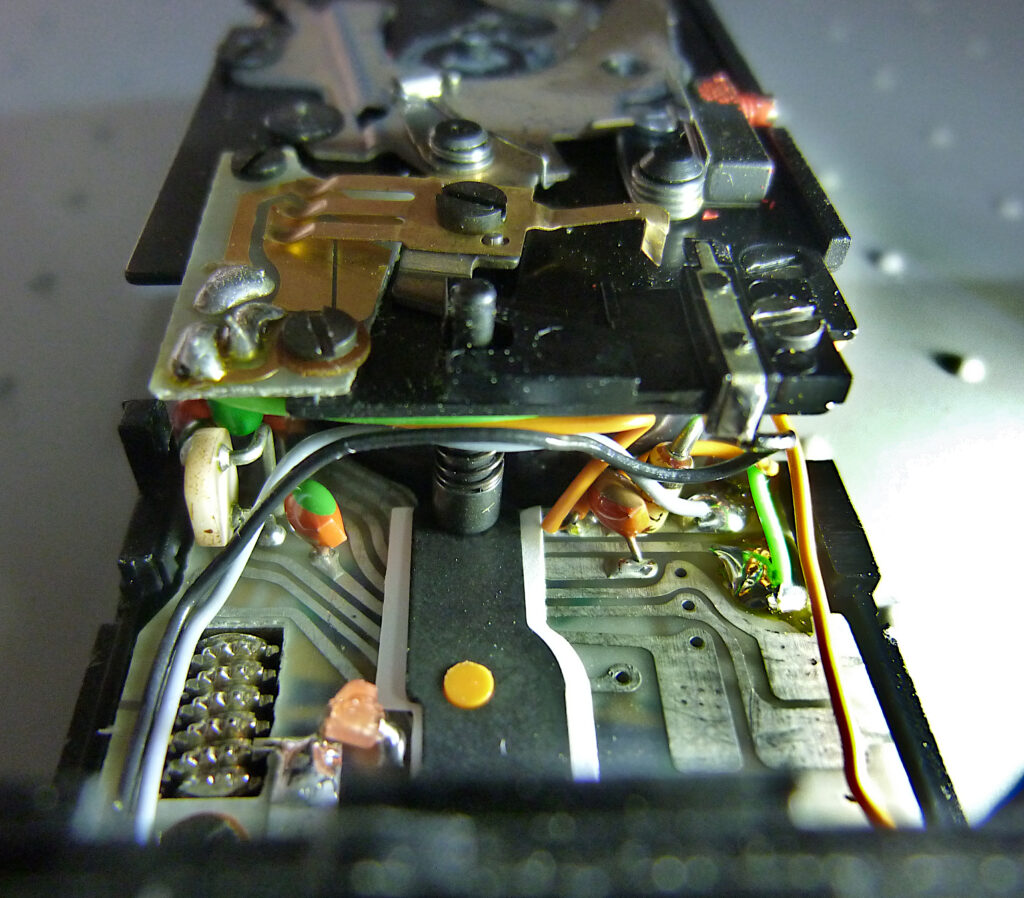
Here you can see a contact area that I have already completely restored (the defective condition can be seen below in the next photo).
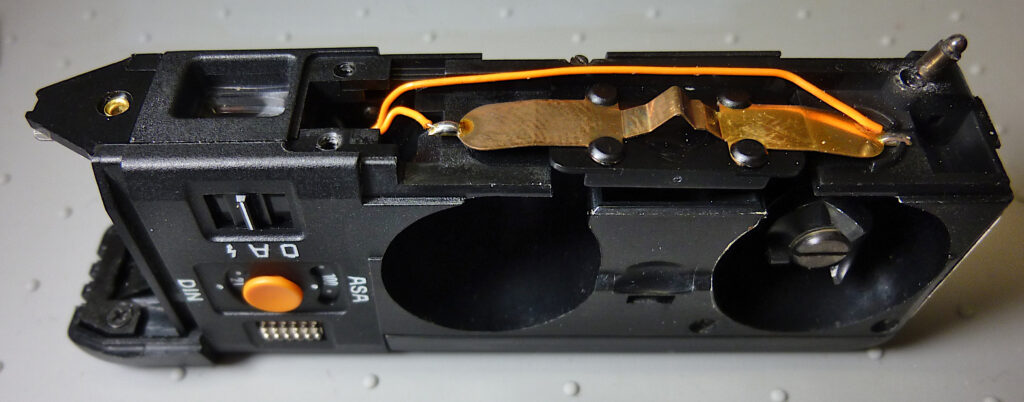
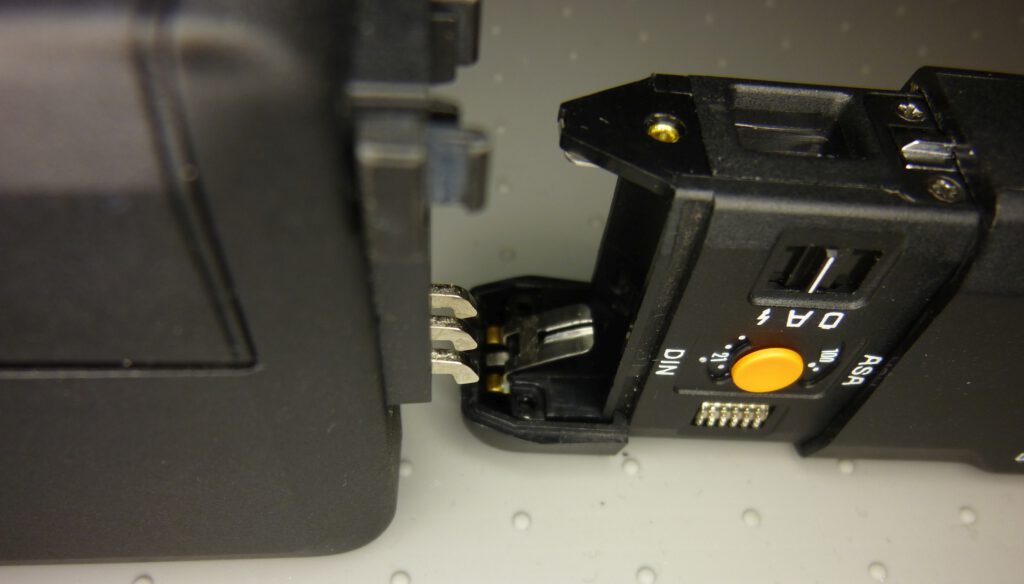
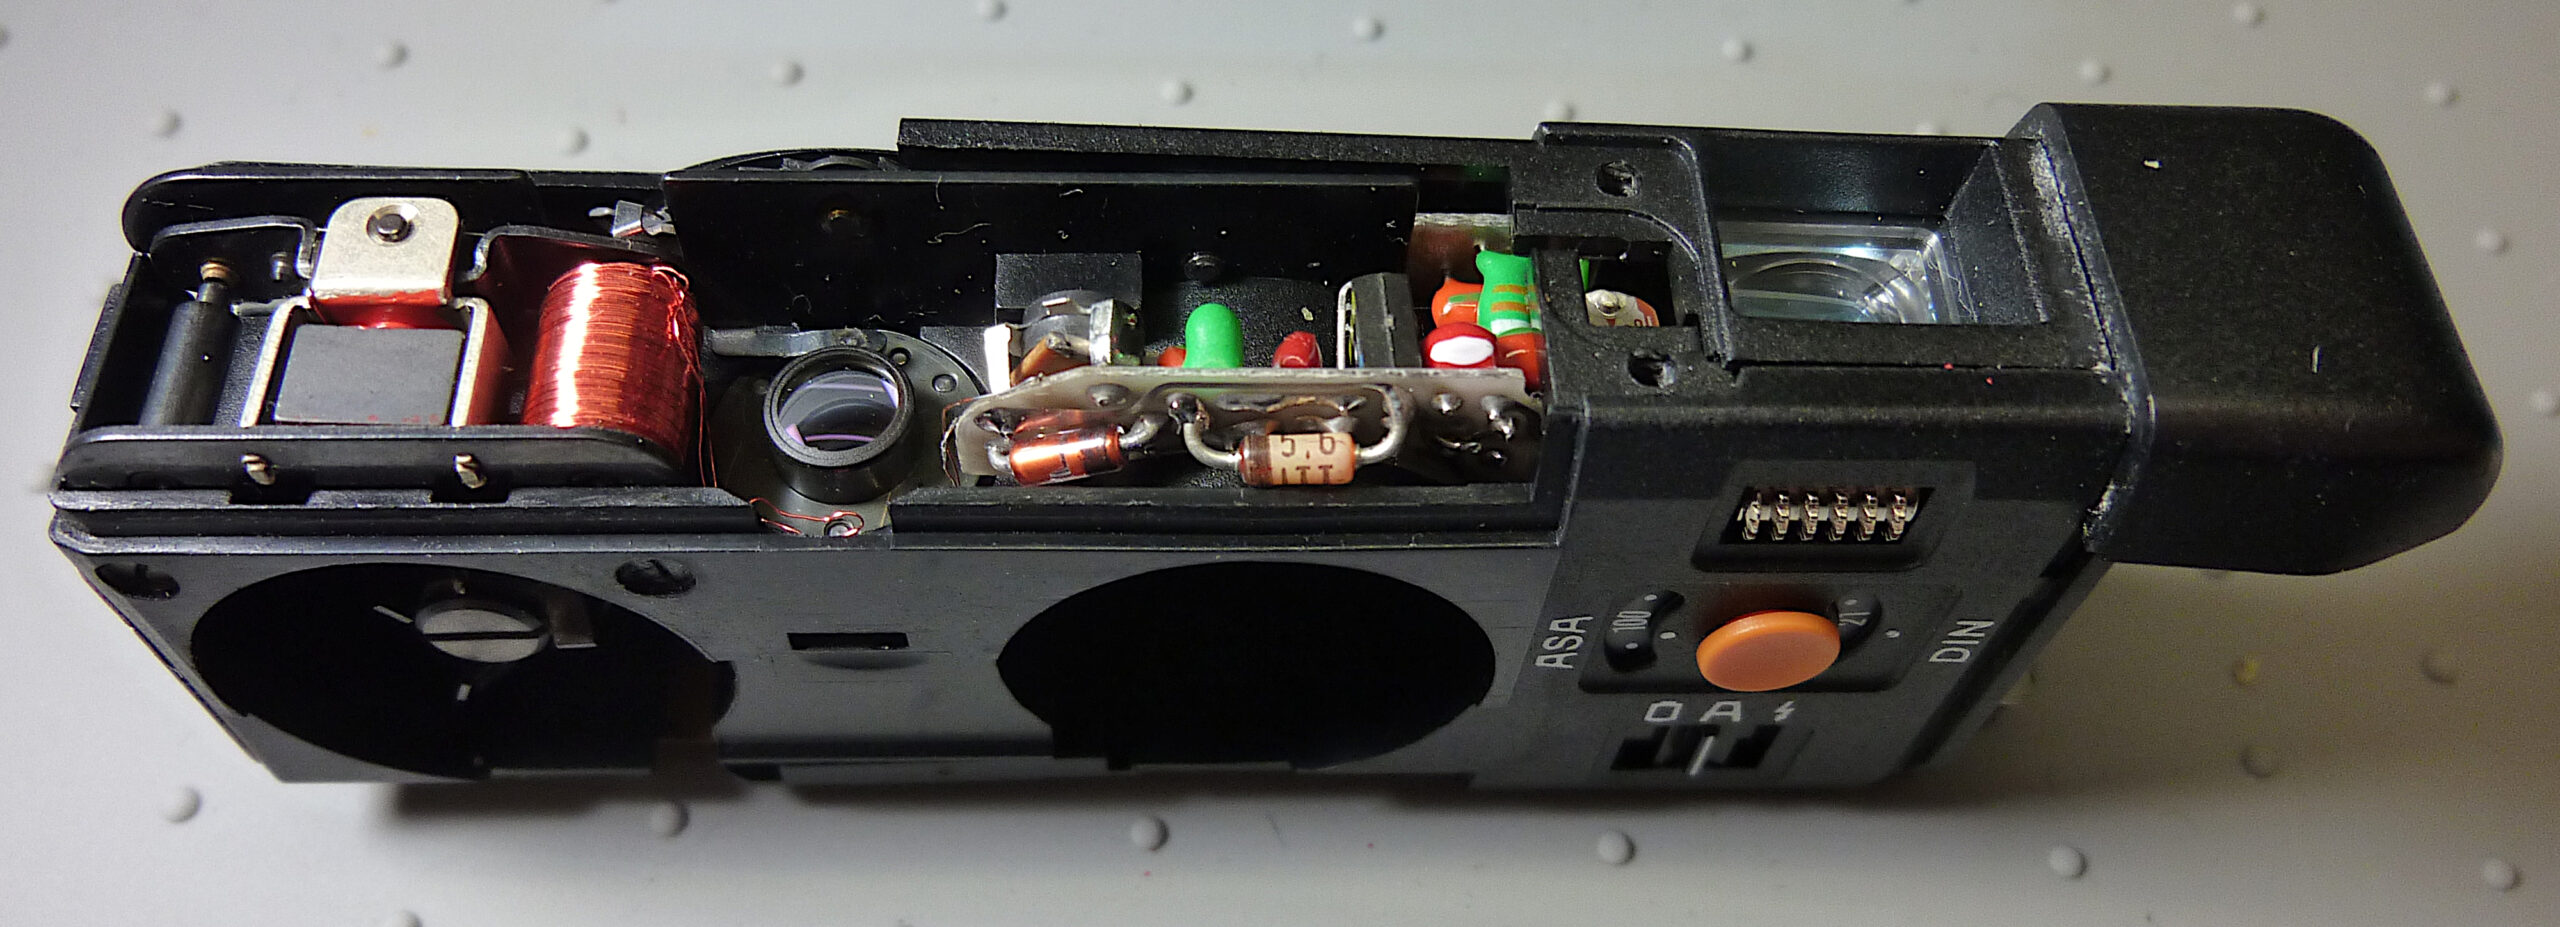
The blue cable is the ground connection, i.e. the connection from the negative terminal of the battery to the camera’s electrical system. The gray and black cables are the two connections to the flash unit. As soon as these are connected together in the camera, the flash triggers.
First check whether there is a good connection between the blue cable and the middle (silver) contact. If not, there is a problem with the power supply.
Then take the multimeter and measure the resistance between the three contacts. There must be no electrical connection between the outer two contacts (gray and black cable), so the resistance between them must be infinite (“OL”). The same applies to the two contacts with the blue and black cables (“OL”). There must be a resistance of approximately 11,000 ohms (11 KOhm) between the blue and gray cables.
This is the correct condition.
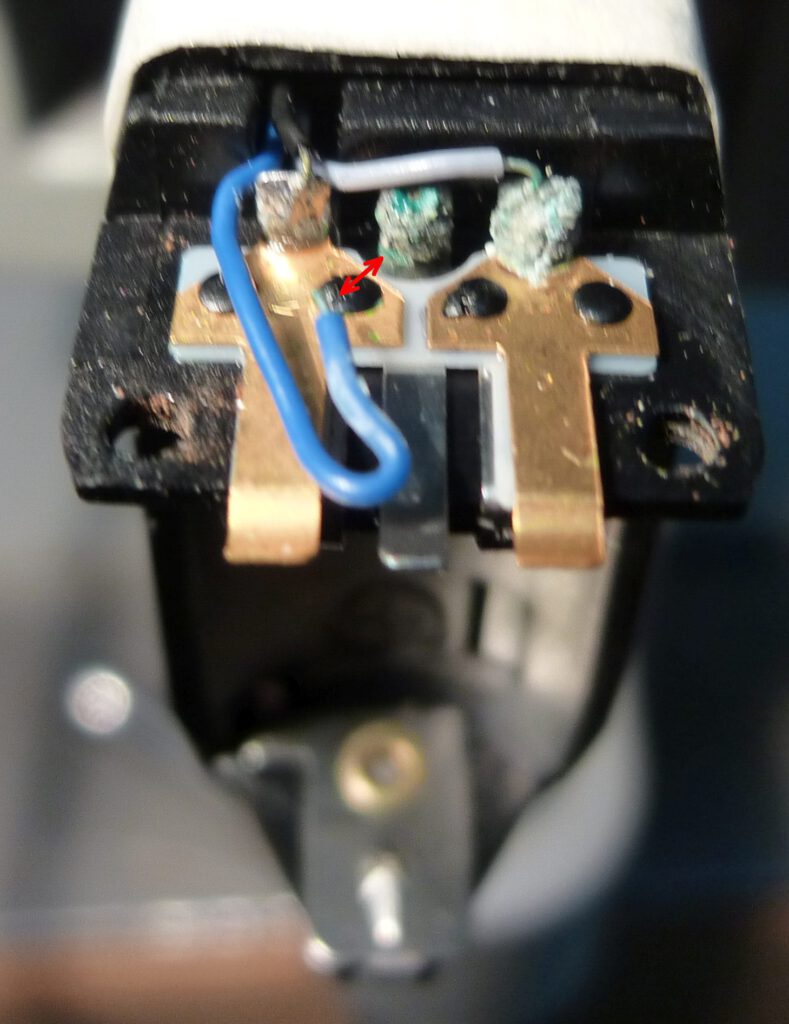
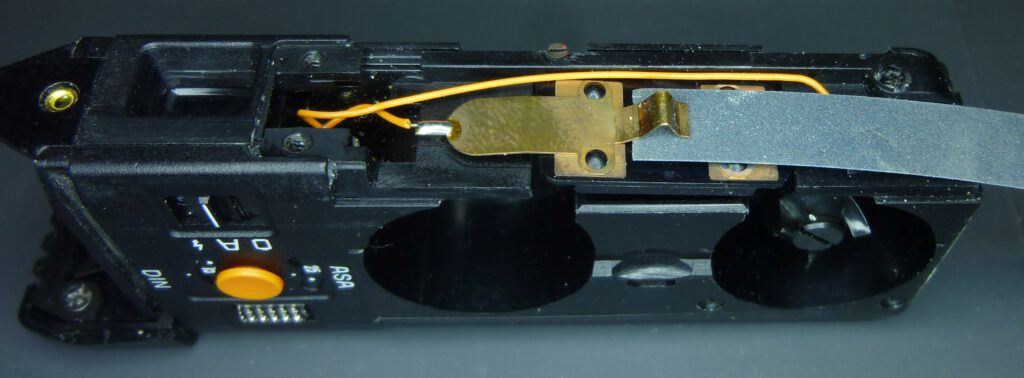
The picture on the right shows a typical damage pattern. All three contacts are corroded. The green crystals formed by the electrolyte of the leaking battery are clearly visible at two soldering points. In addition, and this is crucial here, the blue cable has become detached from it’s soldering point. Note the red arrow. This camera is completely without power and inoperable.
In any case, the blue cable must be soldered back on here. If the corrosion is as severe as here, the solder must first be completely removed from the contact point and the cable. Then re-tin both and solder them together.
You can then test whether the camera is now working.
In the case of the damage shown here, it was also possible to measure a permanent connection between the two outer contacts, which resulted in the flash not functioning correctly. Read the description there on how to restore the contact points perfectly.
Main switch
If all checks so far have been successful and the camera is still not receiving power, it could most likely be the camera main switch. This problem is particularly easy to fix and how to do it is described in detail here.
This switch is operated by pushing the camera apart and together. It ensures that the camera is supplied with battery power when it is pulled apart. Conversely, the current flow is interrupted when the camera is pushed together. The switch is extremely simple and is easily accessible by opening the camera as if you wanted to insert a film. The following picture shows the back of the camera with the film housing removed. The switch is clearly visible as a brass plate (red arrow):
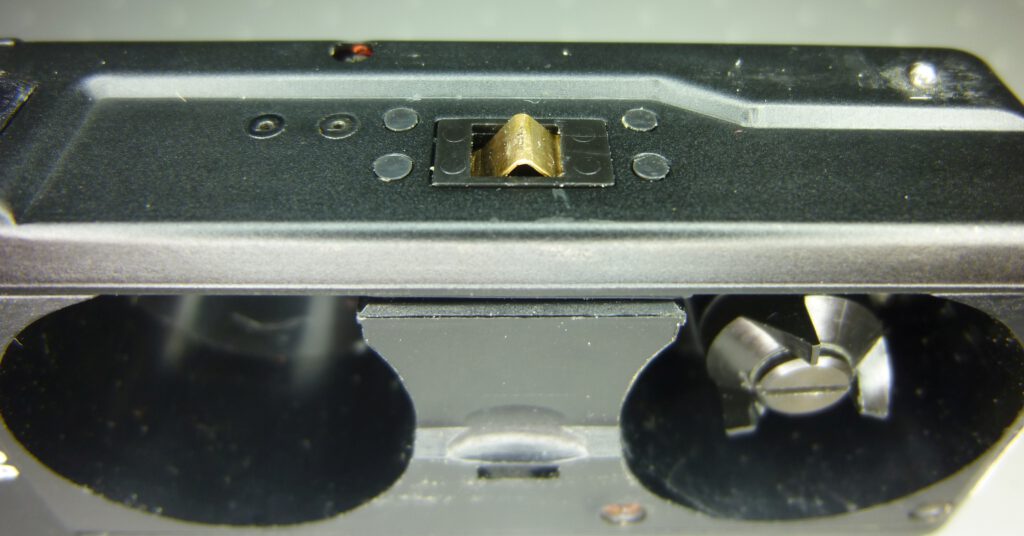
The red arrow in the picture on the right shows the step in the housing which, when pulled apart, presses down the brass plate and thus switches on the current.
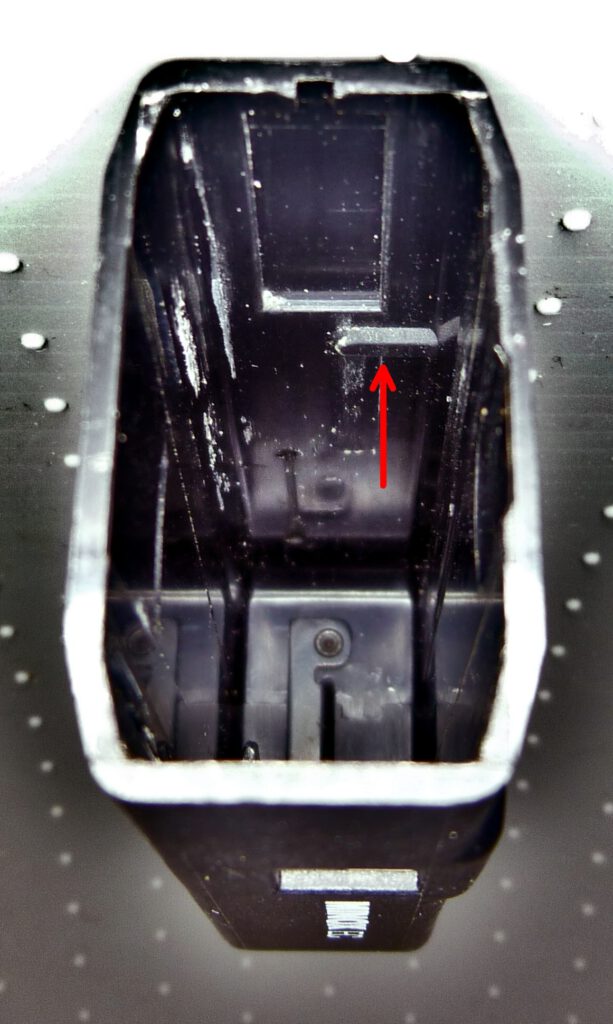
If you remove the housing cover (camera shell) and the rear panel, you can see the complete switch. It consists of two spring plates and the power cable interrupted by them (orange):
The side view shows how the upper plate floats above the lower one:

This is the position when the camera is closed and the power is switched off. When the camera is opened, the upper plate is pressed against the lower plate, closing the circuit.
So there can now be three problems with the switch:
Problem 1
The contact surfaces of the two plates are corroded or are not conductive for other reasons. This means that no current flows even when the two plates are pressed together.
It is easy to check whether this is the case. Pull off the camera shell as if you wanted to insert a film. Place the camera body with the lens facing downwards on a dark surface. Then press the brass plate of the main switch (red arrow in picture above) with your finger. As long as you press, the red LED in the viewfinder must light up. If not, you probably have a conductive problem with the switch. Unfortunately, the cameras are factory-fitted with grease on the upper contact plate to make it easier to pull the camera apart. Over time, this grease can of course easily get into the contact directly below and disrupt the electrical connection.
This can be easily remedied by loosening the two screws on the back of the camera and removing the back, see picture on the right. Then carefully sand the two contact points with sandpaper. Then apply a little contact spray between the contact surfaces using a Q-tip or a piece of paper.
If you don’t want to loosen the screws, you can also try to remove the corrosion with contact spray. Simply spray through the opening onto the brass plates. Be careful, only spray in very little. It is better to spray a little into a bowl and then apply drop by drop to the contact points. I recommend a contact cleaner with additional weather protection, e.g. KONTAKT 60 Plus in Germany.
Problem 2
The distance between the two plates is so large that they do not press against each other when the camera is open. Then the camera does not switch on when opened and behaves as if no battery is inserted.
Problem 3
The third problem is the other way round: the distance between the plates is so small that they always press against each other, even when the camera is closed. The camera then remains switched on even when pushed together and the battery discharges in a short time. I actually had this problem with a Minox EC.
Problem 1 is likely to occur if the camera has not been used for years. If the Minox EC is in regular use, corrosion will not occur at this point.
Problems 2 and 3 are easy to solve. You don’t even have to unscrew the camera although I recommend it because it makes it easier to see what you are doing. Pull off the film housing as if you wanted to insert a film. Then take a close look at the upper spring plate protruding from the housing slot. Using tweezers or a small screwdriver, you can now bend the plate so that it behaves as desired.
Testing the main switch
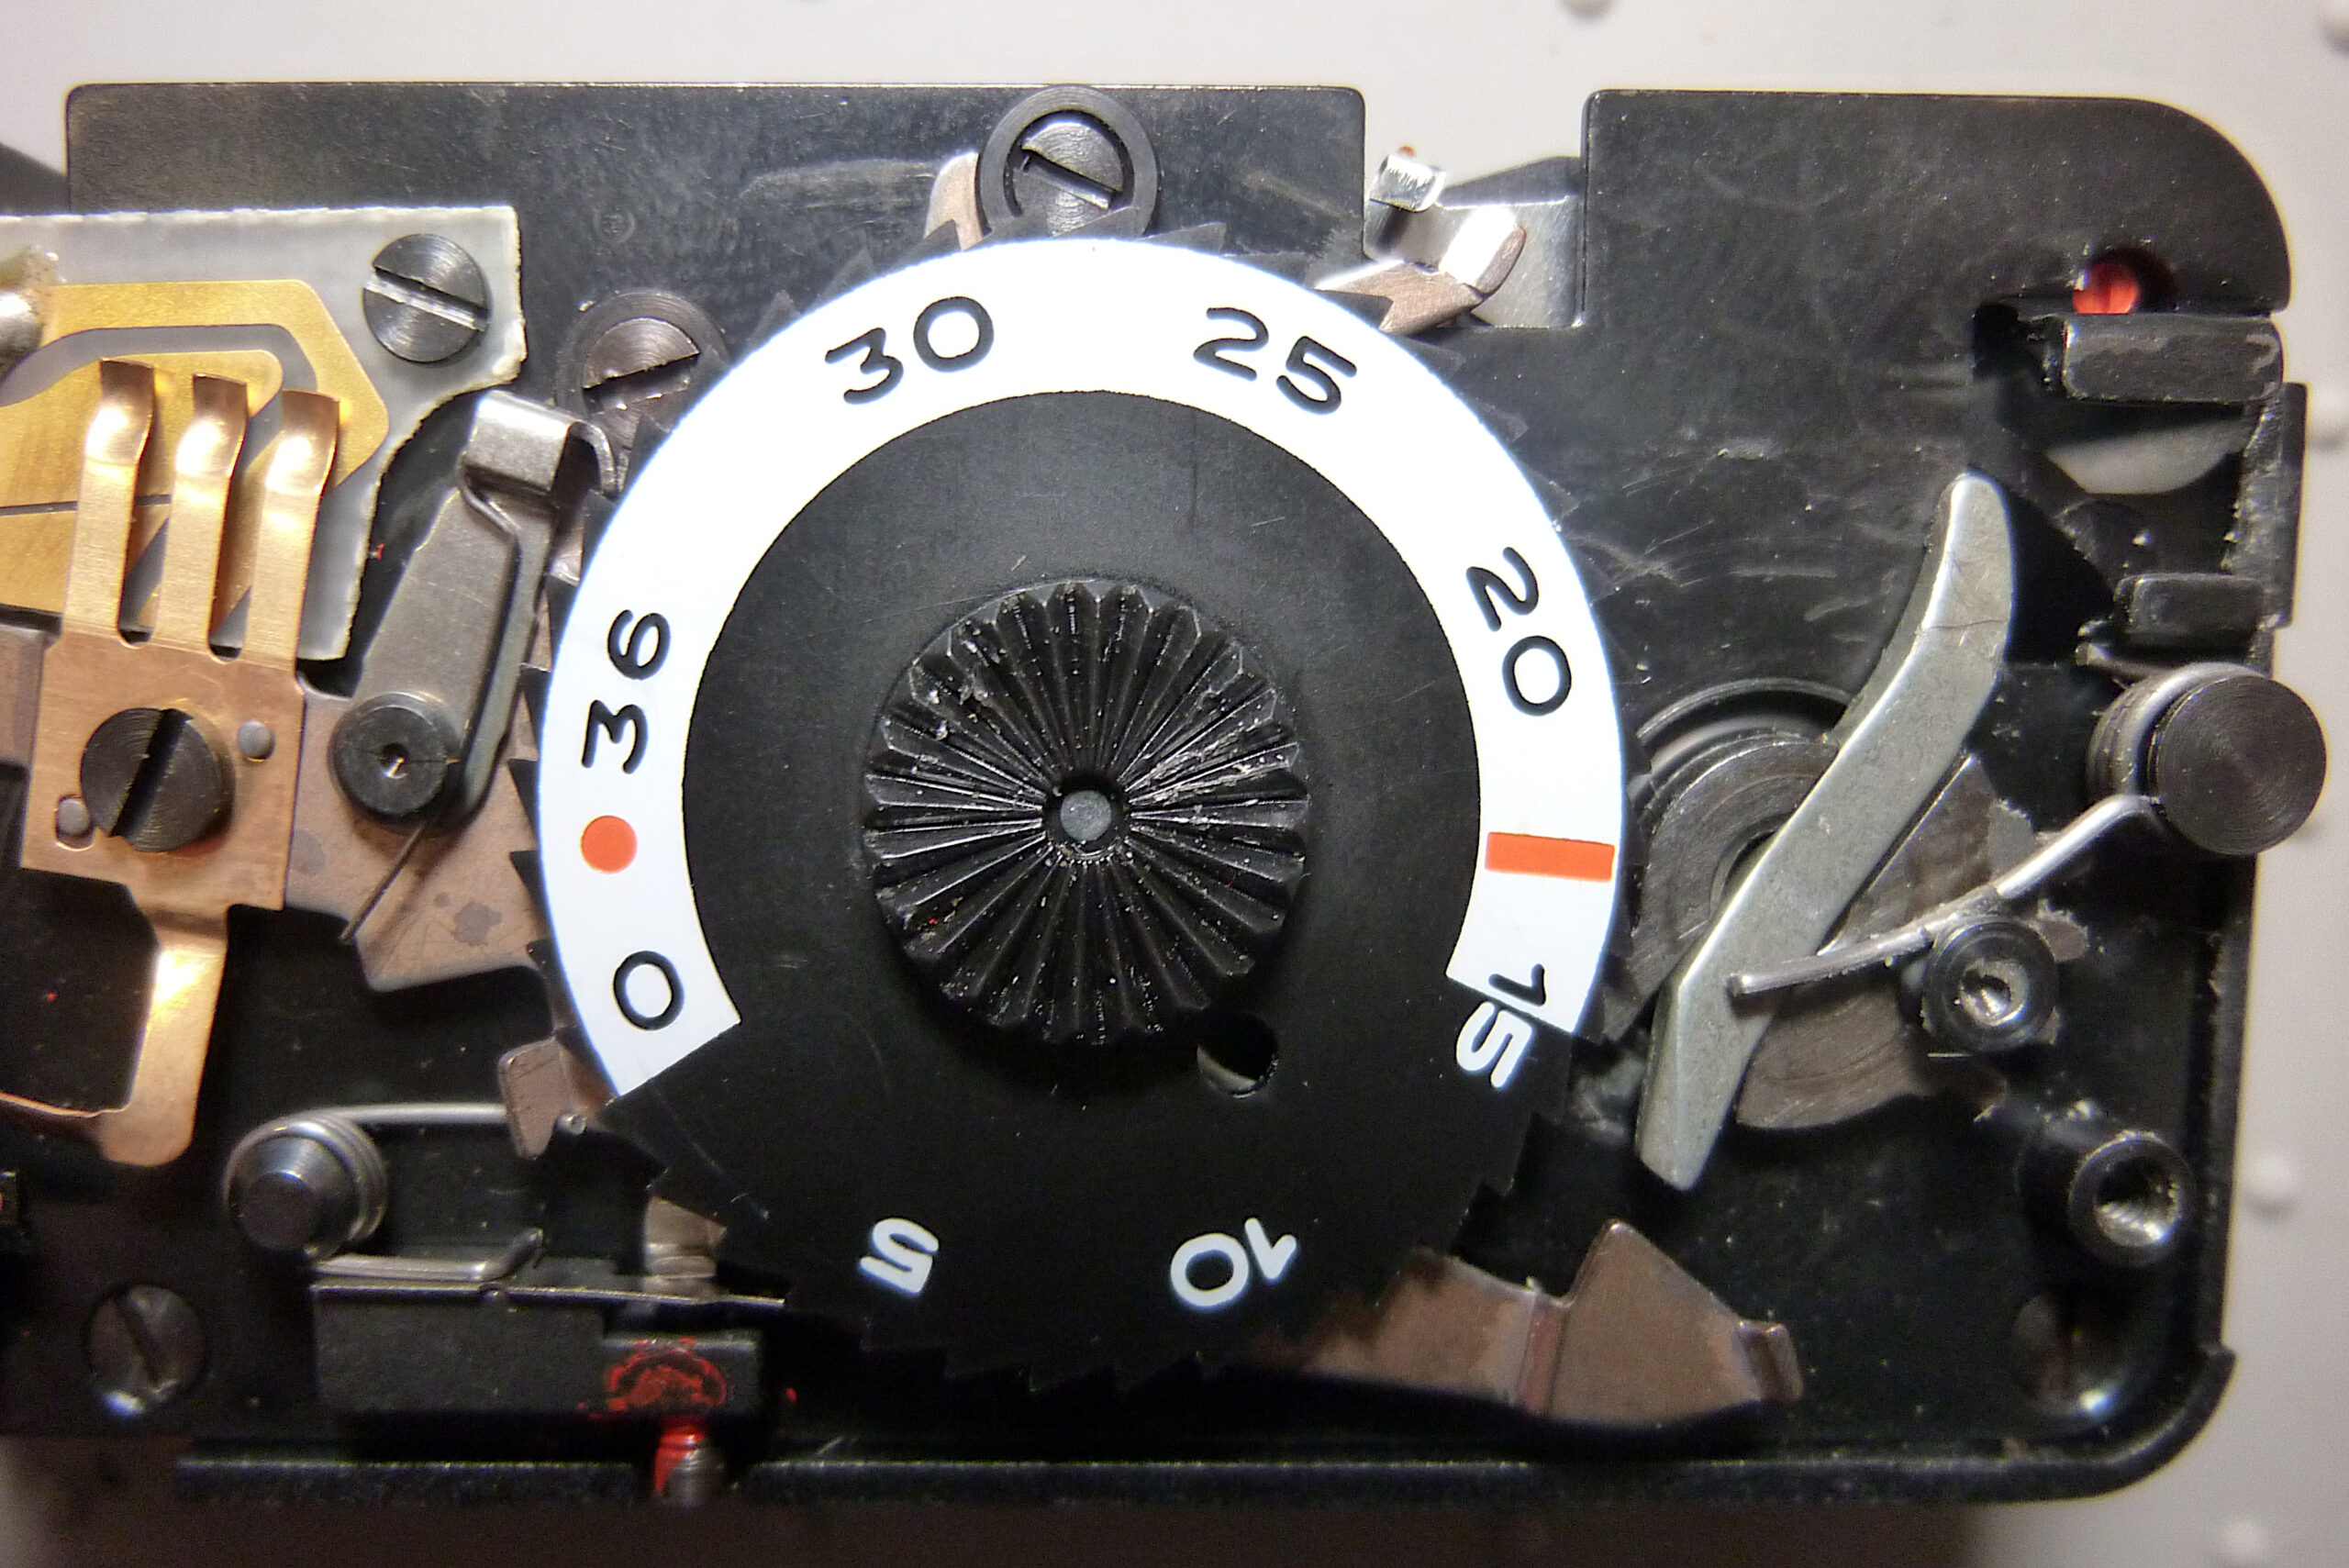
The success of the repair can be tested by placing the camera with the lens facing downwards on a dark surface and slowly pulling it apart. The slide switch must be in the “A” position, i.e. not on flash symbol:
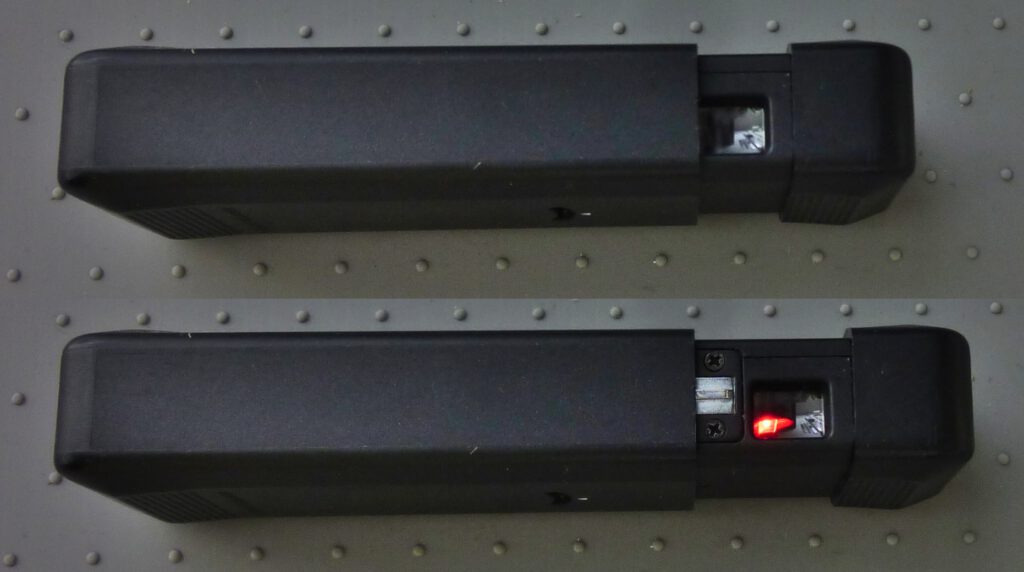
You should then see that the red LED in the viewfinder is initially off and only lights up later when you have pulled the camera completely apart. When pushing it together, it must be the other way around. You need a dark environment on the front side, as the red LED then serves as a low light warning and continuously indicates underexposure.
Flash issues
In connection with the electronic flash unit 8×11 flash there are two faults that I would like to discuss here and show you how to repair them.
- Several users, including D. Scott Young in his book Marvel in Miniature (p. 122), report that the flash is unreliable and does not always trigger. Young recommends “pushing the flash unit slightly from behind so that the flash contacts sit better”. It often also helps to tap the camera and flash on a hard surface. In many cases the flash then works again for a short time.
- I myself had a Minox EC where the flash constantly fired by itself as soon as I connected it to the camera.
The good news is that both problems can be solved with the same measure.

The problems are related to the three contact plates in the battery compartment on the negative pole side. The contacts may have become detached from the support in the camera body (problem 1) and/or the insulation between them may have been destroyed by corrosion by electrolyte from the battery (problem 2).
Description of problem 2: I mounted the electronic Minox 8×11 flash on my Minox EC. Then I turned on the flash and heard the high-pitched buzzing sound as the flash charges. Then the following happened. As soon as the flash was charged, it fired immediately. I didn’t press the shutter button. After the flash fired automatically, it recharged and immediately fired again. This happened regardless of whether I set the camera’s switch to “A” or “Flash”. It didn’t matter whether the shutter was cocked or not.
It took me a long time to find the error. It was a short circuit between the flash contacts due to corrosion. Strictly speaking, it was not a complete electrical connection between the two lightning contacts, but a leakage current. This very small current ran via traces of electrolyte leaking from the battery underneath the spring plates. Cleaning the plates from above was therefore not successful.
Complete restoration of the contact points
Here’s what I did:
- all three cables desoldered (blue cable: battery ground, grey and black: flash contacts)
- the contact plates and the insulation sheet removed from the housing
- Contact plates, insulation and housing carefully cleaned
- everything was reassembled and carefully glued together (unfortunately these parts are not screwed, but fused to the housing with plastic pins)
- all three cables carefully soldered back on
The sequence of pictures below shows the individual work steps:
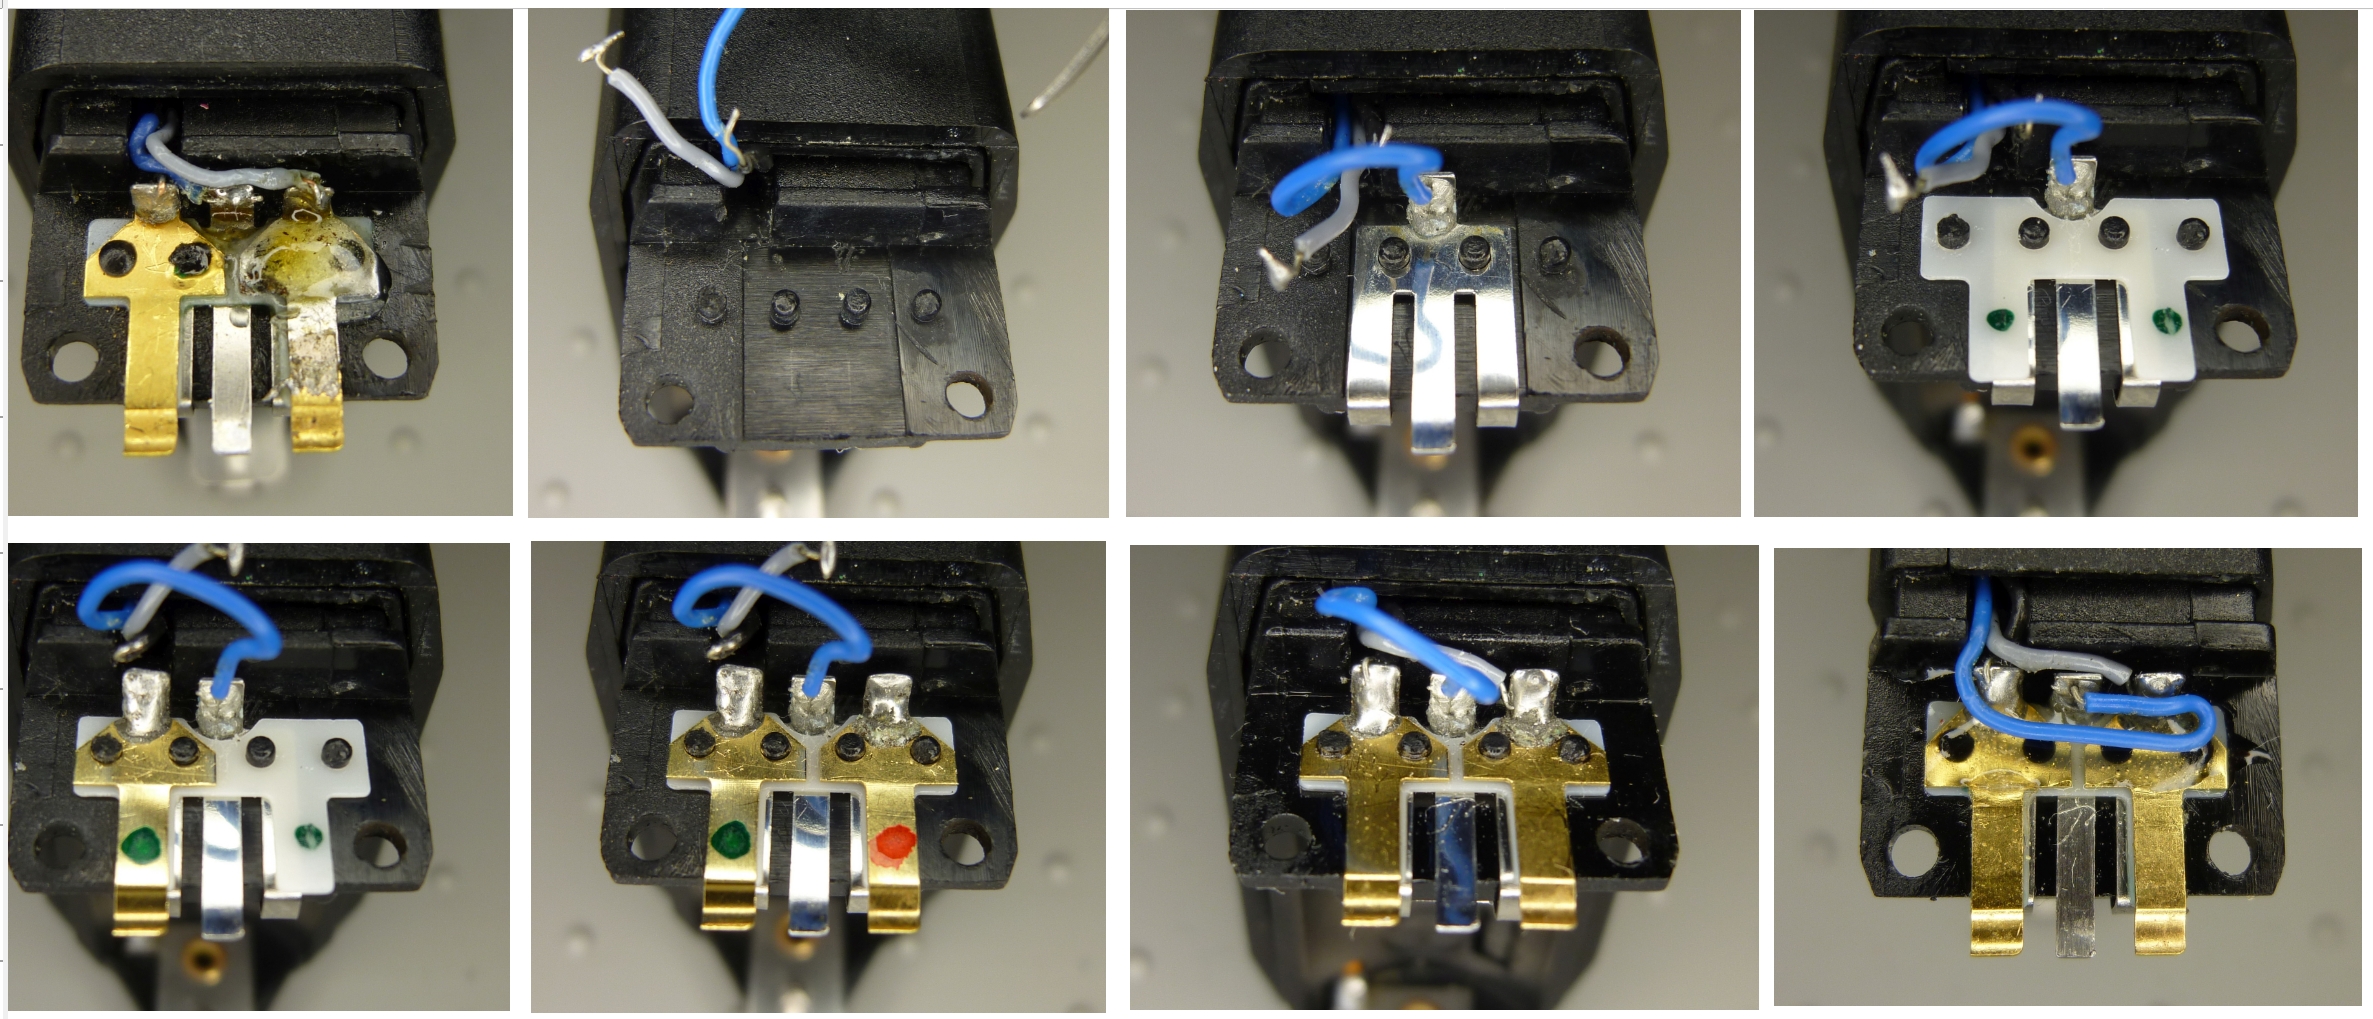
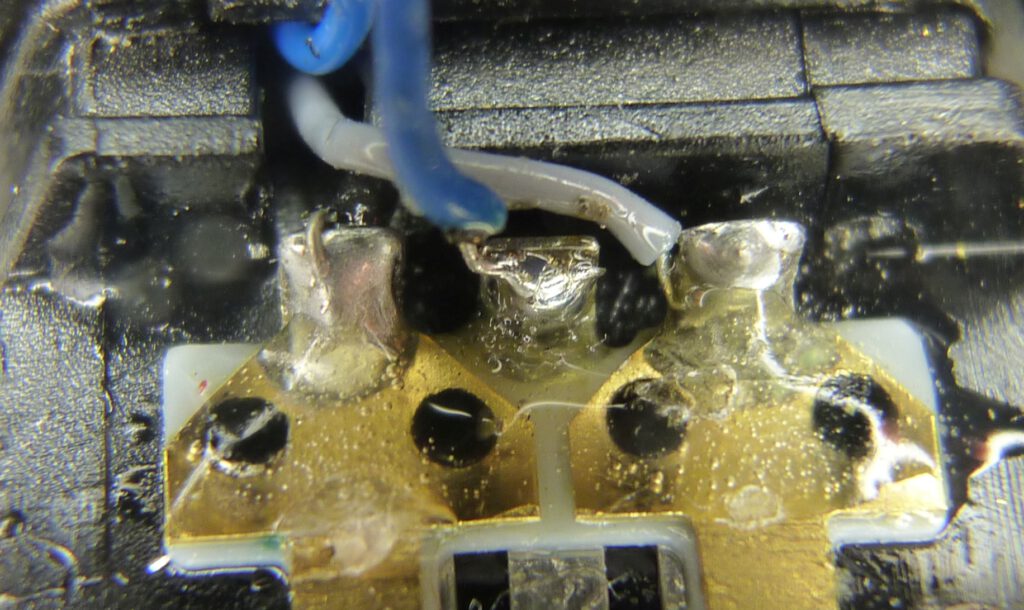
You must prepare the sheets well before soldering. You should lightly sand the later soldering points so that the solder adheres well. Avoid “cold” solder joints, which you can recognize by the fact that the solder has not flowed well. The last photo in the sequence above shows such a cold solder joint on the blue cable (click to enlarge). Even if the camera works at first, such a soldered connection can come loose or corrode later.
The second attempt resulted in a good soldered connection:
Solving problem 1: The transparent substance on the sheets shown in the picture above is a two-component adhesive that holds the sheets in place. Originally, the black pins with their thickened heads held the plates in place. The adhesive has the advantage that it stabilizes the whole thing. Stability is very important if you use a flash later on. The contact hooks of the flash are rigid and press very firmly onto the contact plates, see photo above “Contact hooks…”. They push the sheets away from the support surface, so the sheets must be well fixed.
It happened to me that they simply pushed the plates out of the two black pins. I then covered the entire area around the pins and both sides with two-component adhesive. After that I had no more problems.
After that, the 8×11 flash worked perfectly with this camera again.
By the way, the Minox flash C4 (with flash cube) worked perfectly all the time on this vera camera. Presumably the C4 electrics in it are not so sensitive. If the C4 does not work for you at all, it is probably not due to the camera, but to the C4 flash unit. In the unit, the circuit for firing the flash passes through a total of 6 (!) contact points. There is a high probability that at least one of them is corroded.
Film transport
Sometimes a supposedly perfect purchase turns out to be particularly problematic. For example, I bought a Minox EC Exklusiv set that had never been used, so it should have been as good as new.
It turned out once again that old, unused cameras in particular are mechanically problematic. This is due to the factory greasing of the mechanical parts. The grease hardens over time and jams the mechanics. The camera could be pulled apart with difficulty, but could no longer be pushed together. On the other hand, mechanical cameras that have been used intensively are still ready for immediate use even after 70 years, see my experience with the ugliest Minox I have ever seen.
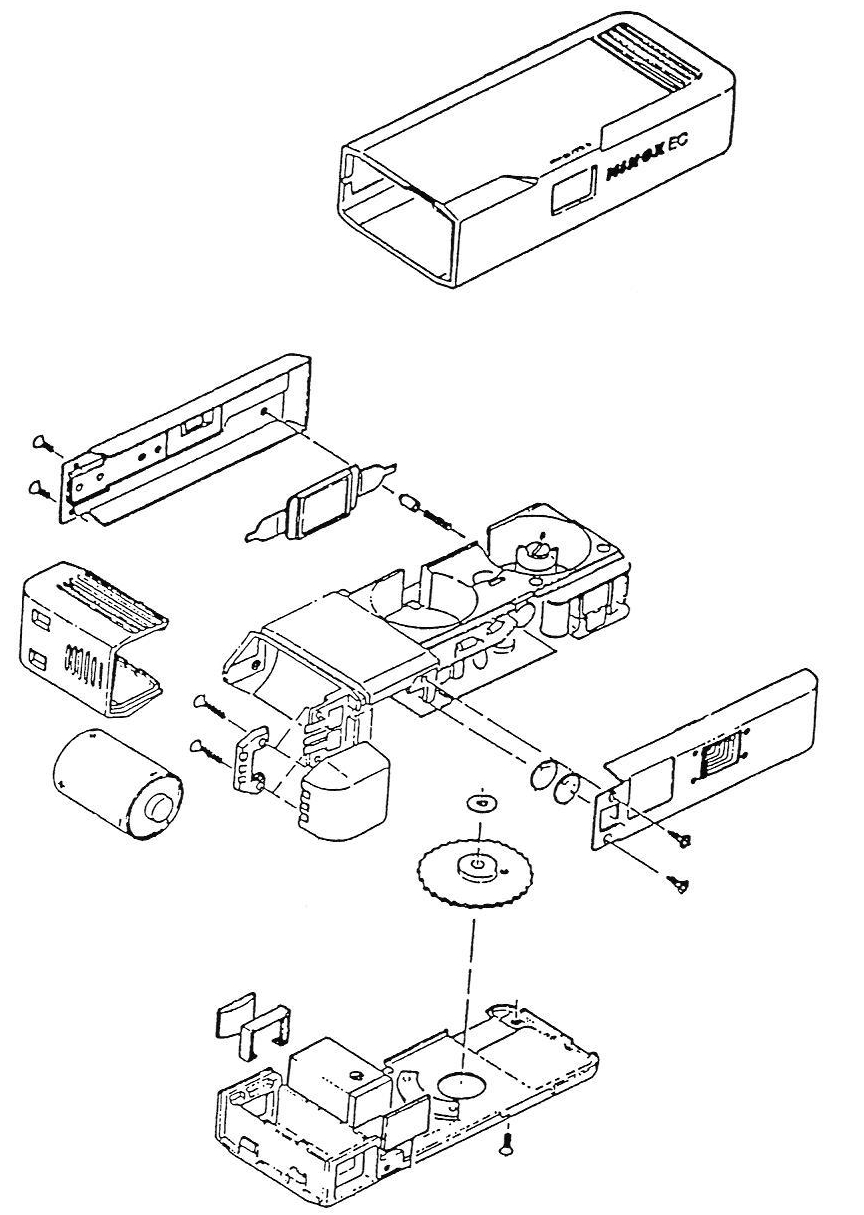
To access the film transport, however, you have to open the camera completely. Here is a quick guide in keywords:
- Open the camera to change the film
- Remove the back: loosen 2 screws,
press in the spring pin and
pull the housing section backwards - Remove the underside: Loosen the screw and
- press in the two snap locks in the battery compartment
- Carefully push the housing part up from the end of the screw using force until it comes loose
Here are the corresponding pictures:

The last picture is for information only. It is not necessary to remove the front of the camera for our project.
In the film chamber, loosen the screw of the take-up spool and remove the spool:
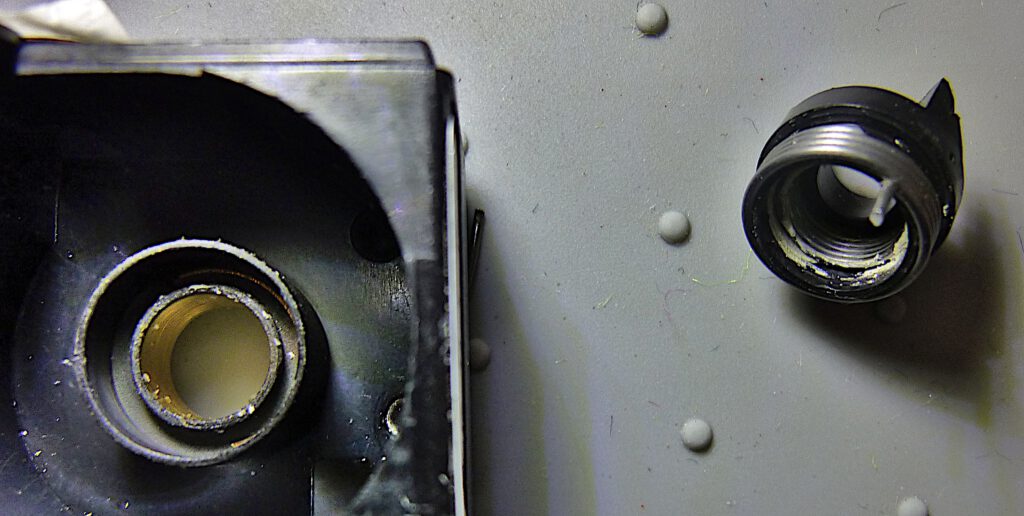
You can clearly see the hardened white fat. You must now remove this and replace it with new grease. I recommend a high-temperature resistant gun grease. This has the advantage that it does not become liquid at higher temperatures and can creep onto the lens.
On the other side of the camera body, we do the same with the spool shaft with the transport gear:
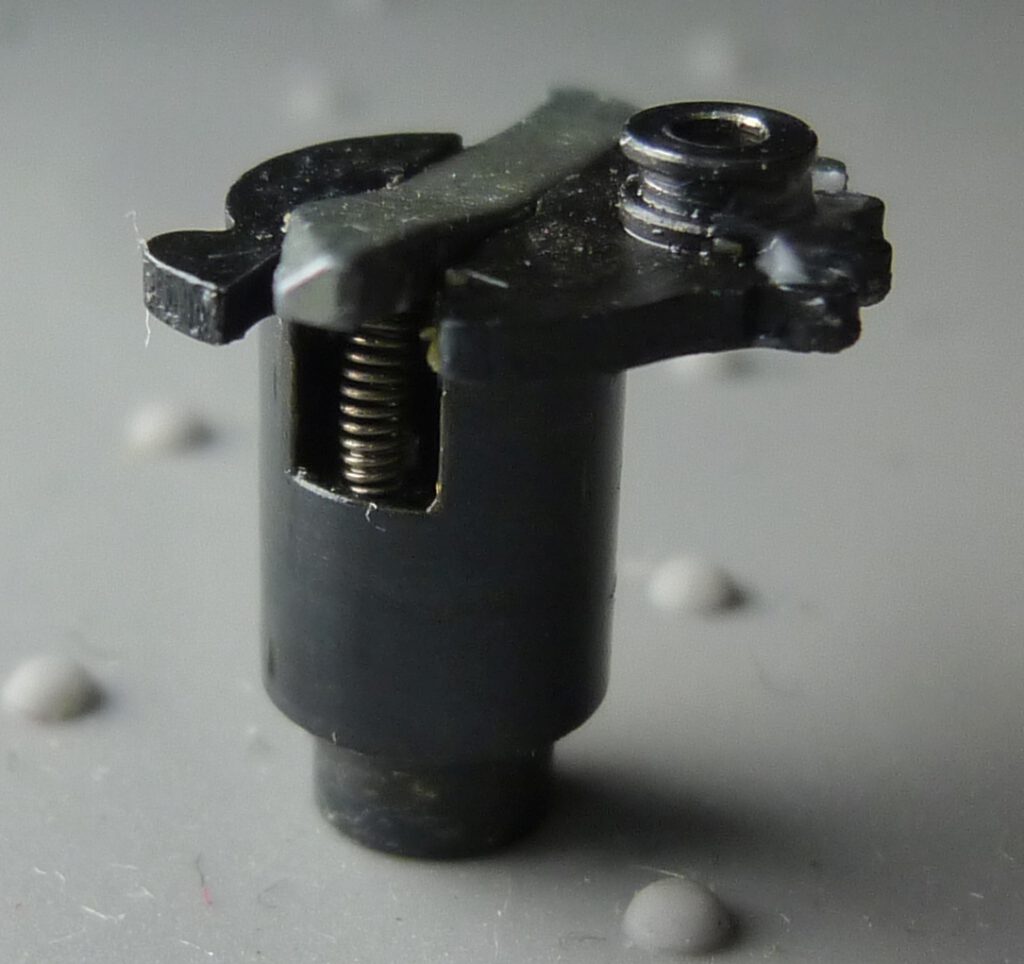
We also clean and grease the contact surfaces of the camera body:
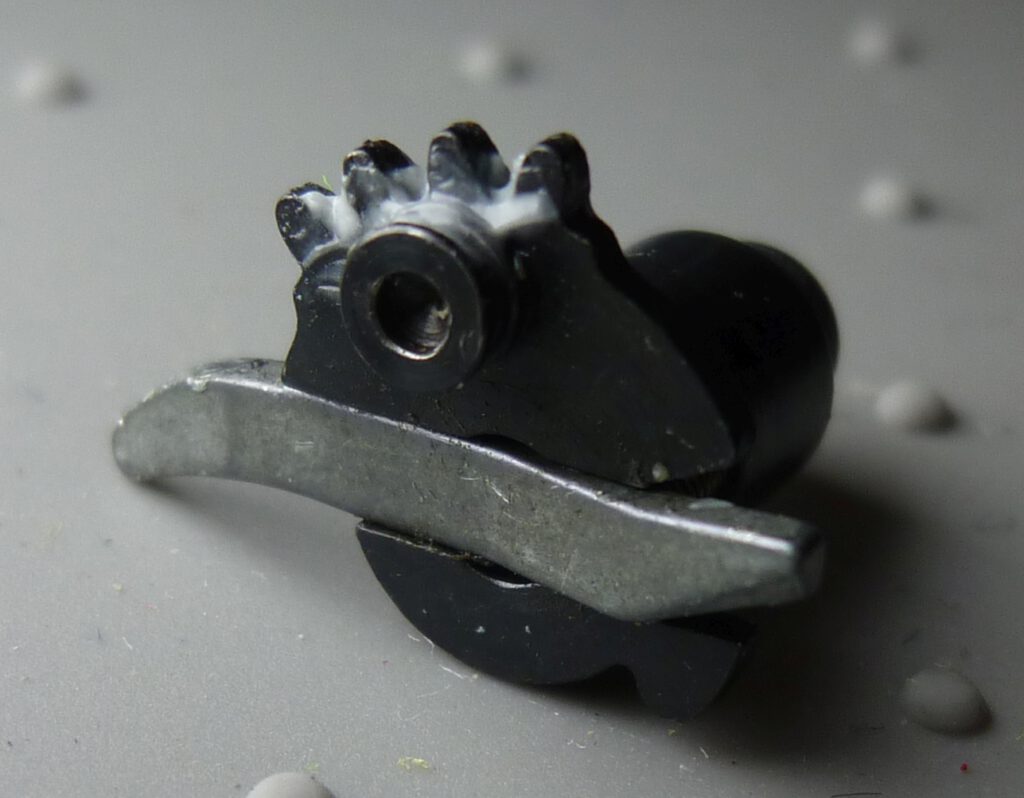
The mechanism then runs smoothly again and we can reassemble the camera in reverse order. Caution when installing the frame counter wheel! The left side of the curved silver lever must be in contact with the cam disk under the frame counter wheel. On the right, it must be correctly positioned on the transport wheel. This ensures that the distances between the photos on the film remain the same from the first to the last shot.
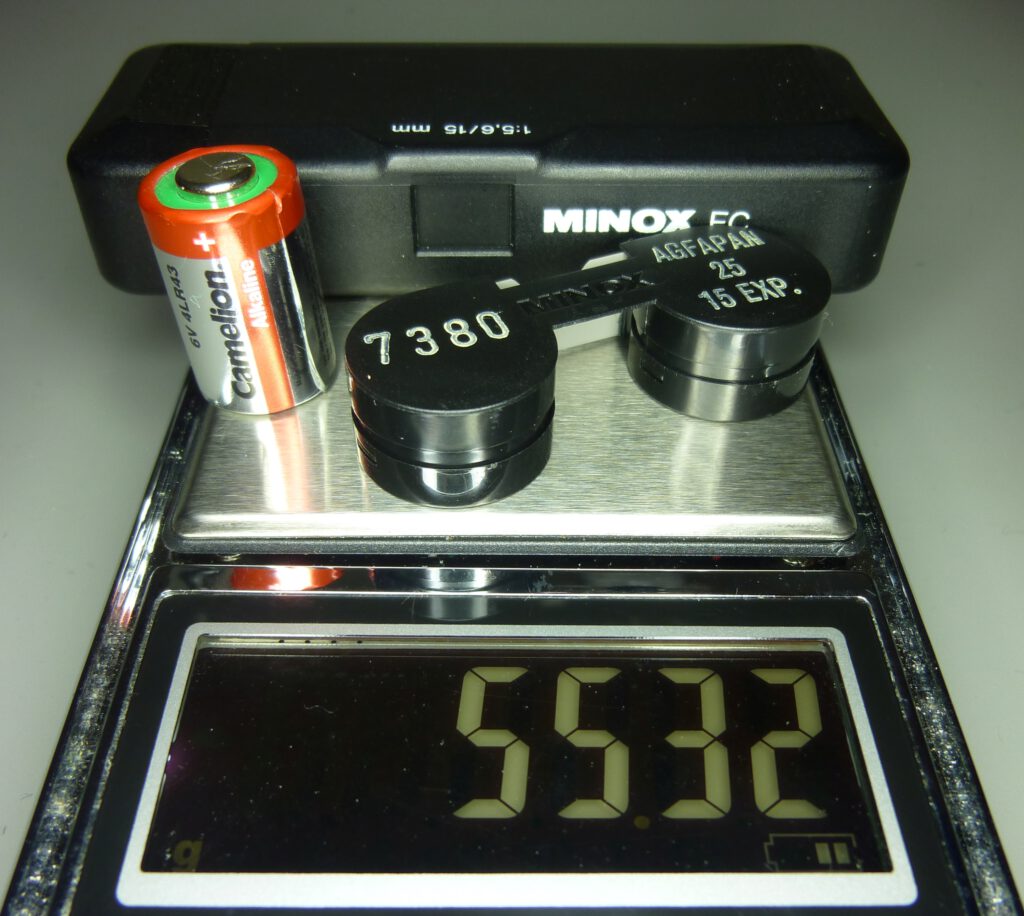
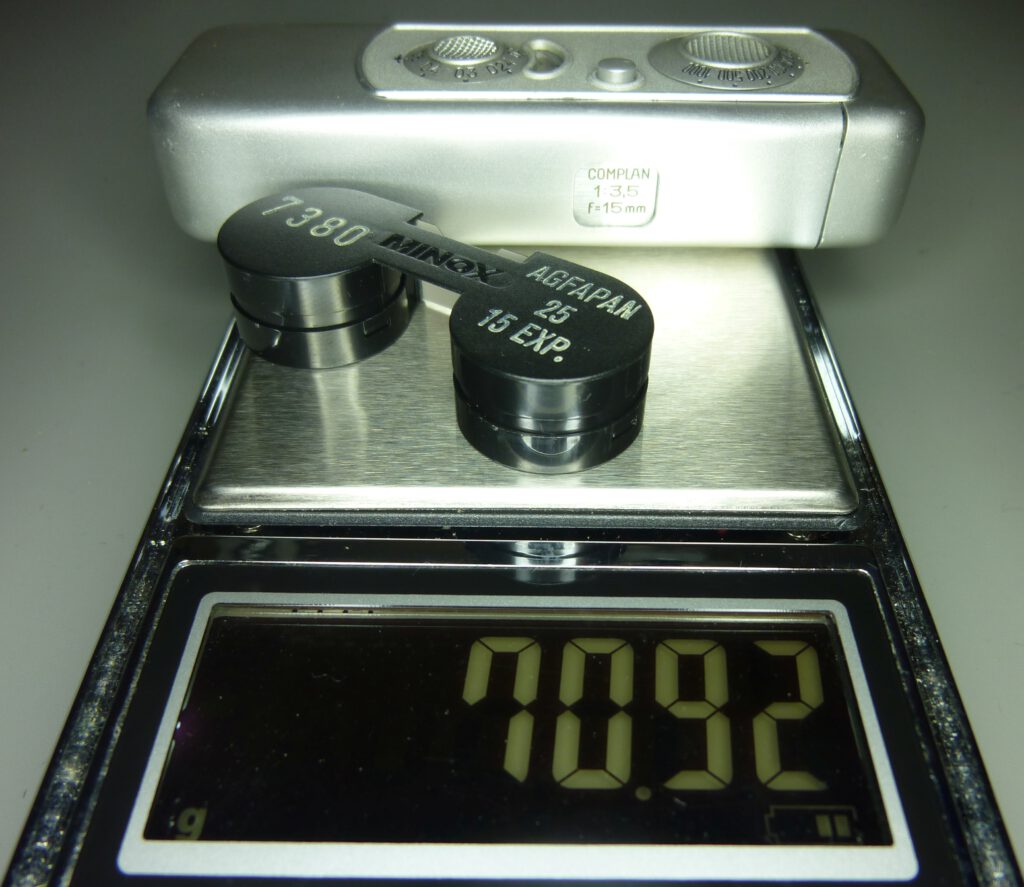
Volume and weight of the Minox EC
Finally, a little reflection on how handy the Minox EC actually is. There is a lot of information circulating about the weight of Minox cameras, but there is none about the volume. I have therefore measured both and compared them with the Minox A IIIs.
The weight is based on the camera ready to shoot, i.e. with film and battery. I determined the volume via the water displacement of the cameras, as measuring is not really meaningful due to the protruding elements and rounded corners. So here are my results:
Conclusion
As we have seen, it is not particularly difficult to repair the power connection of a Minox EC. If the electronic flash causes problems, a little more soldering experience is required.
Mechanical problems of the film transport require the most work and skill, even when assembling the camera later.
All in all, I got three Minox EC back up and running perfectly in this way and also had a lot of fun and a sense of achievement. The financial risk is also limited when you consider that you can buy an untested Minox EC for as little as 10 dollars.
I would also like to emphasize that under good conditions (sufficient light and medium shooting distance) the Minox EC takes better pictures than a classic expensive Minox, e.g. this one: