When offering used Minox cameras, the seller often states that the camera works because “plausible” noises can be heard at different speeds when the shutter is released. Aside from the fact that these noises can occur without the shutter even opening, the times can be significantly incorrect. The only way to tell by ear is whether longer shutter speeds produce longer sounds.
Even after a CLA (clean, lubricate, adjust) or a repair, it is interesting to know whether the shutter speeds are correct or within an acceptable range. Normal measuring devices and methods cannot be used with the minox. But luckily there is a solution.
Usual measuring method
If you actually want to use the camera to take photos, you need to know how precisely the shutter really works. There are various methods, devices and apps for measuring shutter speeds, such as Shutter-Speed. Most methods are based on positioning a light source in front of the camera and using a light sensor to measure the opening time of the shutter. From the opened back panel one measures the opening time of the shutter using a light sensor.
Measuring Minox 8×11 shutter speeds
No normal measurement with Minox cameras
All of these procedures cannot be used with Minox cameras because the back of the camera is not accessible without completely dismantling it. If you still want to do it, I have the disassembly instructions here. (Yes, there is a professional shutter speed measurement device for Minox cameras here, but I doubt there is another one in the world).
This article describes a measurement method that you can use yourself with little effort and expense. I describe a homemade, microcontroller-based measuring instrument for measuring Minox shutter speeds in another article. Anyone who wants to measure shutter speeds frequently should take a look at it.
However, with an addition to the “Photoplug” light sensor, which can be purchased (you can also do it yourself) for the free Shutter Speed app, measuring Minox shutter speeds is very convenient. The sensor is plugged into the headphone port of the smartphone. If your smartphone no longer has a headphone jack, there are adapters (Lightning to Headphone Adapter for Apple or USB-C to Headphone Adapter for Apple and Android).
Important note: I am not the manufacturer of this product, just a user who has had good experiences with it. I bought the product myself and do not receive any commission from the manufacturer.
The solution for Minox cameras
The idea is to use the reflections from the highly reflective surface of the Minox shutter blades. You place the light sensor and a light source next to each other in front of the lens. When the shutter is closed, the light sensor receives all of the light reflected by the shutter blade. As soon as the shutter opens, there are hardly any reflections. The Shutter Speed app uses this difference in brightness for the measurement. While the shutter is open, little light falls on the sensor. This time is measured and represents the shutter speed.
The homemade light source
A suitable piece of plexiglass accommodates 2 LEDs from behind as a light source. The 3V LEDs are simply powered by two 1.5 V batteries connected in series. The front is matted to create a diffused light:
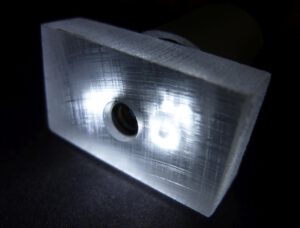
There is a hole in the middle into which the light sensor is inserted so that it can see directly onto the lens.
If you rarely measure shutter speeds, you don’t need to build this lighting attachment. Instead, you can simply hold a bright flashlight at the side of the lens at 45 degrees while taking the measurement. This may be a little wonky, but it also works.
The measuring
To measure, simply place the Minox with the lens in front of the sensor:
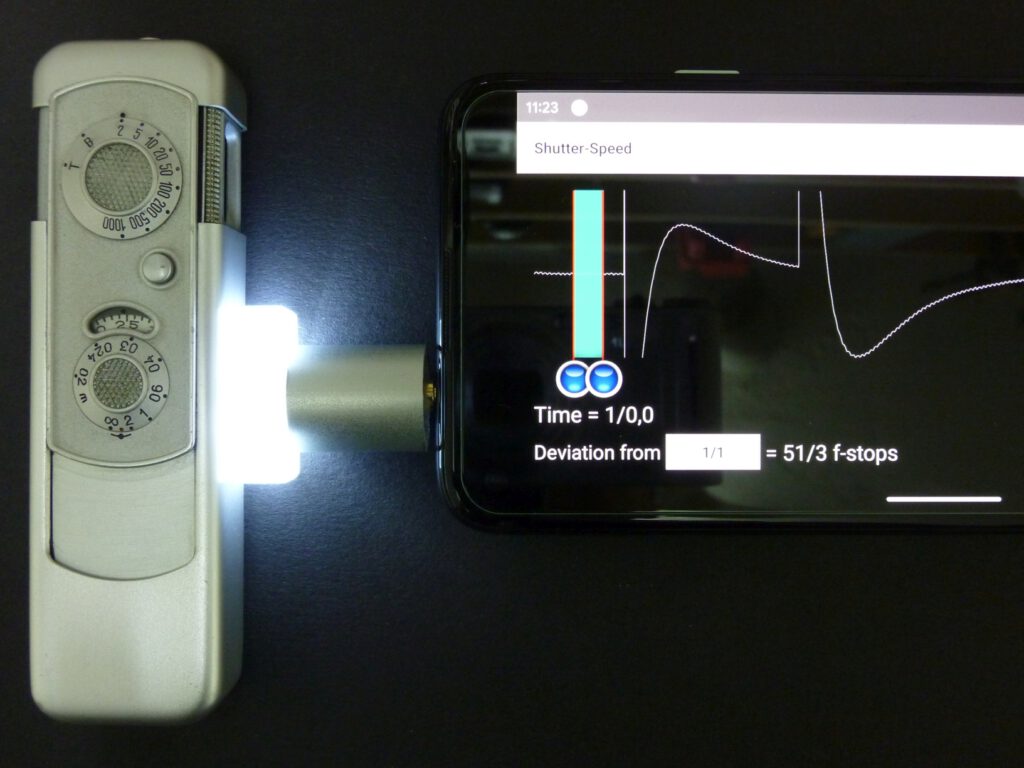
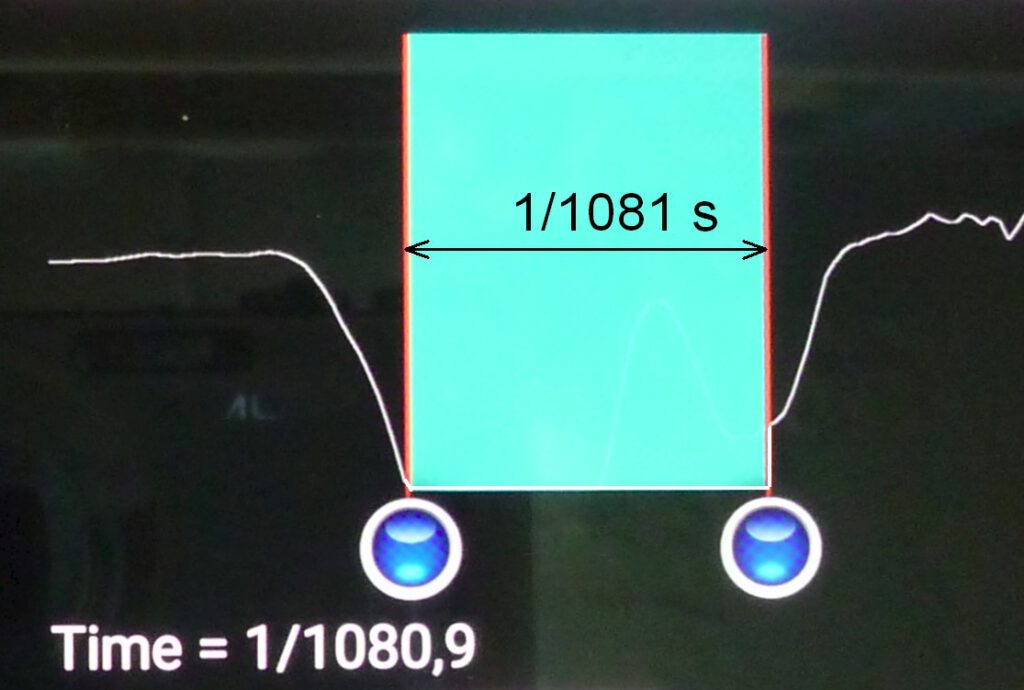
To start the measuring process, press the record button in the app and then release the shutter. The brightness versus time appears as a curve. This is exactly the situation shown in the photo above. Next, move the two blue buttons until the green area represents the period with reduced brightness, see next picture.
Hint
Remember that we measure in the exact opposite way to normal shutter speed measurements. Low brightness means shutter open, high brightness means shutter closed:
At long shutter speeds like 1/2 s the curve looks a bit confusing, see the second to last picture. When the shutter is opened, the brightness seems to gradually increase again and settle to an average value. The same thing can be seen at the right part of the curve after closing the shutter. In my opinion, however, these are not measured brightness values but rather an automatic adjustment of the scaling by the app. These parts of the curve can therefore be ignored.
Practical application of the method
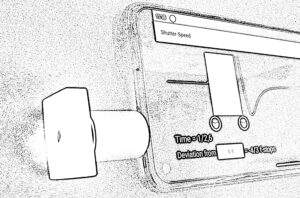
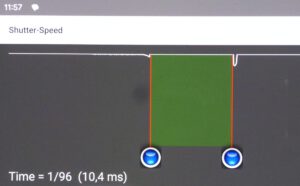
The opening time of the shutter is obtained by marking the dark phase by the falling and the rising flank (here: set 1/2 s, measured 1/2.6 s) on the user interface of the app:

The following measurements were taken using a professionally serviced Minox A IIIs:
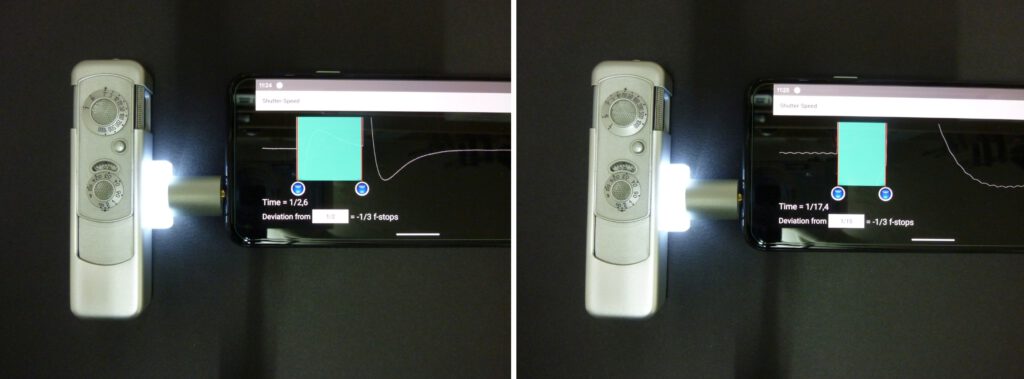
1/2 s / 1/20 s
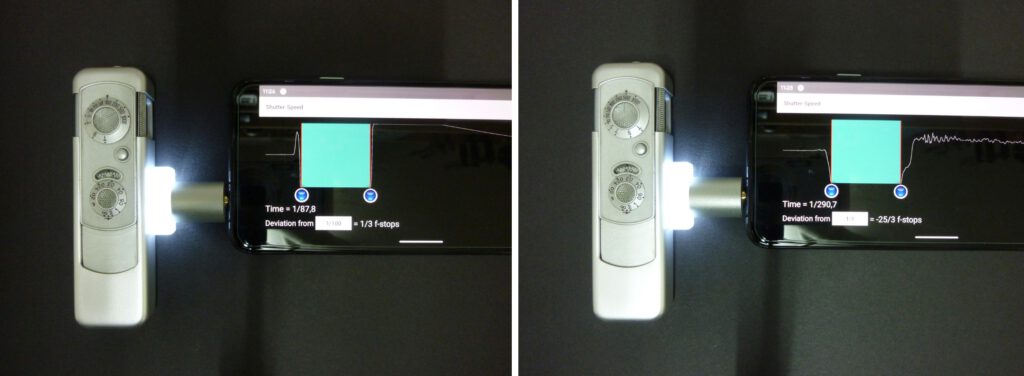
1/100 s / 1/500 s

1/1000 s
Please note that the f-stop deviations are not necessarily displayed correctly. To do this, you would have to select the times set on the camera in the app. Not all values are selectable. However, this has no influence on the measurements.
Practical examples
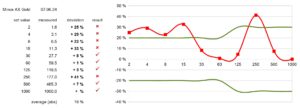
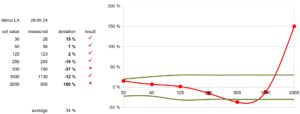
The following diagrams show the measured values for different Minox cameras. The red curves show the deviations in % from the set shutter speed, the green curves show the tolerance ranges according to ASA.
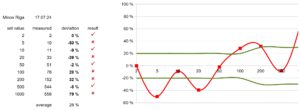
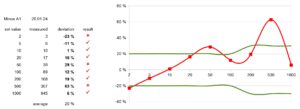
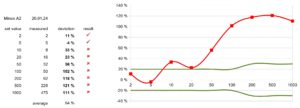
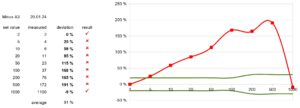
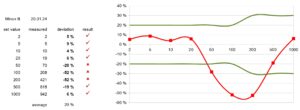
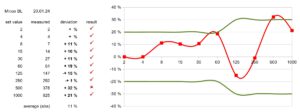
All four mechanical cameras had “plausible” shutter speeds, i.e. by ear the faster times corresponded to shorter shutter noises. But as you can see,
- the actual measured speeds vary greatly between the cameras
- the deviations between the set speed and the measured speed on the same camera are considerable.
The Minox LX with a fully electronic shutter, is only listed for comparison purposes. It can be seen that 1/2000 s cannot be measured using this method.
Conclusion
The shutter speeds of Minox 8×11 cameras can be measured very easily without opening them. The results are accurate and reproducible. With my setup it takes me about 1 minute for 4 measurements. With the Minox’s 9 shutter speeds, that’s 3 minutes including setup to completely and objectively test the camera’s shutter speeds.
What consequences can be drawn from this? On the one hand, you now know which corrections you need to make when exposing photos or you try to adjust the deviations on the camera. In any case, you have certainty and not just a feeling!
If you are interested in the history of measuring instruments for camera shutter speeds, you may find this article interesting.
Checking the measuring device
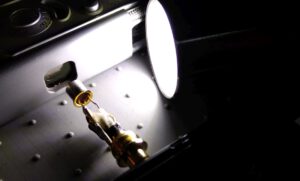
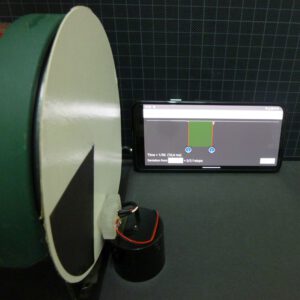
To check the measuring device, I set up a device that can simulate different shutter speeds. This consists of a rotating white circular disk on which a black sector is attached. This sector represents the opened shutter. The circular disc is mounted on a speed-controlled disc sander:
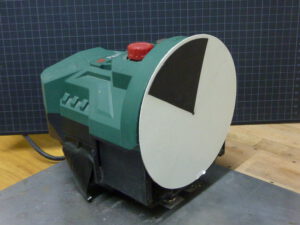
The brightness sensor (a silicon NPN phototransistor of the type Osram BPX 38) and the LED light source are placed in front of the circular disk and connected to the Shutter-Speed app (running on an Android smartphone Pixel 4a):
The desired shutter speed can now be set by the corresponding speed of the disc. With the black sector size of 74°, the speed is:
rpm = shutter speed * 74 / 360 * 60
e.g. for 1/100 s:
rpm = 100 * 74 / 360 * 60 = 1233
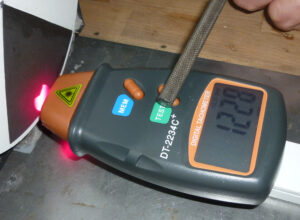
I adjust the speed continuously on the disc sander and measure it with a digital tachometer:
The measurement is then carried out as usual by starting the recording in the Shutter-Speed app. Manually measuring the pulses using the two blue buttons then results in the time period (in this case for 1/100 s) for the black sector of the disk:
Checking the measuring device at different speeds showed good correlation between the specified shutter speeds and the measured values:
| disc speed [rpm] | shutter speed [1/s] | ||
| expected | measured | deviation | |
| 680 | 55 | 54 | 2% |
| 1230 | 100 | 96 | 4% |
| 2460 | 200 | 200 | 0% |
| 3720 | 302 | 290 | 4% |
| average | 2% |
The small deviations can be explained simply by the fact that the speed of the disc is not completely precise. Taking this into account, the measurements are surprisingly accurate. The measurements by the Photoplug in combination with the Shutter-Speed app can therefore be regarded as reliable.
CLA = clean, lubricate, adjust