Whether you want to buy a Minox or inspect one yourself, here you will find a simple description of how to quickly and easily check a Minox without any tools.
Page Contents
How difficult is the inspection?
Checking a Minox is very easy and can be done in a few minutes without tools. You can easily do this before purchasing.
However, the prerequisite is that you have the camera in your hands. Even if you want to buy the camera online and a certain feature is important to you, you can ask the seller to carry out the corresponding test. It is so quick and easy that there should be no excuse for a reputable seller to carry out the test.
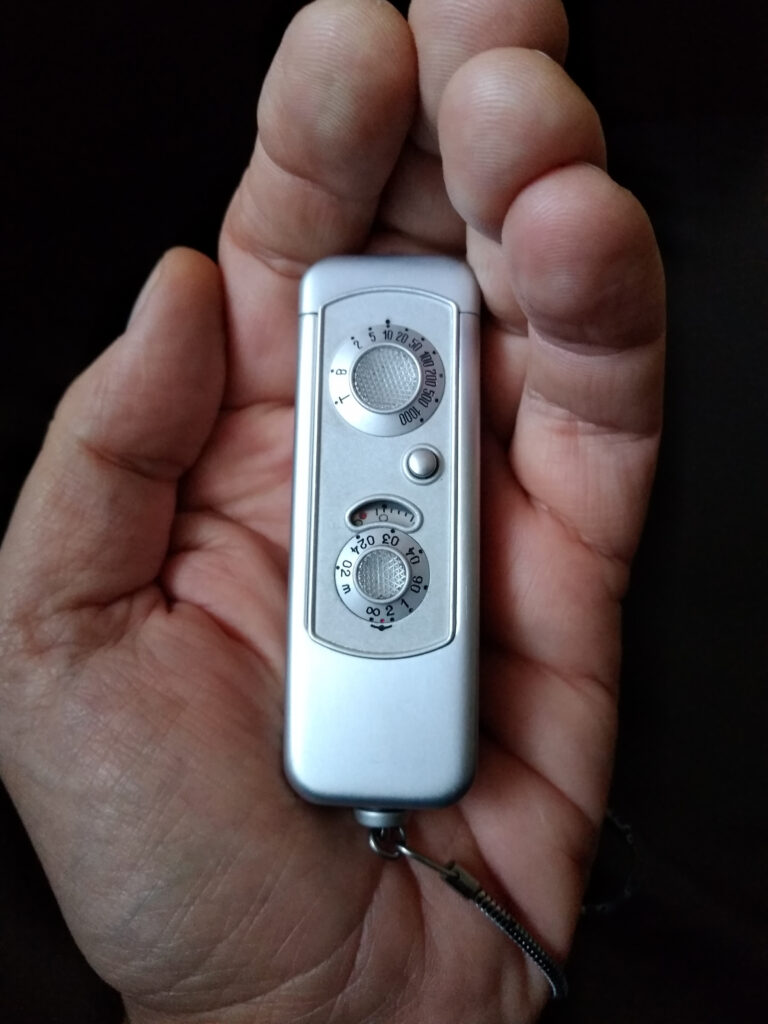
All tests presented here can be carried out directly for Minox A IIIs, B and AX.
For the LX and EC models, you need a suitable battery for the shutter test and the battery check of course. With the BL you only need a battery to test the light meter.
Check the seals
The first question that arises is whether someone has ever disassembled the camera to try to repair it. Although this is not a problem in principle, it often results in more damage than repair. If the seller can say why and, above all, by whom the Minox was repaired and can show proof, this shouldn’t be a problem.
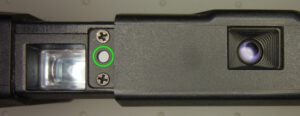
A camera in original factory condition can be easily recognized by the seals that cover three screws. If a seal is missing, the camera has probably already been disassembled. The check takes place in two steps.
- Open the film chamber as if you were loading a film cartridge. Look at the small set screw shown in the picture below. The screw head must be covered with black paint.

- Look at the two screws that hold the cap in place. The top of the cap with the two screws is easy to control as long as the film chamber cover is pulled out. Here too, the heads of the two fastening screws must be covered with black paint.

Please note that the screws on the Minox AX are not sealed at the factory. You can only check whether the screw slots are intact.
Check the shutter
Minox A, B, BL, LX, AX
Checking a Minox definitely means examining the shutter. Either it doesn’t work at all, or more often than not, it is sluggish. If you are interested in how the Minox shutter actually works, you can find an explanation with pictures and videos here.
- Set the speed dial to maximum speed.
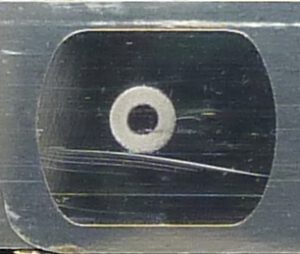
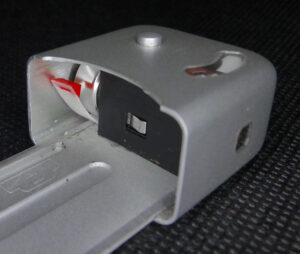
- Close and open the camera and look at the lens from the outside. A circle must be visible on the metal surface of the shutter blade.
- This signals that the shutter is cocked and the shutter blades are in the correct position. If the circle is not visible, there is probably a problem with the shutter blades.
- Press the shutter release button. You should hear a short click and the indicator circle will disappear. The lens should again be closed by a continuous metal surface that does not show a circle. In this case the shutter is fine.
- If the circle is still there, then your shutter is still cocked. If it didn’t click, then there is a problem with the clockwork mechanism in the camera. If it did click, but the circle is still there, then your shutter blades are likely stuck or already broken.
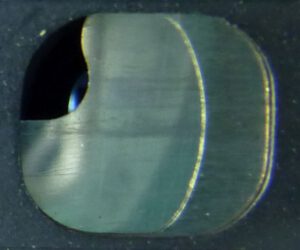
If you don’t see a consistent, continuous metal surface without a circle before the lens, there’s something wrong with the shutter blades, see picture below. - Repeat the last 3 points for all shutter speeds. Pay attention to whether the clicking sound lasts longer and whether you can see the lens during the longer exposure times. Check whether the exposure time for 1/2 second is plausible. On a separate page we see how to measure the speeds exactly with an additional tool.
Minox EC
The shutter of a Minox EC is checked in two steps as follows.
- Without Battery:
- Remove the battery.
- Pull the camera apart and turn it so that you can look at the lens from the front.
- Hold it up to the light so that you can see the shutter behind the lens.
- Then press the shutter release and watch what happens behind the lens. If the shutter opens, it’s probably fine. You have to look closely because the Minox EC shutter is black and not silver. It is normal for the shutter to stay open when there is no battery in the camera.
- You can close it by pressing the camera back together.
- With Battery:
- Now insert the battery.
- Pull the camera apart and turn it so that you can look at the lens from the front.
- Hold it up to the light so that you can see the shutter behind the lens. Then press the shutter release. Observe whether the shutter opens briefly and then closes.
- Then close and open the camera to cock the shutter again.
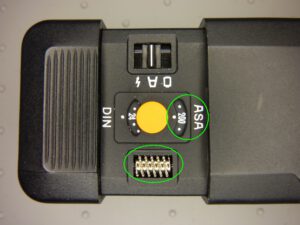
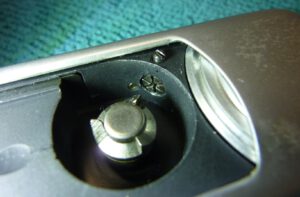
- Trigger the camera in different lighting conditions to check the automatic exposure. The sensor of the light meter is located on the front next to the viewfinder (green circle in the picture below).
- Then cover the sensor with your finger before you release the shutter, hold it there and check whether the shutter opens for several seconds (for 8 seconds if the camera is set to the film speed ISO 25) and then closes again.
The following video shows the shutter release at the longest exposure time. For this purpose, the light sensor was covered with black adhesive tape.
Check the viewfinder

Open the camera, look through the viewfinder and aim it at the sky or a bright surface. Check whether the viewfinder image is clean, without scratches, spots or cloudiness. Also pay attention to the area outside the light frame.
Check the lens
- Set the speed dial to “T” (for Minox LX, set the shutter midway between 2000 and A; for Minox AX set to “B”).
- Close and open the camera. Press the release button to open the shutter. The shutter stays open as you release the button (not for the Minox AX; here you have to hold down the release button).
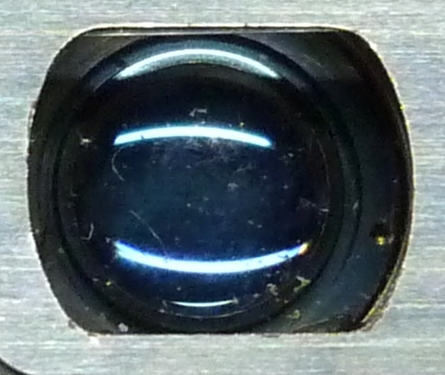
- Inspect the lens and the lens window. They must be clean, without scratches and fungus.
- Turn the distance dial and watch closely to see if the lens rotates. This is hard to see, maybe you need an extra lamp to see it. If the lens does not move, the transmission between the distance dial and the lens is disengaged. In the following video you can see the lens while the distance dial is turned. Watch the edge of the lens to see how it rotates. Also observe how the lens shifts from front to back:
If the lens does not move, this indicates a serious defect. Such a defect usually occurs when someone has attempted to repair the camera improperly.
If you are interested in how the Minox distance setting actually works, you can find an explanation with pictures and videos here.
Check the film advance mechanism
Basic method
- Pull the Minox apart and turn it on its back.
- Open the film chamber.
- Push the camera back by holding two ends of the opened camera, without touching the opened cover
- Push the camera together; the three prong film advance spindle should rotate clock wise, otherwise the film advance mechanisam is faulty.
In the following video you can see how the spindle rotates correctly:
Additional test
Now shake the camera gently next to your ear. Do you hear a loose part clicking? In fact, you must if the film advance is in good order. The sound is from the movement of the ompensator which adjusts the turning of the take-up spool in order to keep frame spacing even as more film is wound onto the take-up side. This part is named lever 10 and described in detail here. So don’t be alarmed by this noise; it should be audible on every Minox A, B, or BL model.
Advanced method (Minox A, B, Riga)
This is a method for checking the even spaces between the frames of film negative strip. Perform the following steps for frame counter positions 1 and 36 at least:
- Ensure that there is no film in the camera.
- Set a specific frame number (1, 25, 36 or 50) on the frame counter.
- Stick a marking dot onto the take-up spool.
Stick a piece of adhesive paper onto the housing.
Draw two marks opposite each other:

- Push in the camera to transport the film by one frame.
- Pull out the camera and mark the new position,
which indicates how much the take-up spool has turned:

- Stick the red dot onto a printable protractor and measure the angle (124°):

- Compare the measured angle with the following table. The measured angle should normally be near φ or within the range of φmin and φmax. The values in brackets are the absolute minimum for achieving a spacing between the frames of 0 mm:
| Frame | φ [°] | φ min … φ max [°] |
|---|---|---|
| 1 | 145 | (121) 138…153 |
| 25 | 118 | (98) 112…124 |
| 36 | 110 | (91) 104…115 |
| 50 | 101 | (84) 96…107 |
If your measured angle is less than the value in brackets, the frames will overlap! That would ruin your exposures.
If your measured angle is greater than φmax, it’s not a disaster. In that case, the spaces between the frames will be too large and you may get fewer images on the film strip.
If you are wondering where these values come from, you can find the explanation here.
Check the frame counter
This function is independent of the film advance mechanism and must therefore be checked additionally.
It may happen that the exposure counter does not work at all or does not work reliably. I had this happen with two Minox A’s that had been improperly repaired. On one camera the counter didn’t run at all and on the other the counter sometimes stopped moving. So if the camera seals have been removed, you should pay special attention.
The easiest way is to carry out this check during the shutter test. To do this, pay attention during cocking to see whether the counting disc moves by one mark.
It is not necessary to pull the Minox completely apart. It is sufficient to pull the closed camera apart by about 5 mm and then push it back together again. The frame counter should advance by one frame.
Check the parallax compensation

Be sure to check the parallax compensation. With the camera open and the viewfinder facing you (you are looking at the front of the camera), turn the distance dial. You should notice the viewfinder moving sideways. If not, the linkage between the distance wheel and the viewfinder is defective.
In the following video you can see when turning the distance dial the viewfinder’s optics swivel to show the right frame, especially in close-ups:
Check the measuring chain

There are three types of Minox chains : unbeaded chain for EC, metric measuring chain in meter and imperial measuring chain in feet.
- The bead positions on imperial chains are 8″ (20cm), 10″ (25cm), 12″ (30cm) and 18″ (46cm). The total length of the chain is 24″ (61cm).
- The bead positions on metric chains are 20cm, 24cm, 30cm and 40cm. The total length of the chain is 60cm.
For an intact metric chain, dimension L4 in the picture below must be 40cm. For an imperial chain, L4 must be 18″ (46 cm).
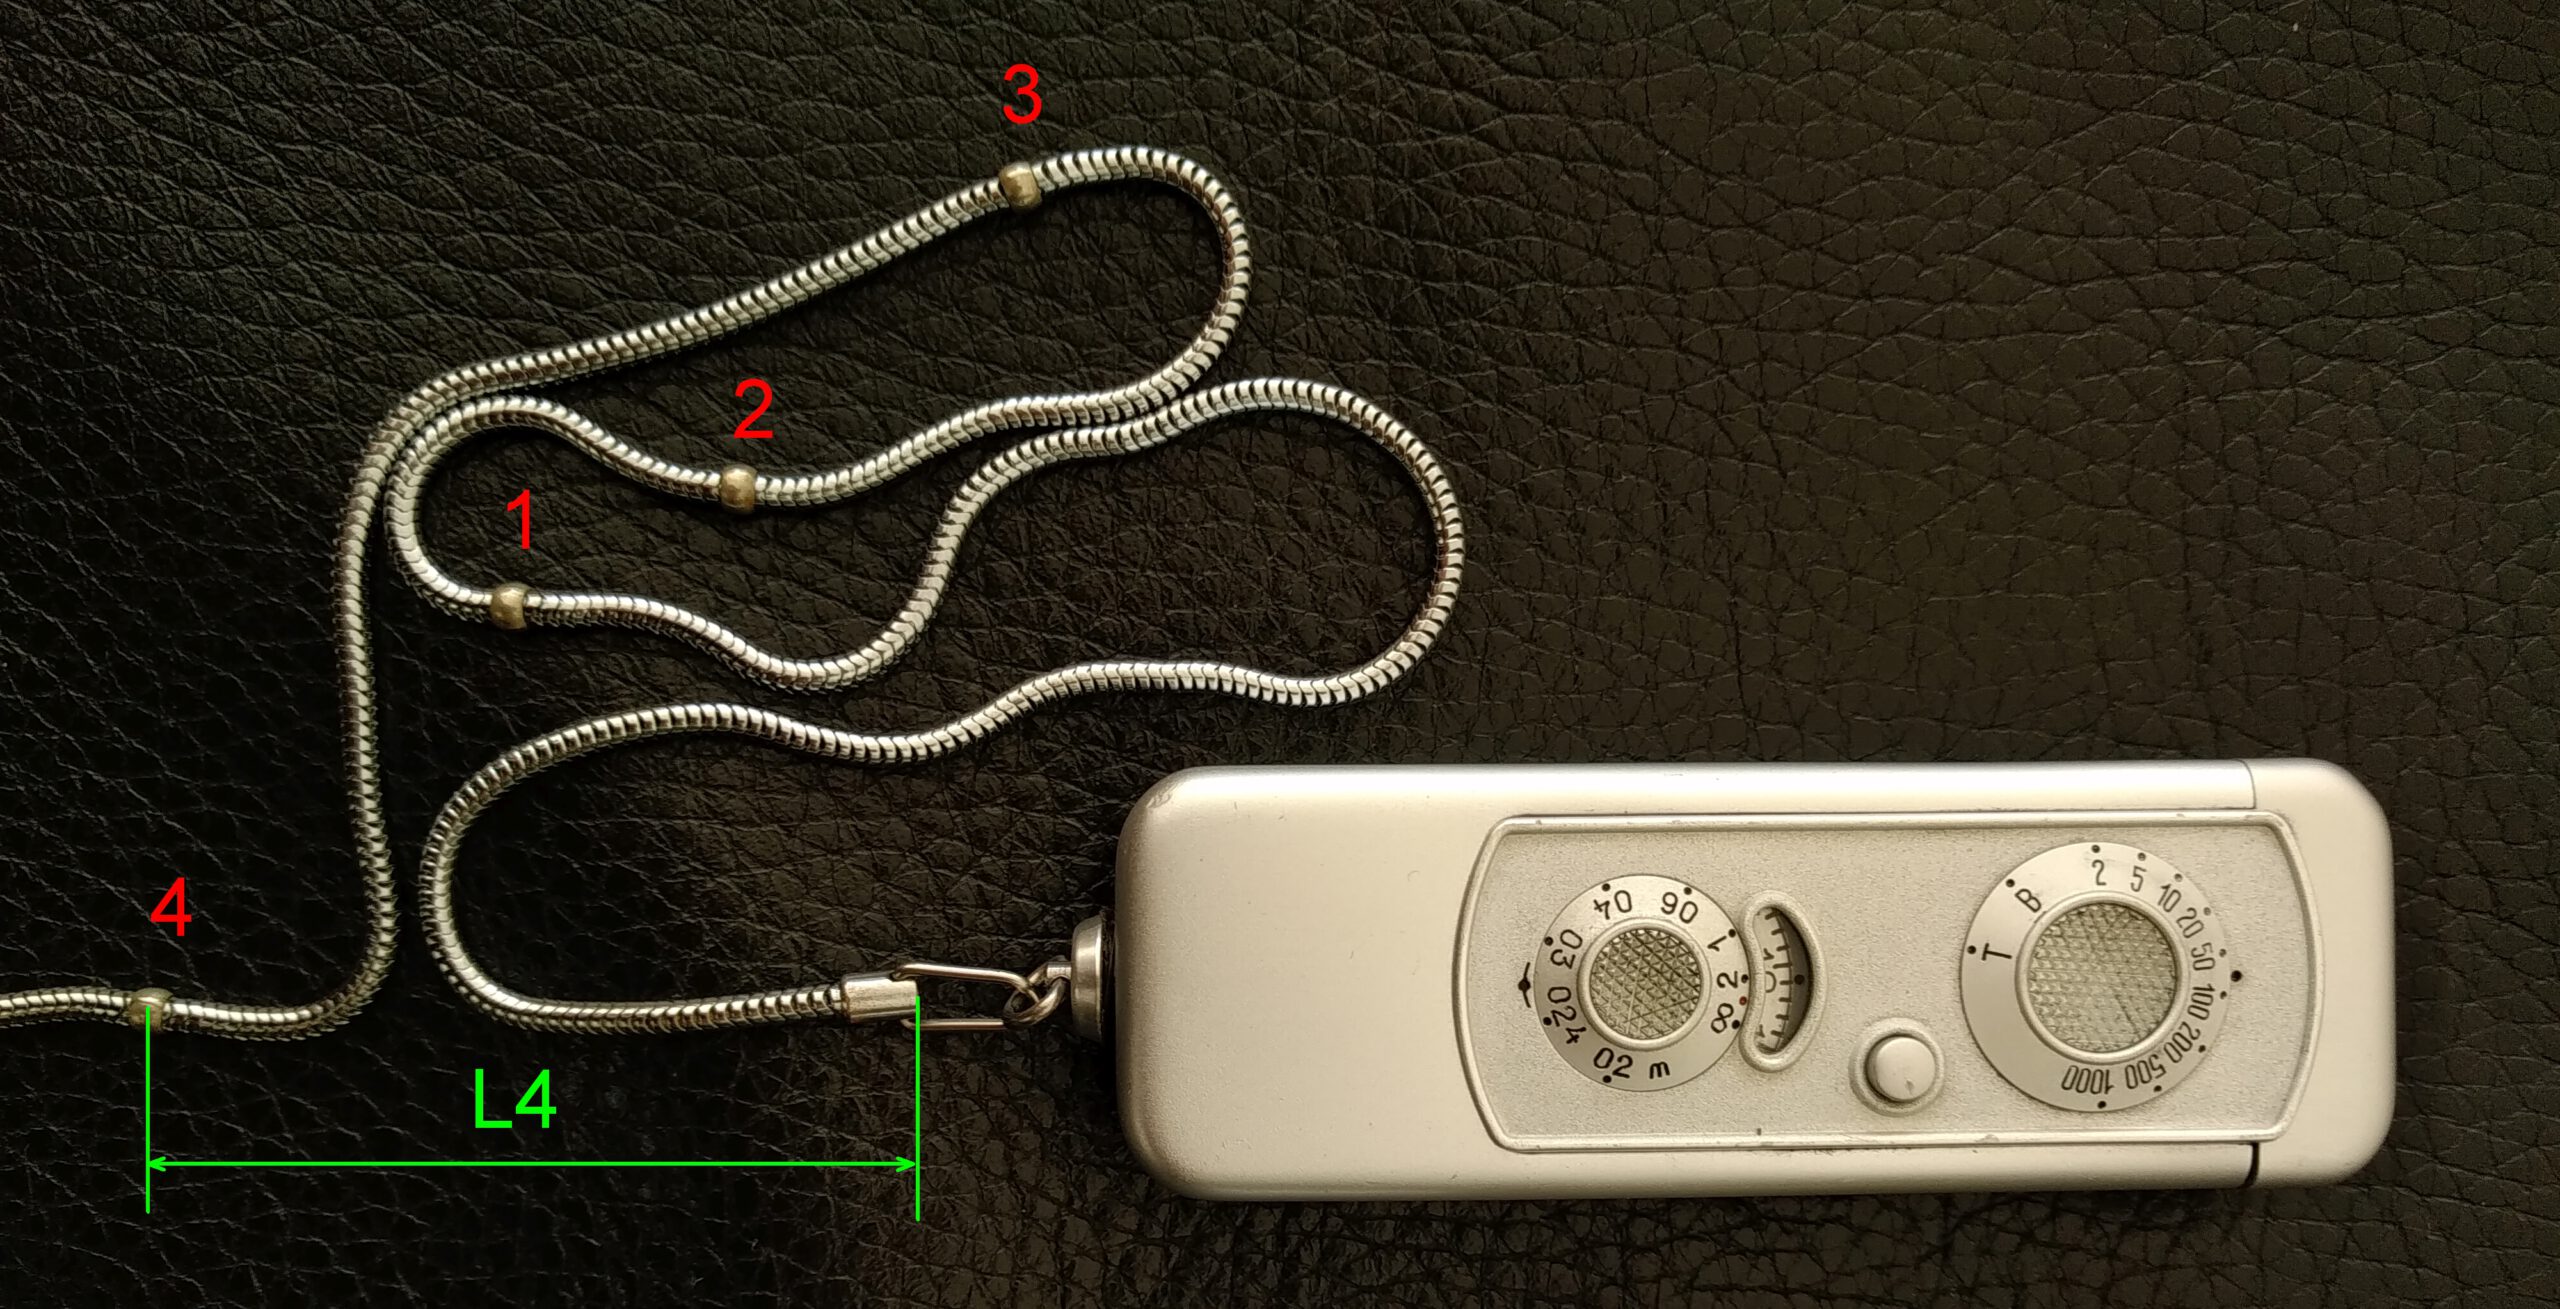
Be careful to match a metric chain to a metric camera, and an imperial measuring chain to an imperial camera. You can differentiate a metric chain easily from an imperial chain: the first three beads on metric chains are separated by unequal distances, the first three beads on imperial chain are separated by equal distances. The 8″ bead on imperial chain is exact match for 20cm bead on metric chain.
Check the chain against a ruler. The chains can wear out. I measured deviations of 10 mm at length L4.
Check battery (BL, LX, EC)
Minox BL
According to the original operating instructions, one Mallory PX675 is required. Since this is no longer available, I use an alkaline LR44/AG13/A76 button cell.
Battery check: With the camera open, press the slider for the ND filter up. The pointer on the exposure meter must move to the right edge.
Minox LX
According to the original operating instructions, one Mallory PX27 is required. Since this is no longer available, I use 4 x LR43 button cells with adapter or a 6V PX27A Alkaline Photo, see Minox EC.
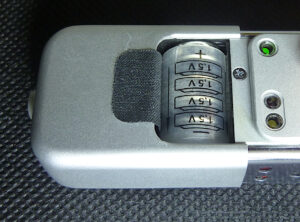
Check the battery with the camera closed or opened and cocked. Press the lever on the shutter speed dial towards the front of the camera; the green light should light up.
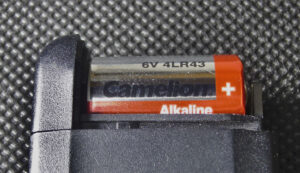
Minox EC
Battery: Since the original is no longer available, I recommend Golden Power 6V/4LR43 Alkaline. This battery is slightly shorter than others, so that the flash contacts do not fail. When inserting it, you can feel that it goes more easily than other products.
Battery check: Open the camera, press and hold the slide switch to the battery symbol. Look through the viewfinder, the red LED should light up.
Attention:
- Carry out the test in a bright environment. If it is dark, the red lamp lights up even if you have not yet pressed the switch to the left.
- If the LED lights up, at least the power supply contacts are OK. But be careful, I know of cases where the LED lit up during the battery test, but the shutter still didn’t work. In all cases, this was because the battery was strong enough for the battery test, but still too weak for the camera to function properly.
- If the LED does not light up, there may be several reasons for this:
The most common cause is a weak battery. Never use an old original battery for testing. These are always too weak, even if they have a voltage close to 6 V when measured with a multimeter. Use one of the batteries listed above to rule out any errors from this side.
A complete electrical test of the Minox EC is described here.
Check the light meter (B, BL)
The pointer of the instrument must deflect when the front of the camera is held in bright light. However, this is not proof that the light meter works accurately. In sunlight or a very bright lamp, the pointer must move completely to the end of the scale. If not, the exposure meter is no longer OK. The exposure meters cannot be repaired, but they can be completely replaced on the Minox B.
Check the accuracy of the exposure meter with an external, tested exposure meter or with one of the numerous smartphone apps. I prefer the Android Lightmeter app, which I present here, for various reasons.
Conclusion
Checking a Minox is easy and can be done in a few minutes.
However, two defects can ultimately only be detected with certainty by exposing a film:
- Overlapping images on the film due to incorrect film feeding. If the test described above is successful, the problem cannot be ruled out, but it is unlikely.
- Blurring in every image, which is caused by a defective distance setting. If the test described above is successful, the problem cannot be ruled out, but it is unlikely.
Also interesting
If you are interested in photography with a Minox, you will find useful information here.
Hello dear Thomas,
Ive recently purchased a Minox EC that has some problems and just stumbled across your website. As i see, you have already discribed and showed how to fix a big bunch of problems with the ec. Unfortunatly the problem wich accures on my Ec is not one of them. Thats why i am reaching out to you. Mir problem is, that with a battery inserted the shutter of the ec opens but then stays open. It only closes if i push the camera together and back appart again. Have you any idea how i can fix that problem or what the culpurate could be? Thank you very much and have a nice day.
Greetings from Swizerland
Sincierly Mika Dellenbach
Hello Mika,
I sent you an email.
Thomas