Mamiya super 16 restoration
Restoring a historic mechanical camera is much more than just a technical repair – it is a satisfying, meditative process. What makes this job so rewarding:
- The principle of visible logic:
No black box – Unlike electronics, where you often just replace a chip without understanding what’s going on internally, mechanics reveal their soul. Every lever presses another, every spring has a purpose. - The fascination of pure mechanics – the interplay of gears, springs, and levers is easy to understand. When you restore a gummed-up shutter mechanism to working order, you can immediately see the success of your own work.
- Presence: Every movement must be deliberate.
- The tactile experience and the slowing down – The process of restoration and subsequent use forces a mindfulness that is often lost in everyday digital life.
- Reverse engineering: The ability to decipher the function of a complex mechanism through mere observation and logical thinking is a deeply satisfying experience that challenges your own mind.
- Bridge between generations – Restoring a camera means establishing a connection to the original inventor and previous owners. And you are preserving a piece of technological history from decay.
Page Contents
- The big reveal: Lifting the control plate
- How the Mamiya super 16 shutter works
- Cleaning the escapement
- Brass and steel: Restoration of the shutter assembly
- The moment of truth: Data vs. intuition
- Lens check and a message from the past
- Second skin: elevating the Mamiya super 16 with genuine calfskin
- The missing link: building a custom flash sync cable
- The final proof: Field testing with film
- My journey into the Mamiya super 16 ends
- Practical tips for the Mamiya super 16
This is more of an experience report than a step-by-step guide. If you wish to attempt restoring this camera yourself, please be aware of my legal disclaimer.
The tactile joy of handling a miniature masterpiece
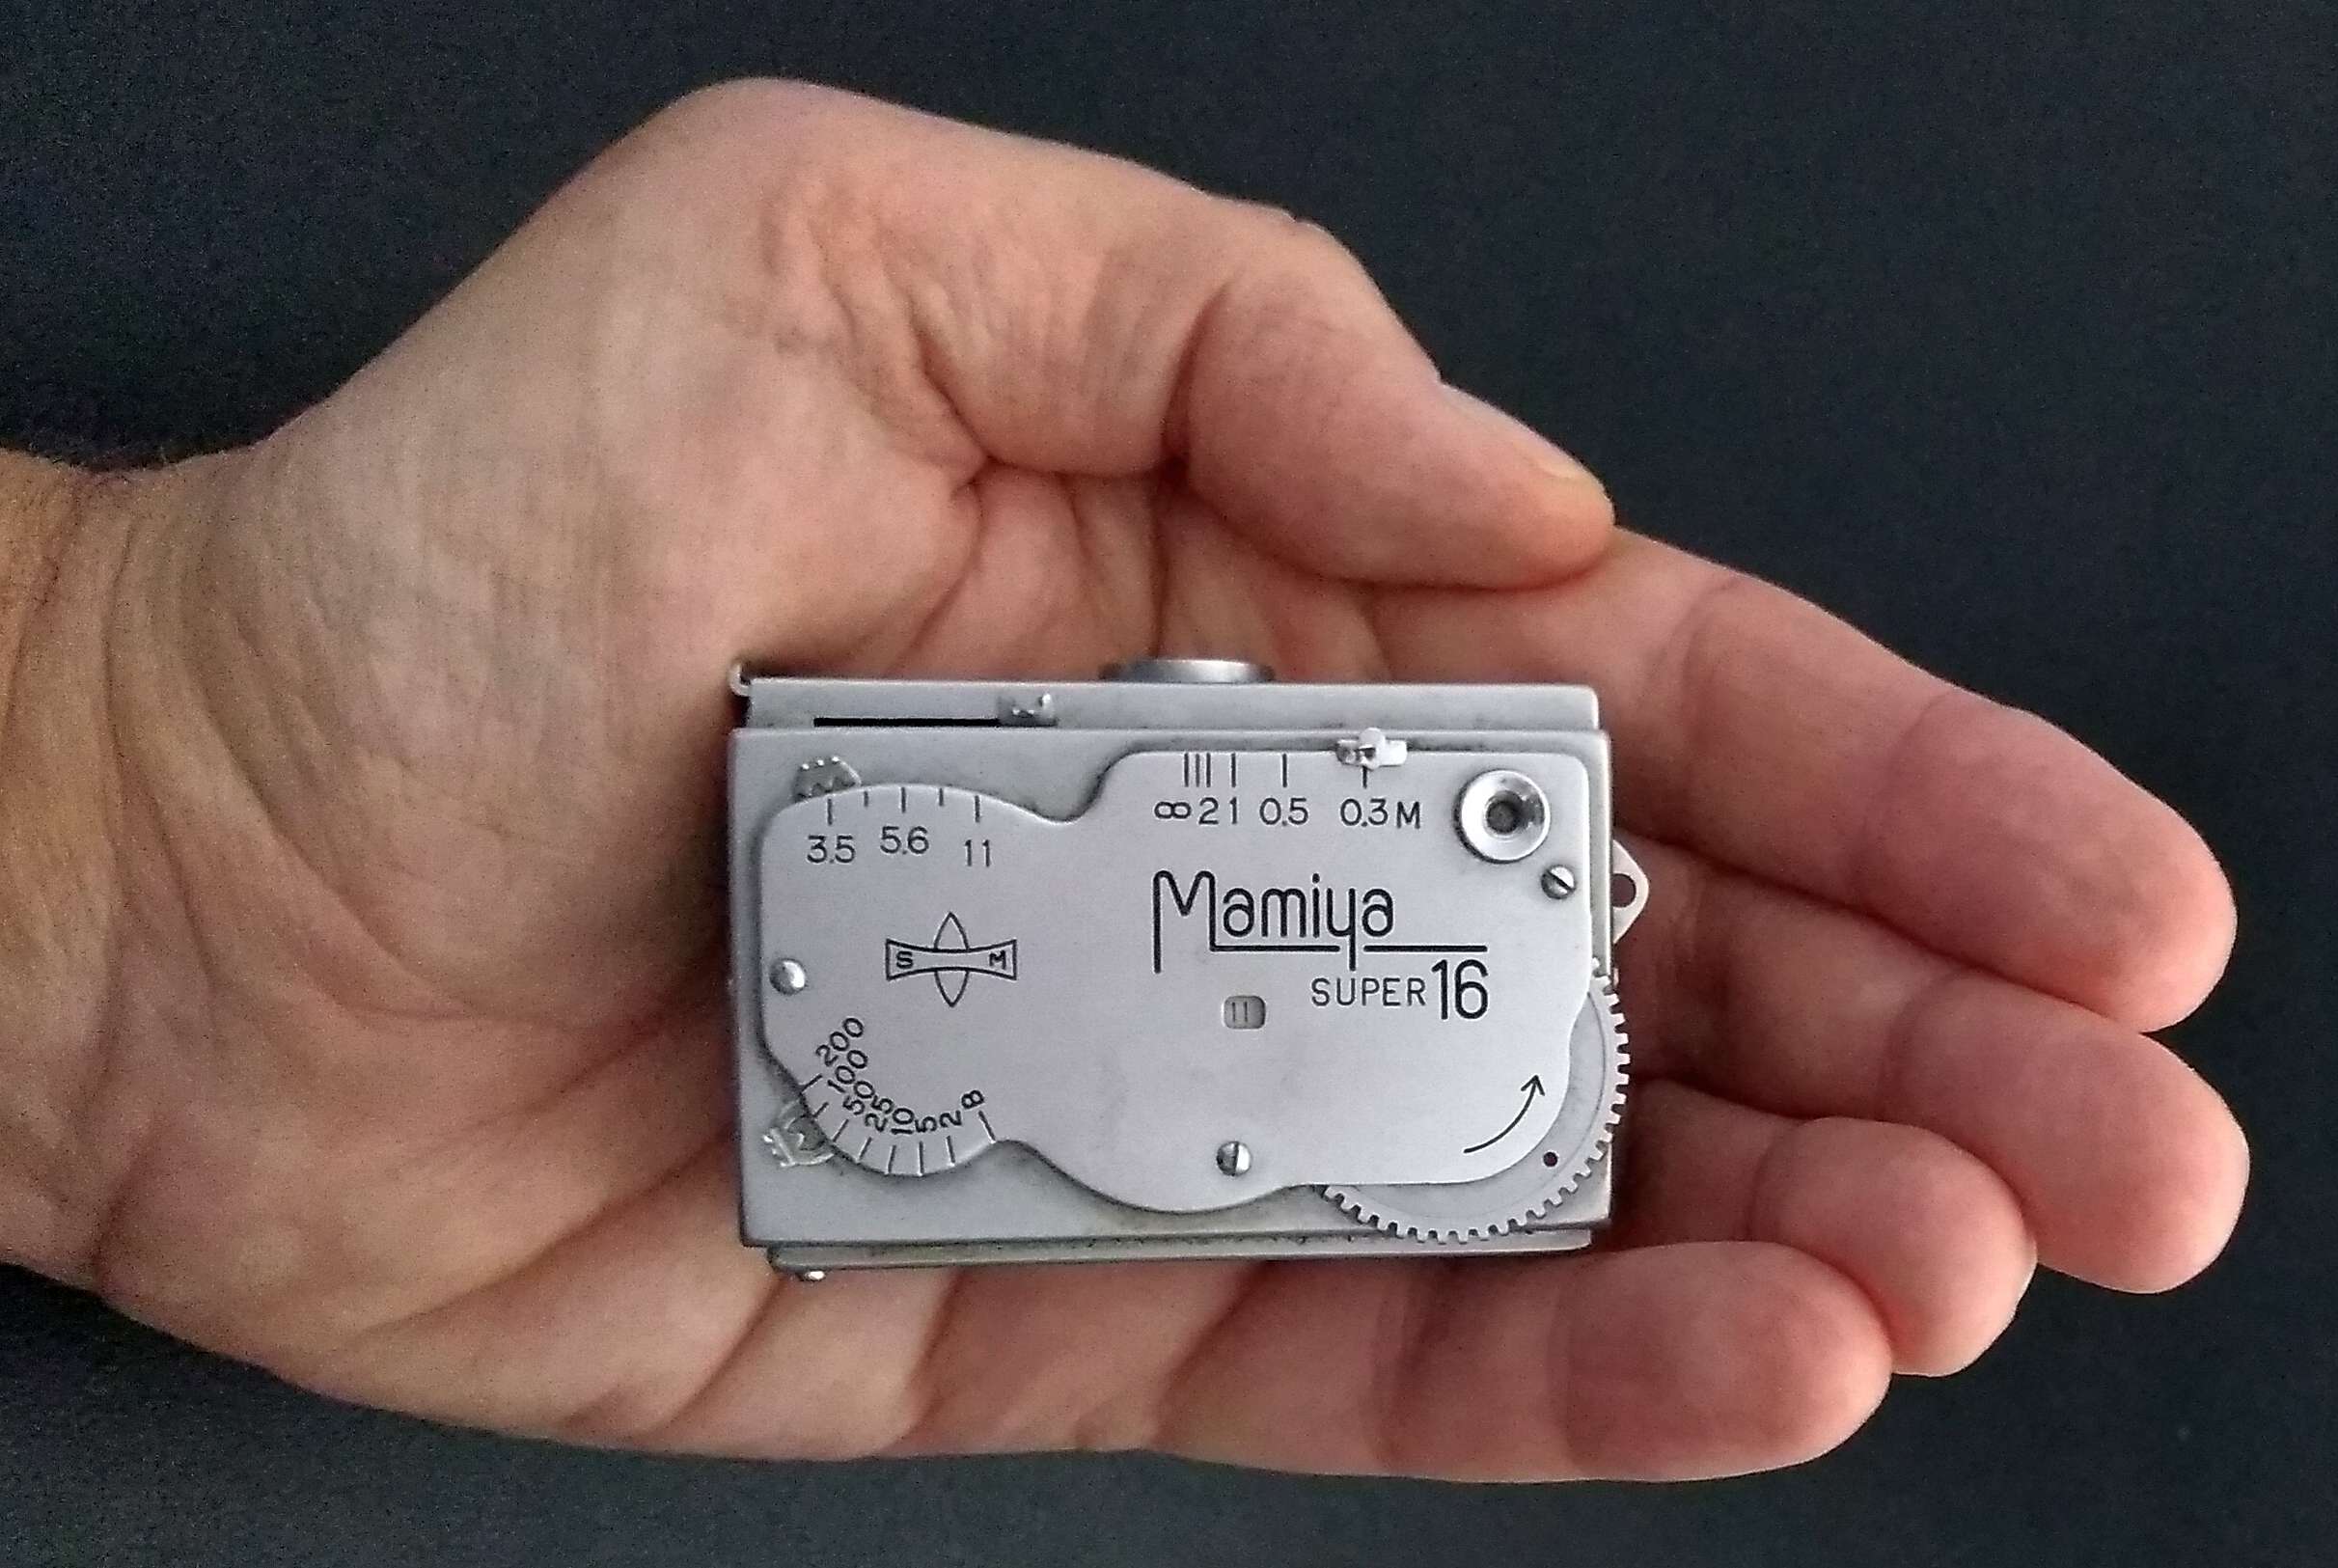
There is a profound, silent joy in the act of disassembly. It is not about the end result – a functioning camera – but about the journey into the heart of a miniature masterpiece. As I hold the Mamiya Super 16, its cold, chrome-plated body resting in my palm, I feel a connection to an era of uncompromising mechanical precision.
For me, a CLA (Clean, Lubricate, Adjust) isn’t just a maintenance task; it’s a conversation with the engineers of the past. It’s an act of rescue in a world of disposable electronics.
To perform a CLA on this tiny marvel is more than a technical necessity; it is a ritual of mechanical mindfulness. Each screw removed is a step deeper into a mechanical space, a path where time slows down. There is a specific, tactile happiness in the way the metal responds to the touch – a dance between the tool and the object.
The path is the destination
In these moments, the world outside fades away. There is only the smell of watch oil, the glimmer of brass gears, and the quiet satisfaction of restoring order to a complex, miniature universe. This is not just a repair; it is a meditation on human engineering and the joy of working with one’s hands.
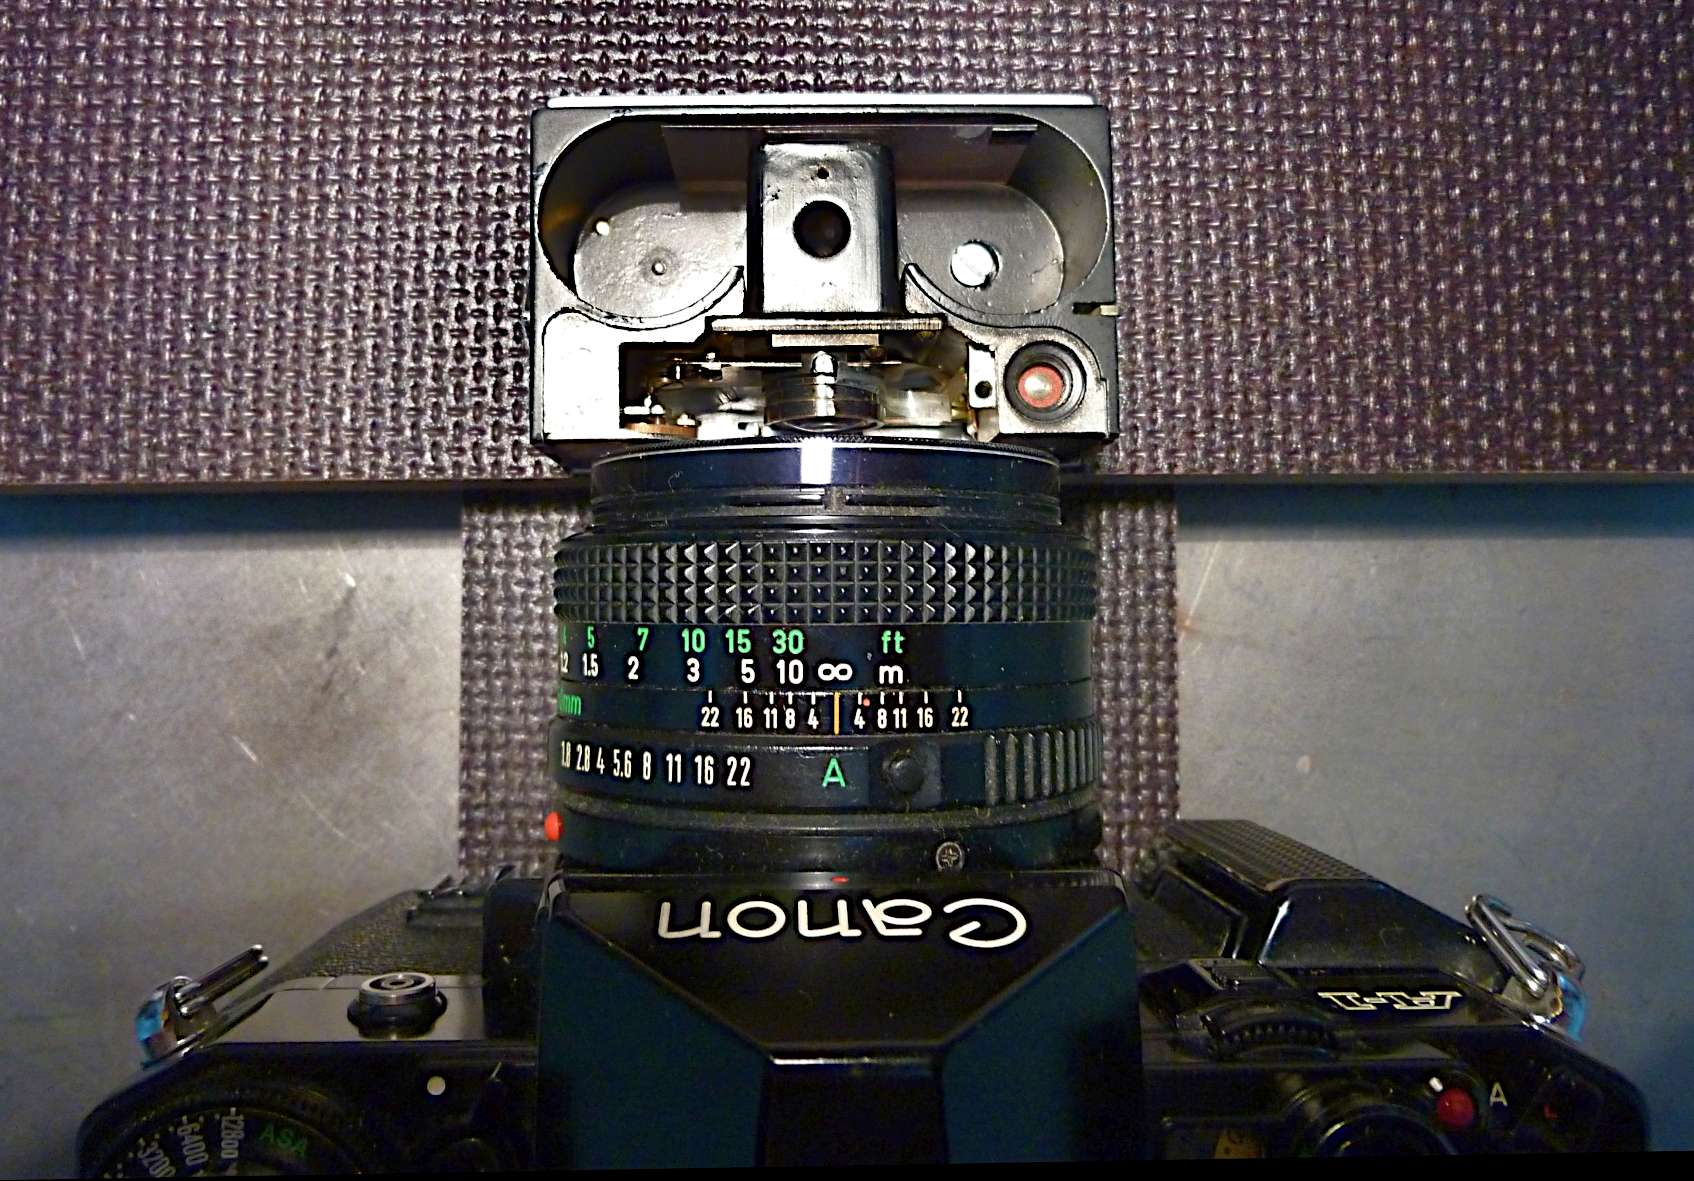
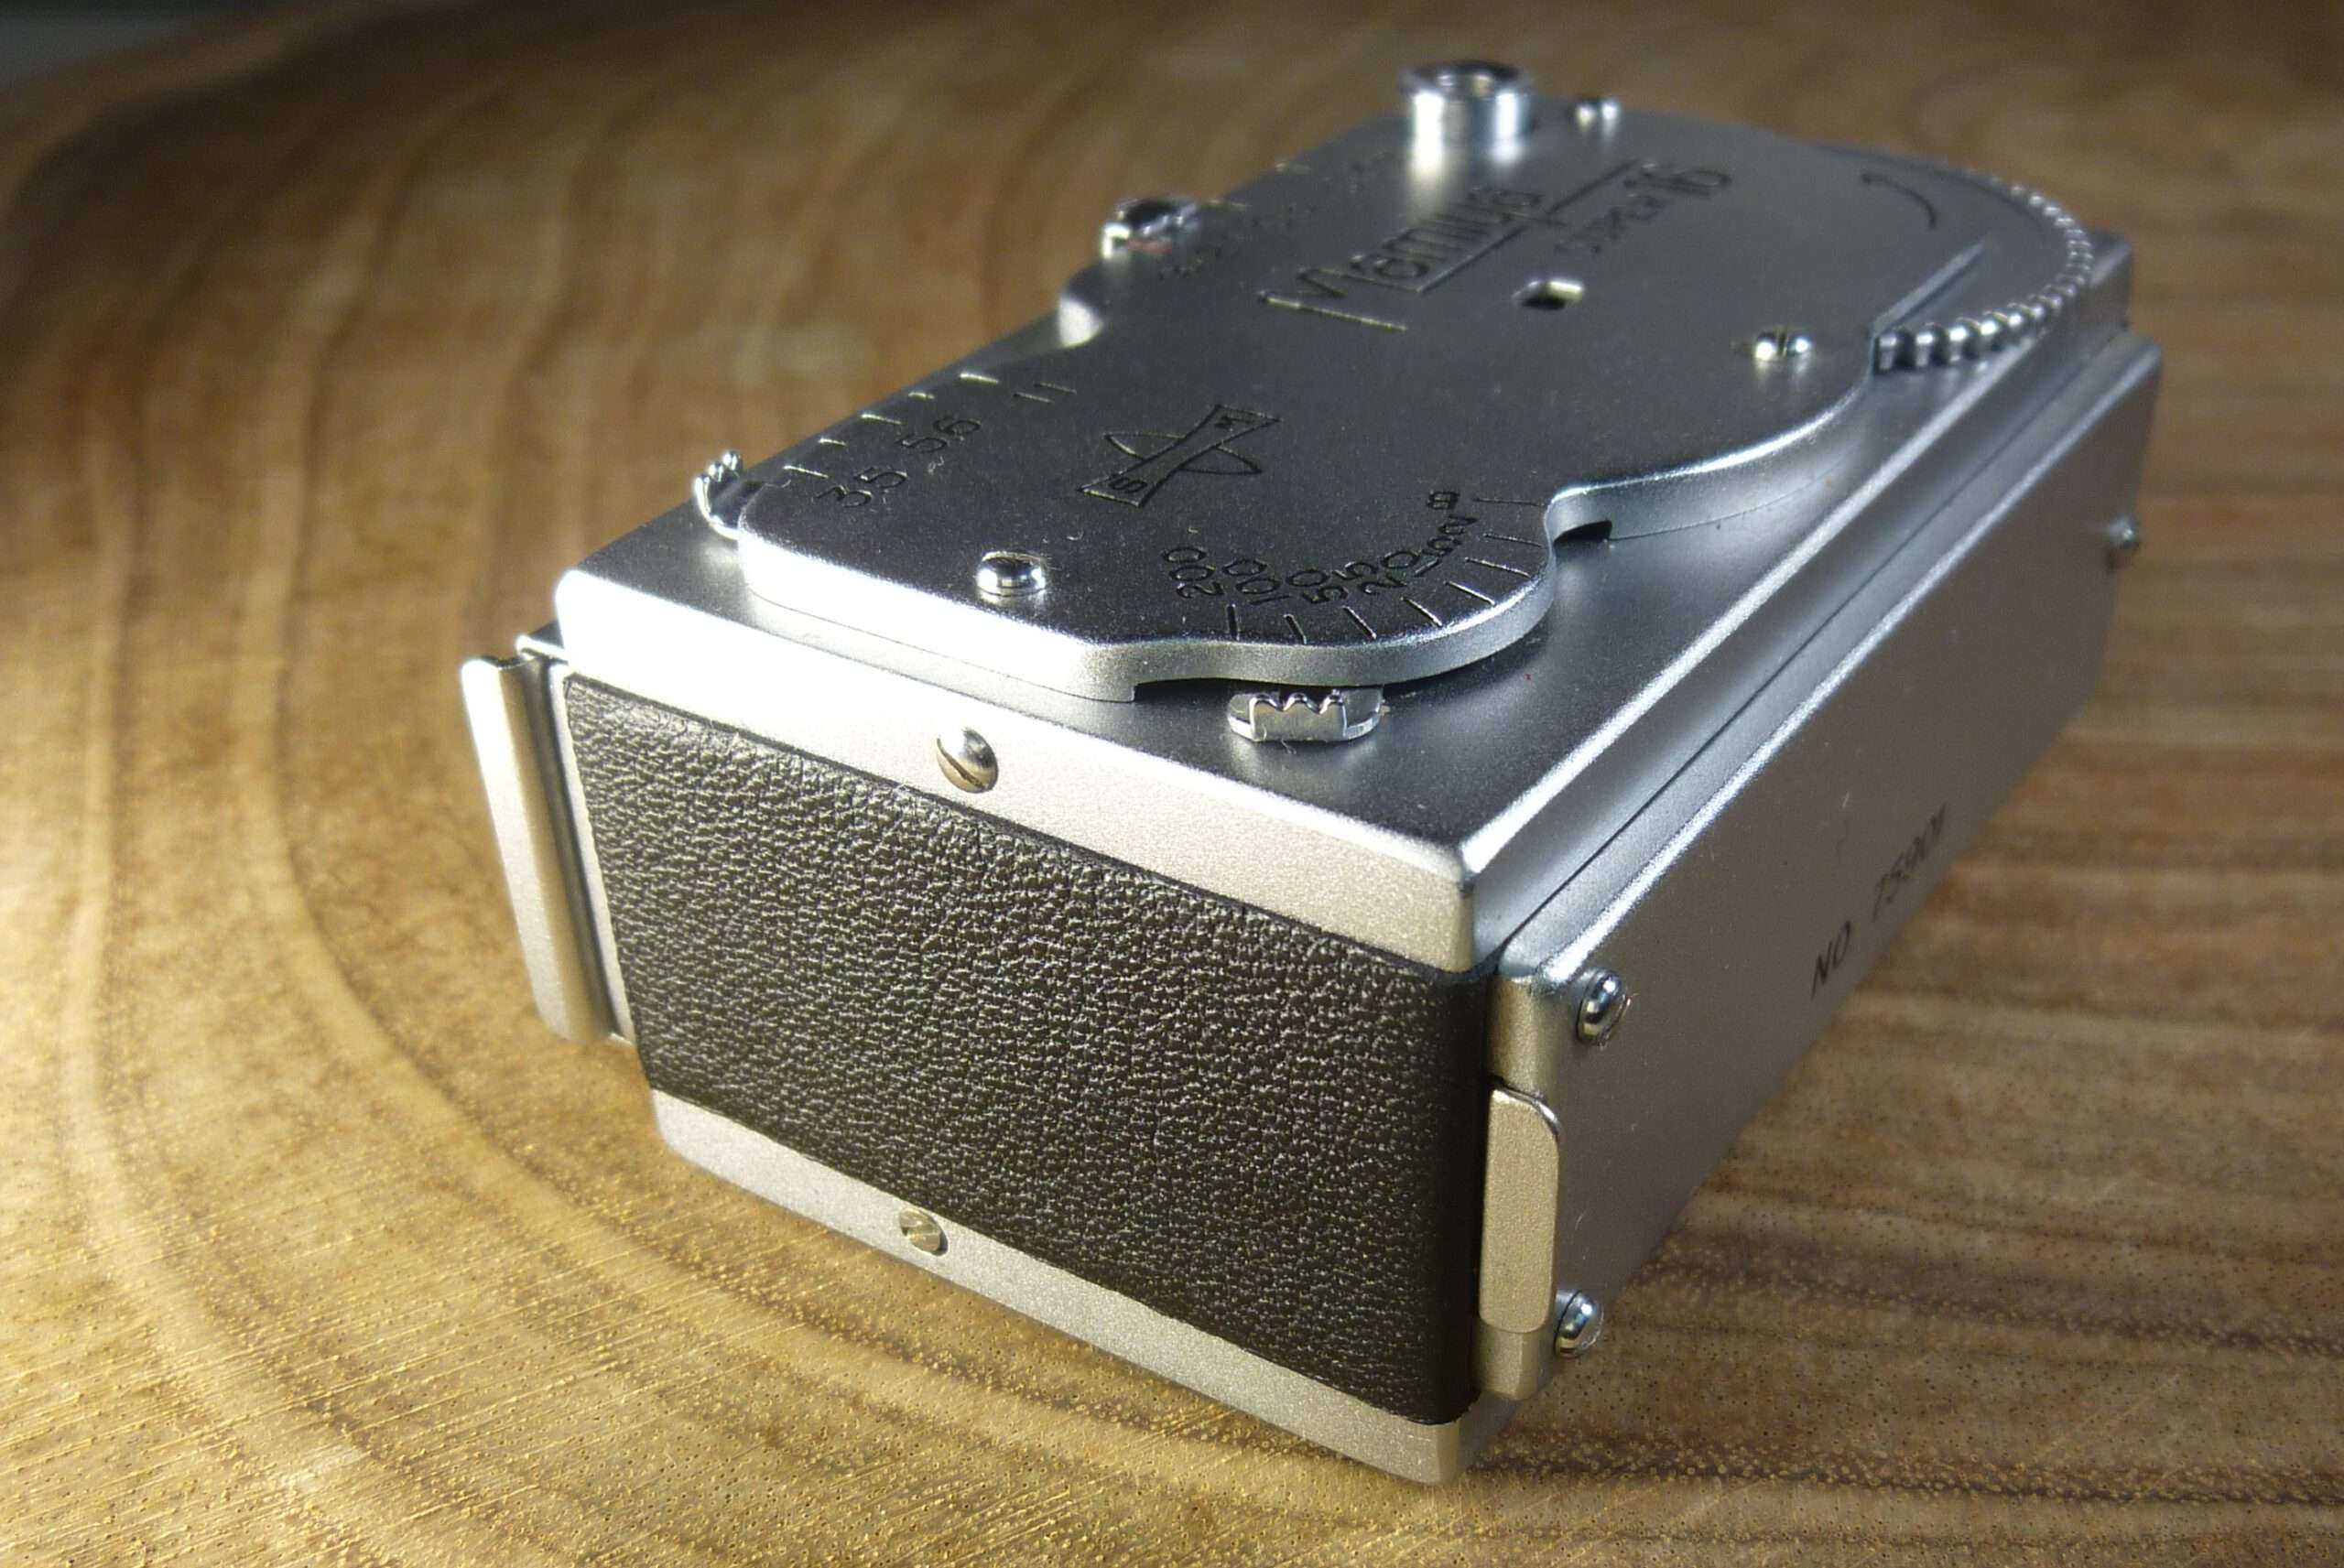
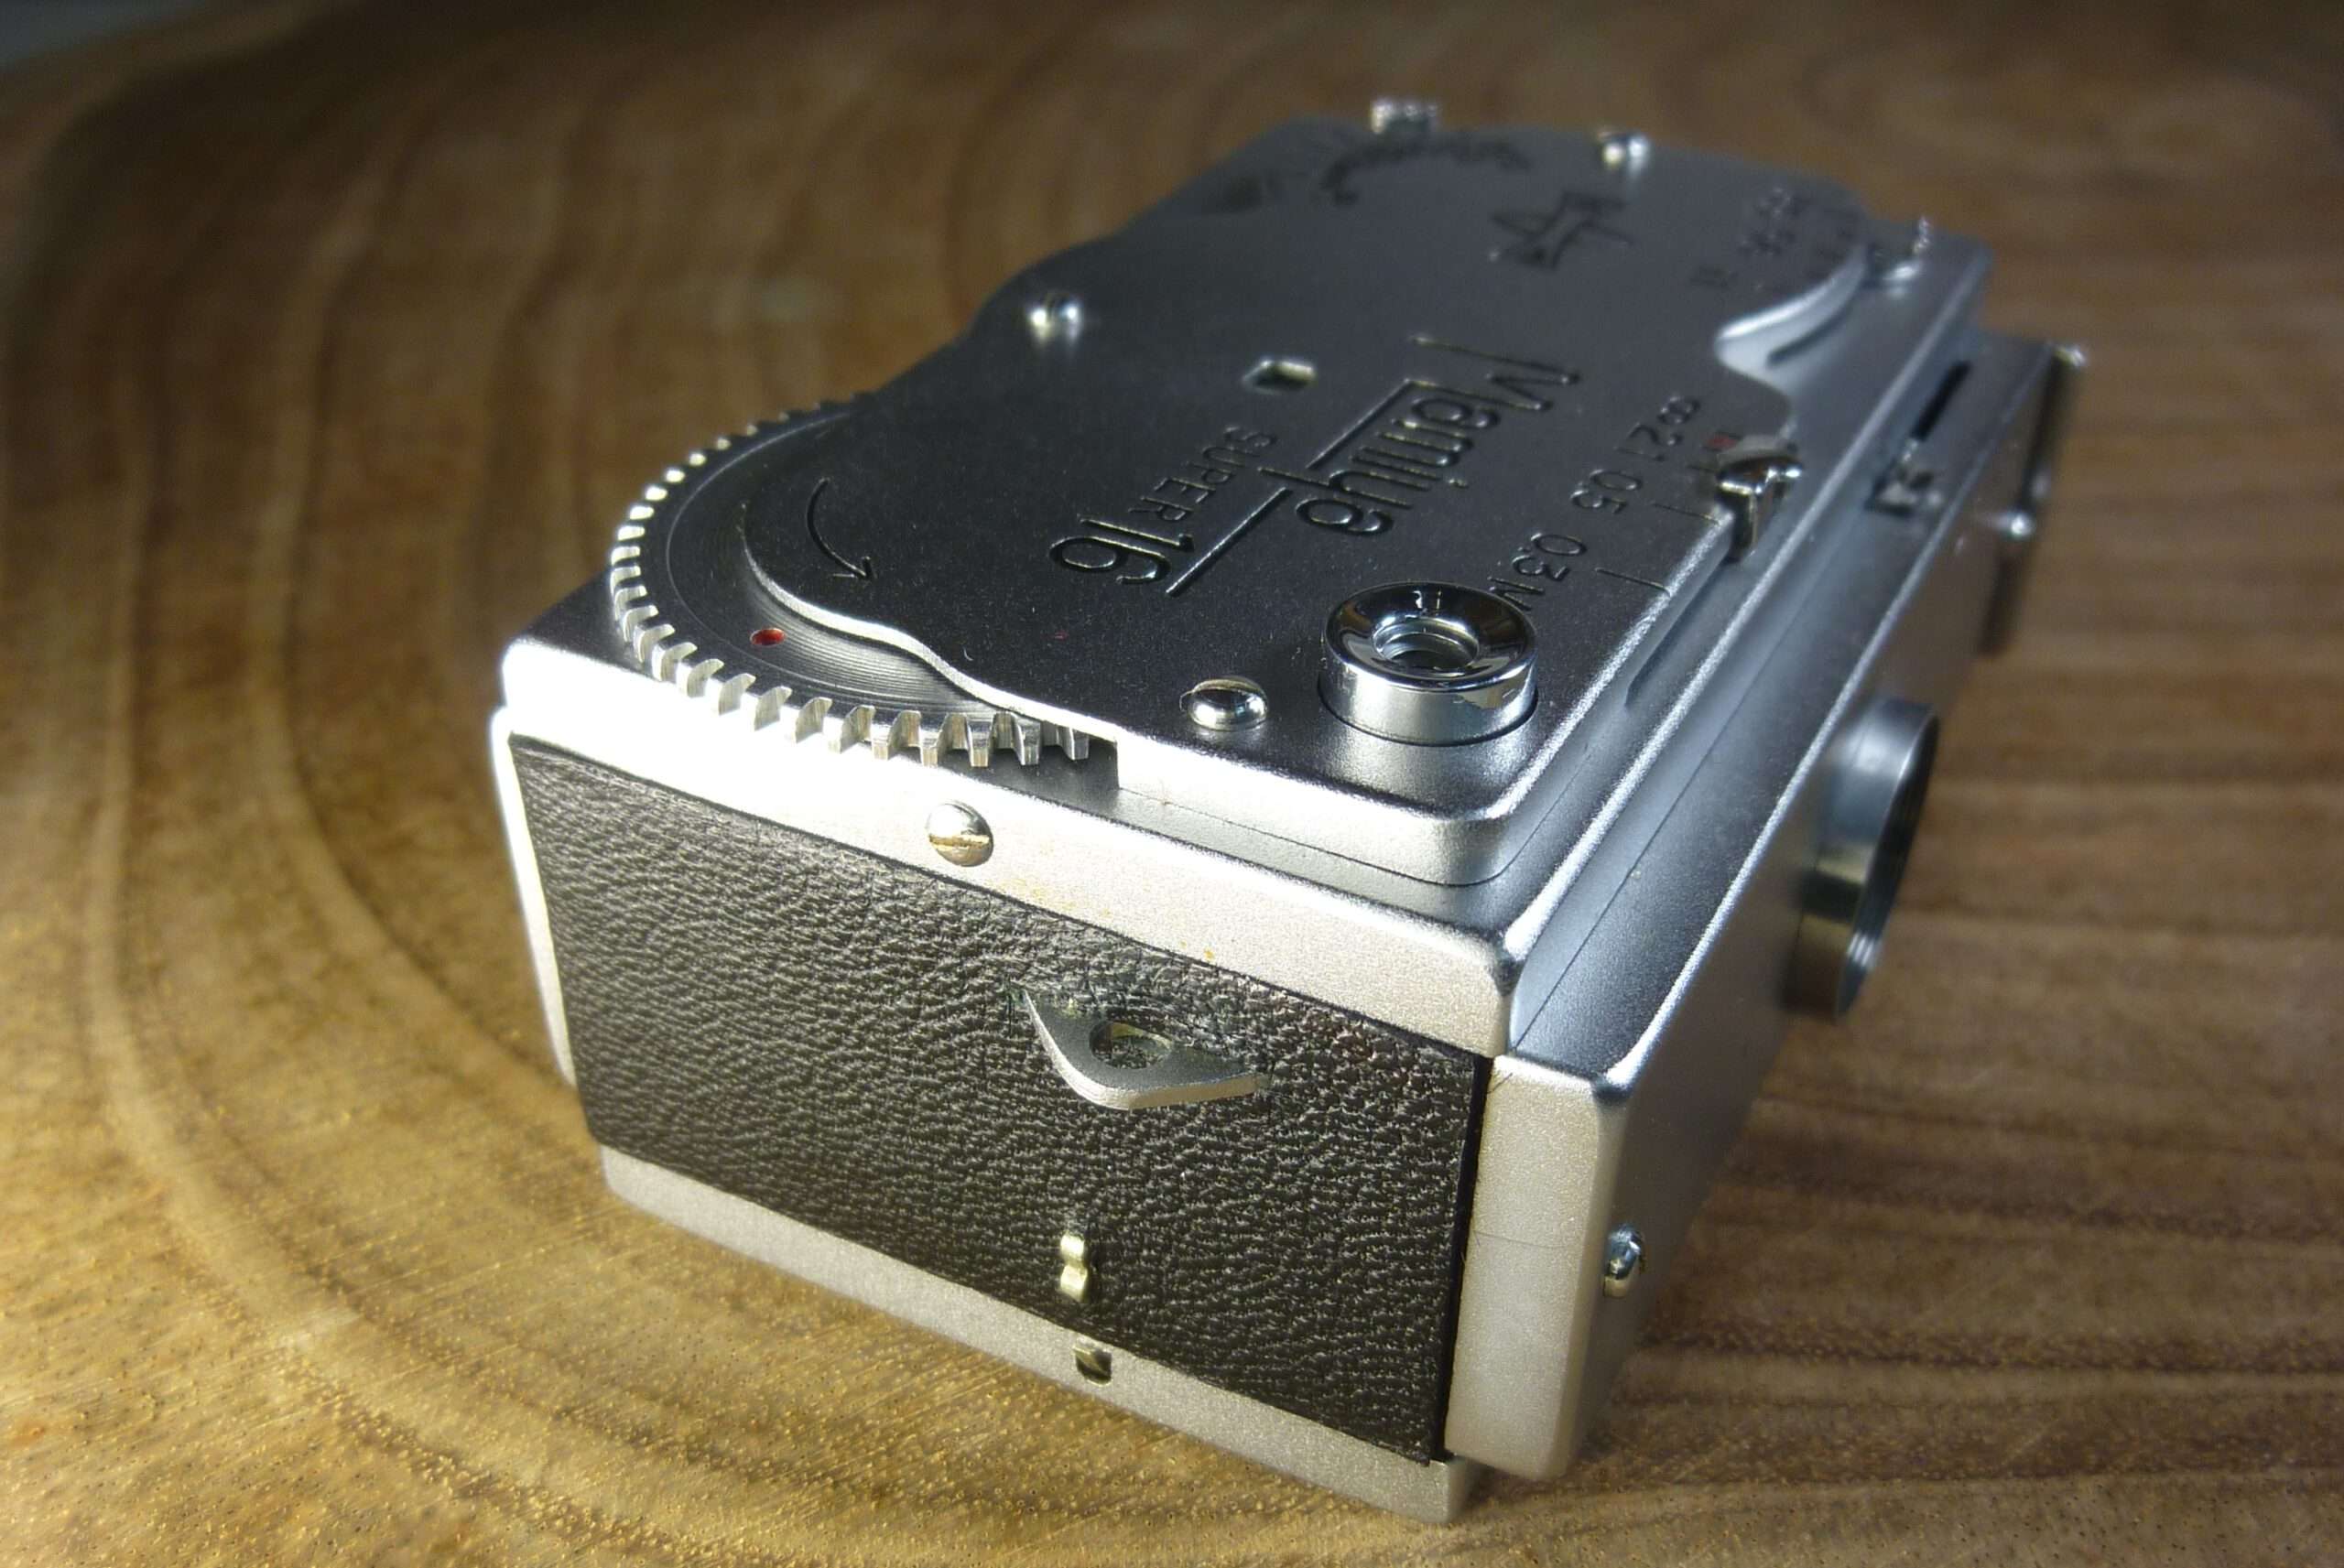
The first step: crossing the threshold
The journey begins with the simplest of tools and a deep breath. Opening a Mamiya super 16 is like uncovering the secrets of a bygone era.
There is a specific weight to a Mamiya 16 that defies its size. Holding it in your palm feels less like holding a camera and more like holding a solid ingot of 1950s ambition. It’s cold, heavy, and silent – a sleeping piece of history waiting for a heartbeat.
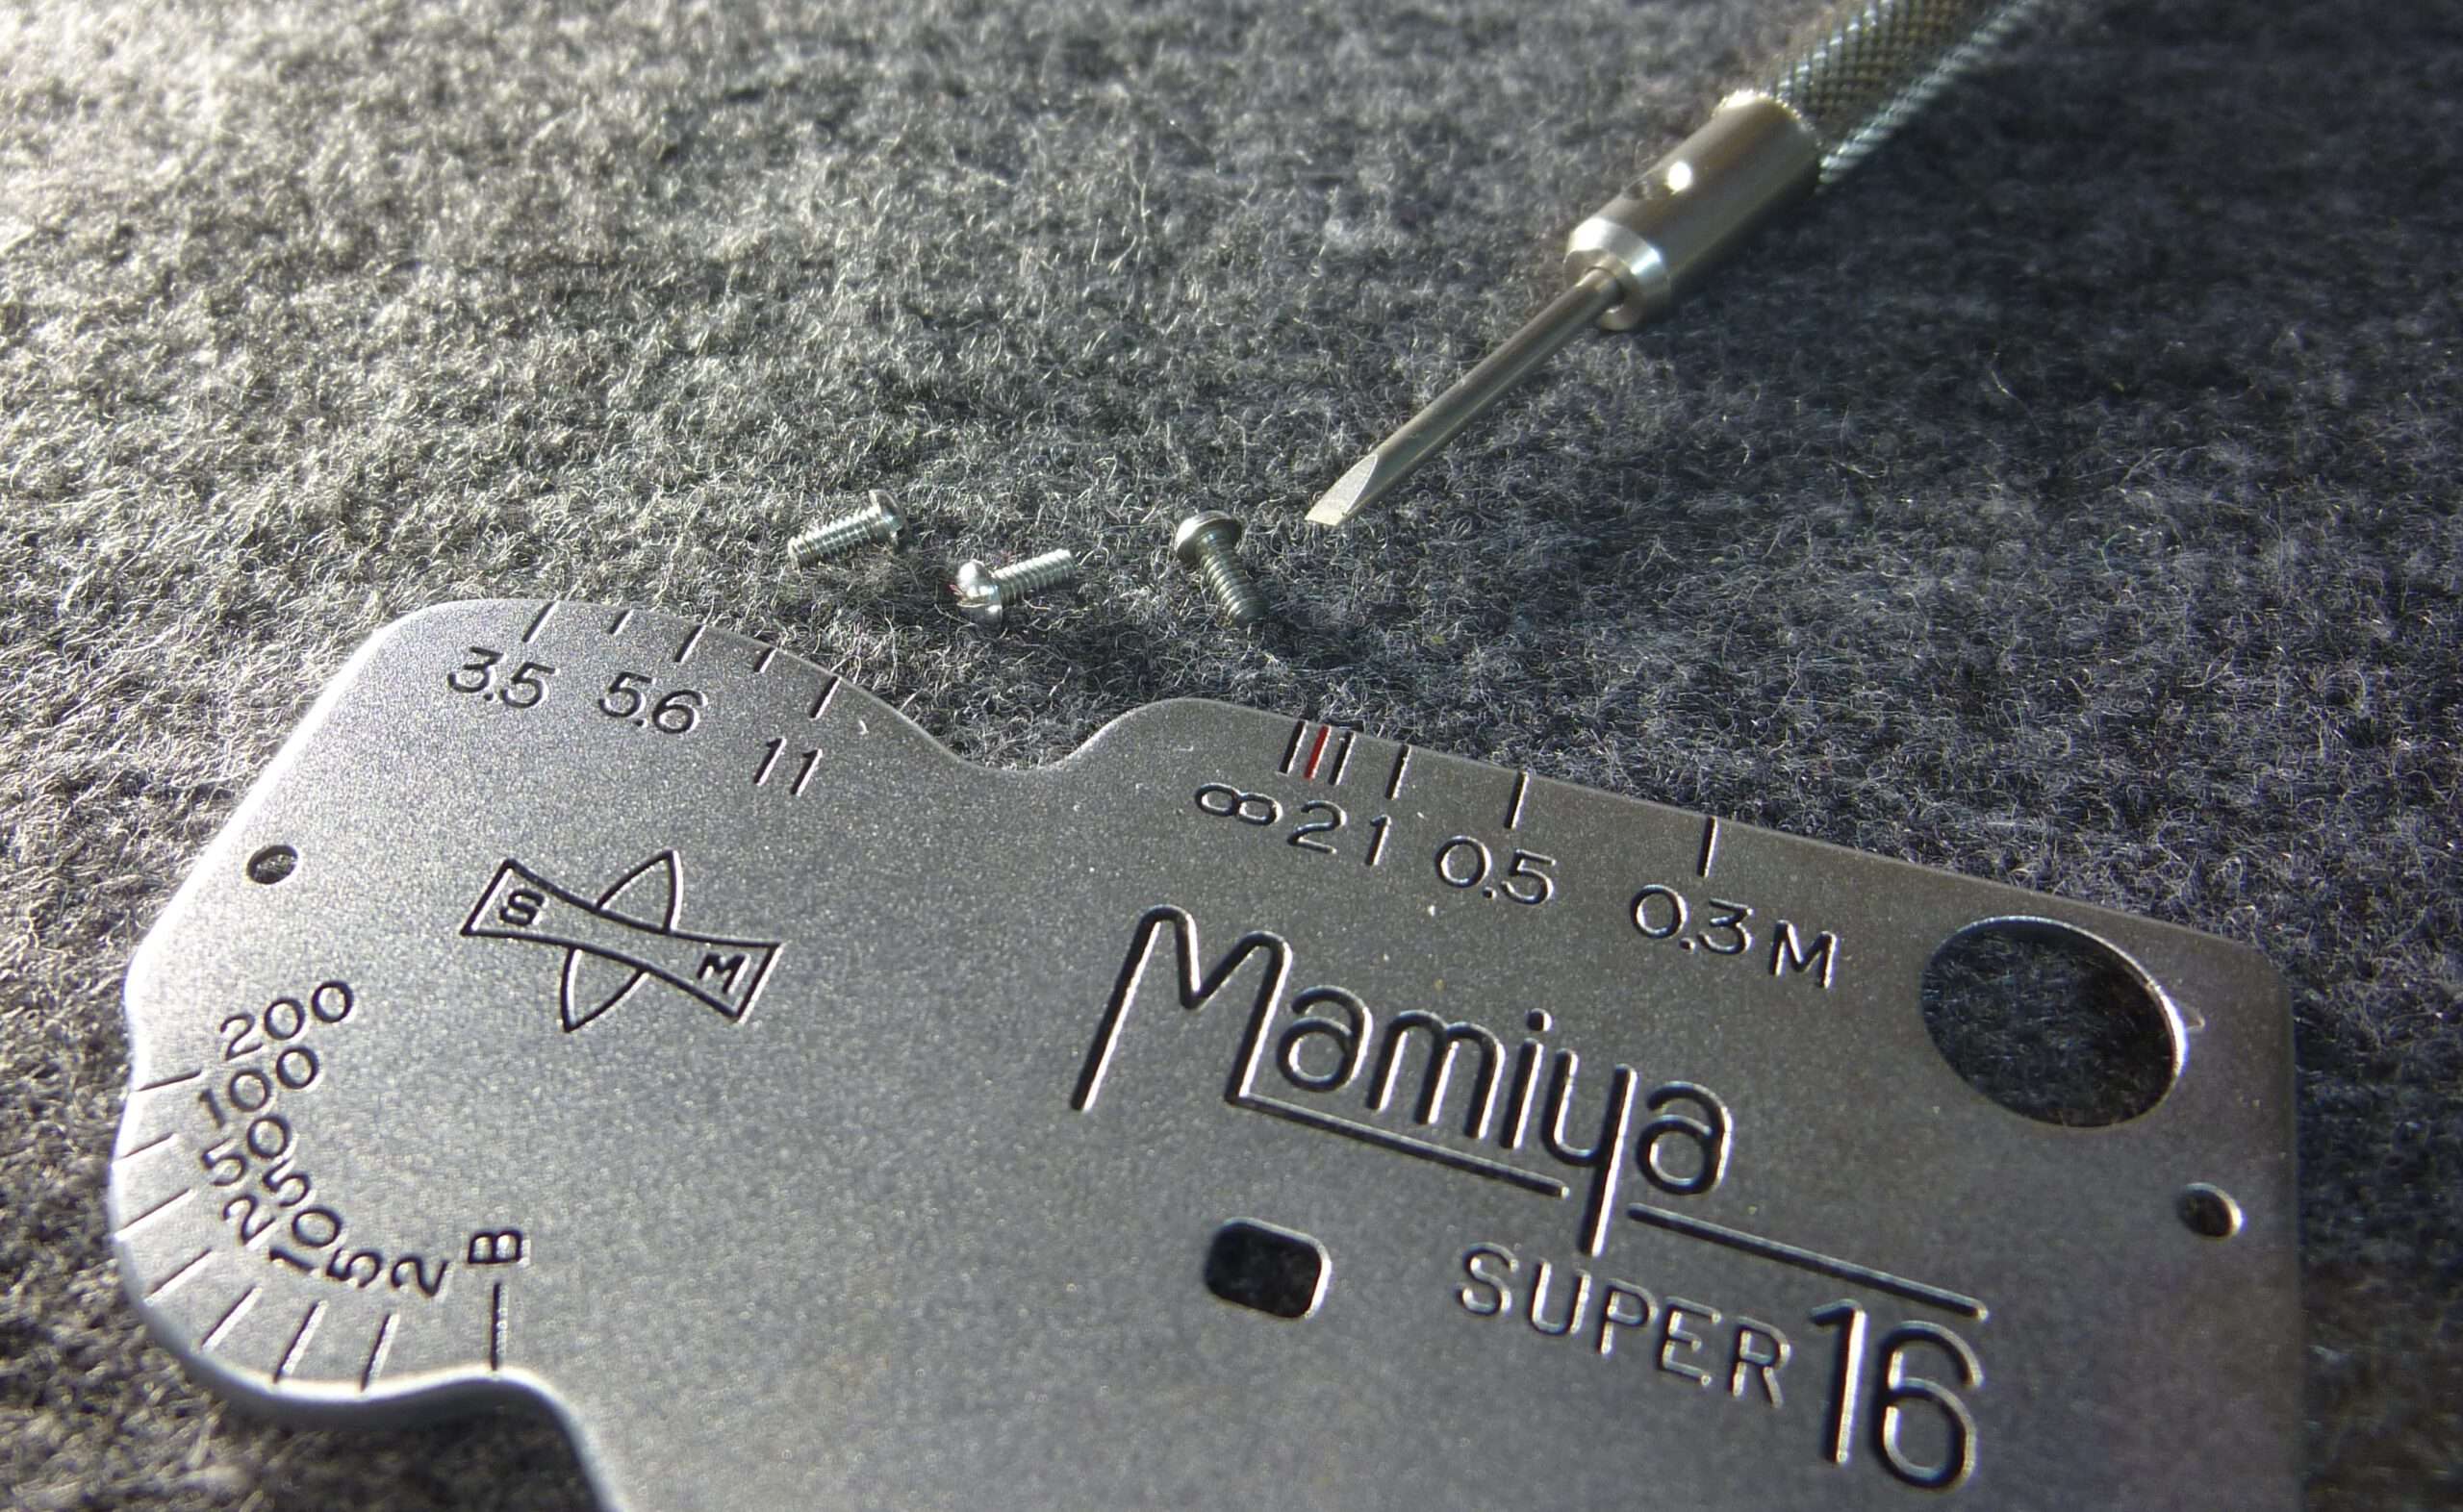
My attention now turns to the tiny slotted screws that hold the top plate in place. Using a watchmaker’s screwdriver, I search for the exact moment when the metal tip engages with the screw slot. This is the first “moment of now” – a tactile dialogue that requires my complete presence. Too much force and the camera will be damaged; too little and I won’t get anywhere.
As the screws loosen, I hear soft, metallic “clicks” perceptible better to the fingertips. Lifting the top plate is like opening a pocket watch from another century.
The strategy of the paper trail
My process begins not with a screwdriver, but with a pen and a checklist. As I delve into the camera’s internals, I write a checklist and the steps I want to perform. I’ve found that noting the storing place for every specific component is the only way to stay sane.
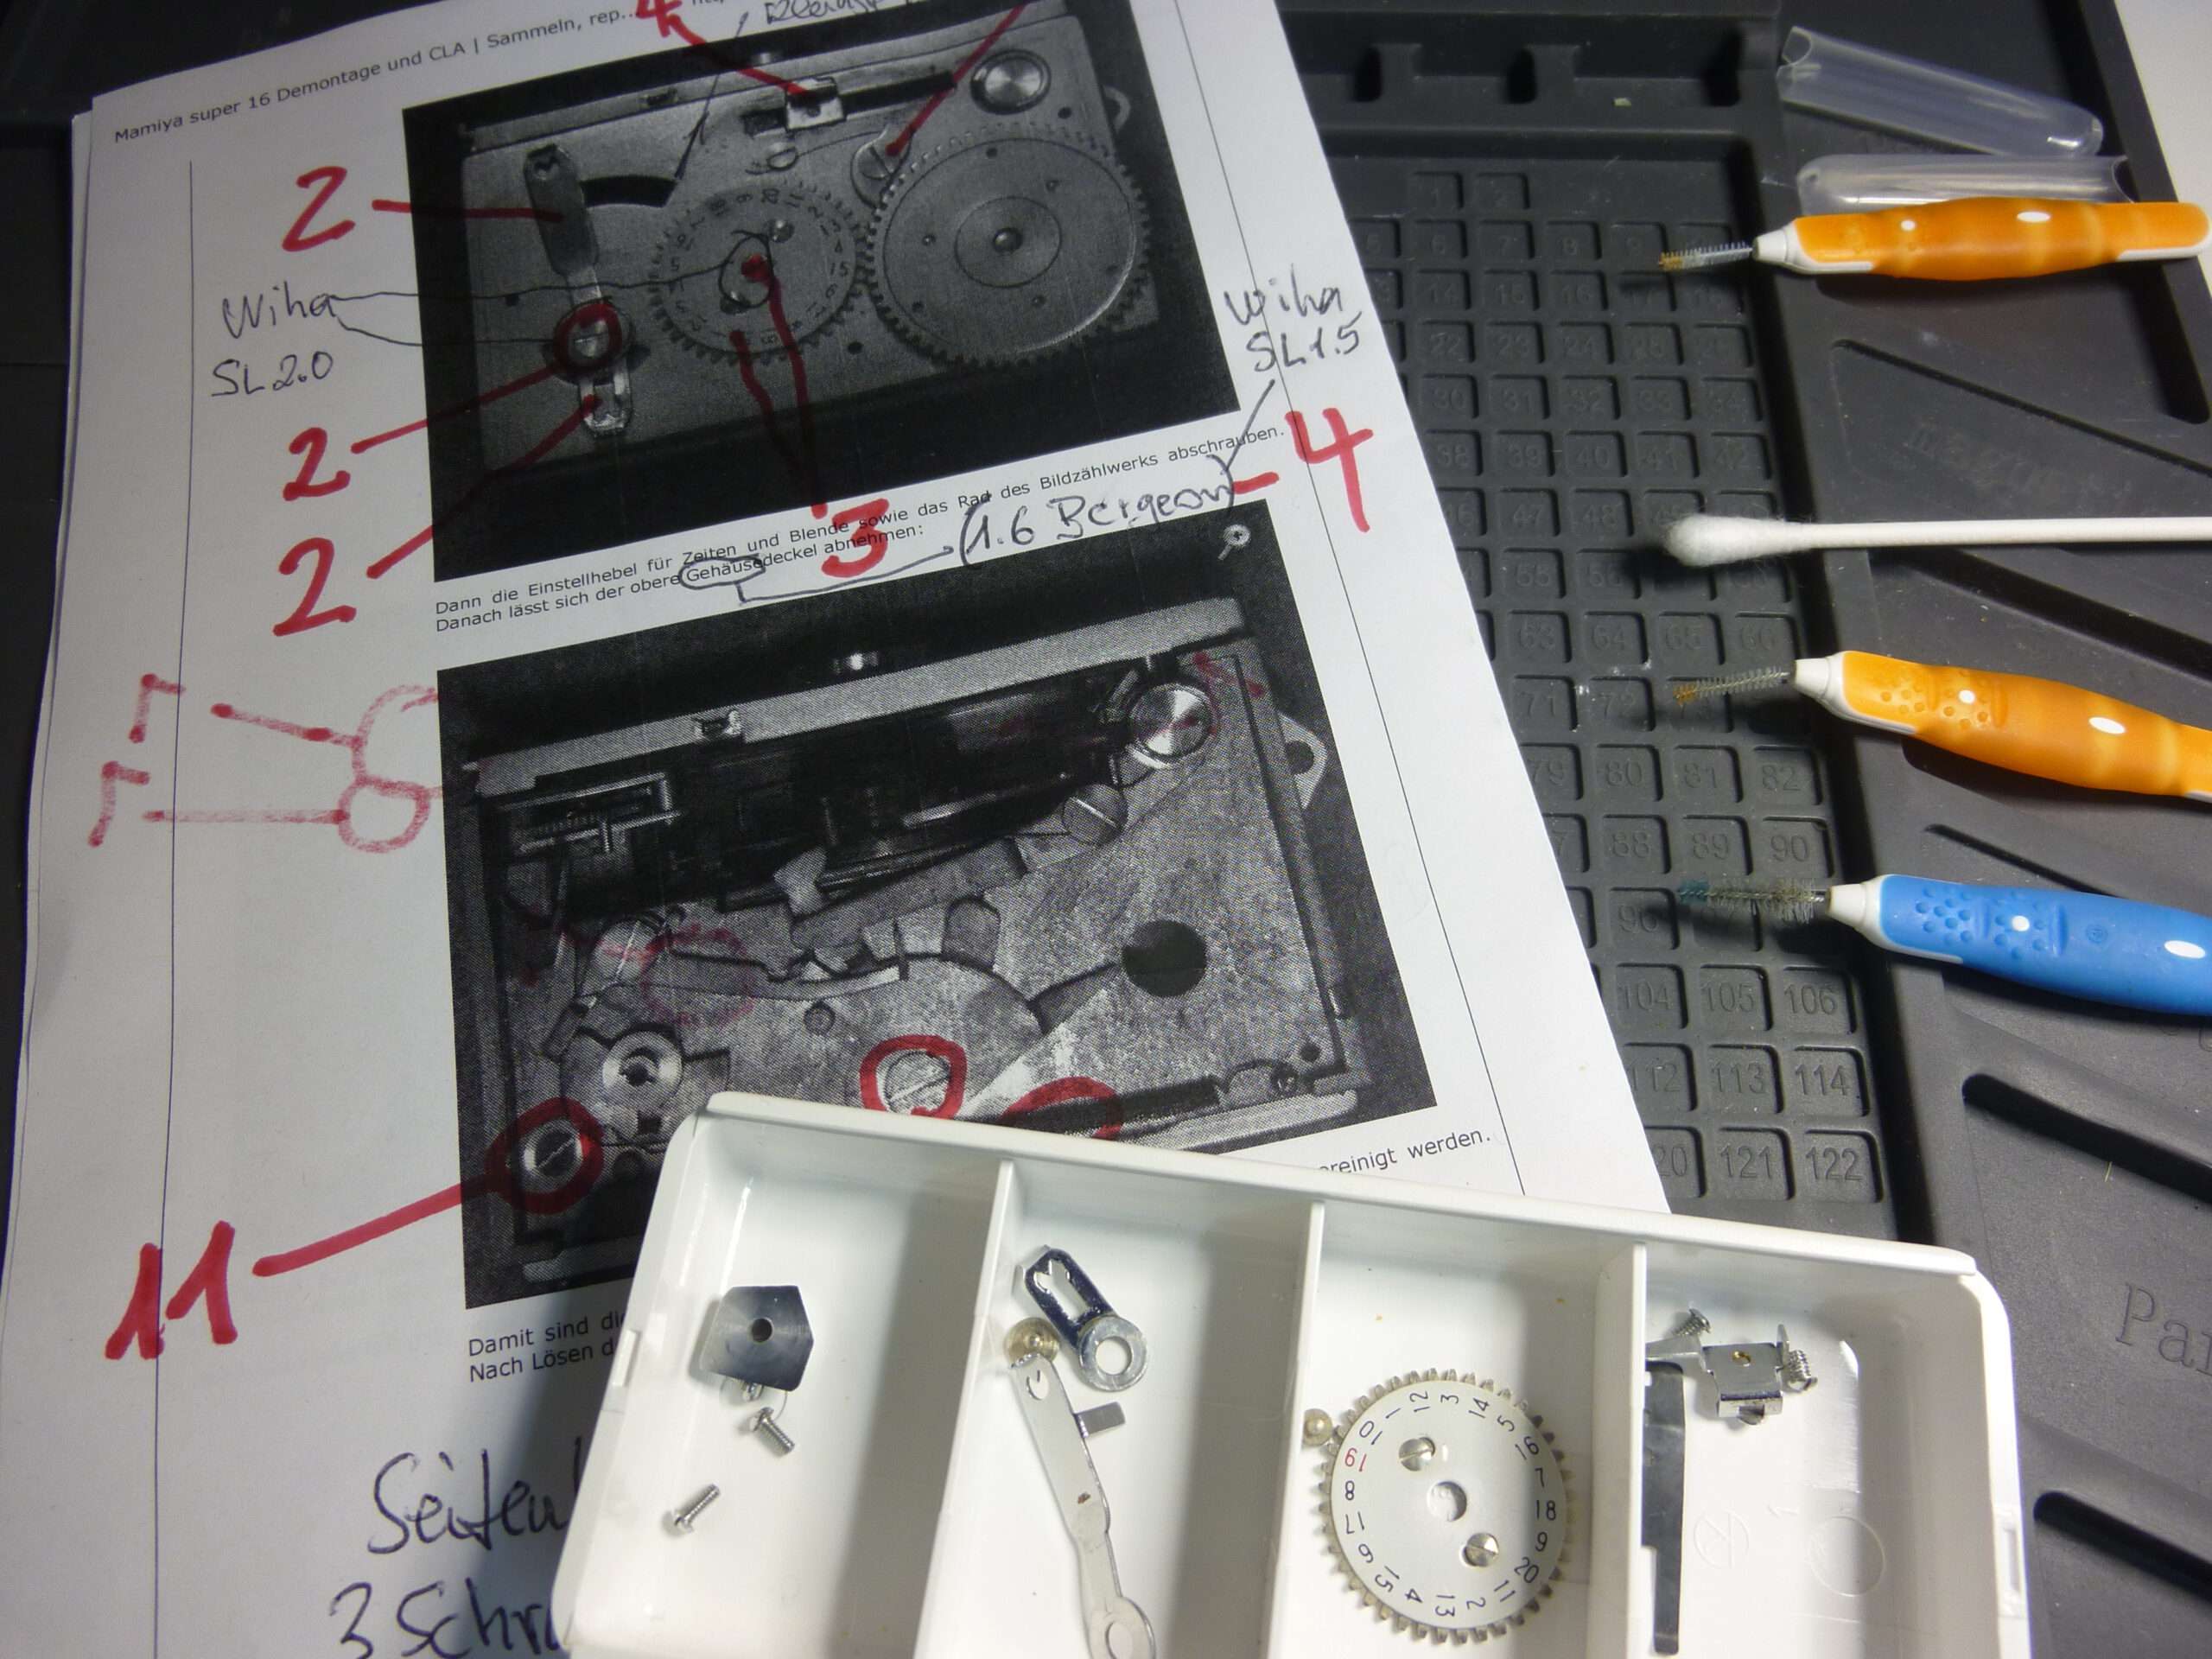
When I pull a screw from the frame counter or the shutter assembly, I immediately note the exact tool used. It’s a conversation with my future self, ensuring that when it’s time to rebuild, I won’t have to guess which driver fits which delicate head.
The heart of the operation is the white compartmentalized tray. It’s my physical database. As the “skin” of the camera comes off, exposing the intricate brass gears and the frame counter dial, each piece finds a home in its own specific numbered cell in one of my many boxes. There is a certain rhythm to it: unscrew, document on the diagram, and deposit into the tray from left to right. Once I have removed the top cover and all the parts underneath, I have a chronological “timeline” of the parts.
Spread across my magnetic mat is also a toolkit that looks more like it belongs in a dentist’s office than a camera shop. Interdental brushes and fine-tipped swabs are lined up, ready to whisk away decades of dried-up grease. These tools allow for a level of surgical cleanliness that’s mandatory for a camera this small; even a single stray fiber could jam the delicate shutter timing.
75-year-old grease
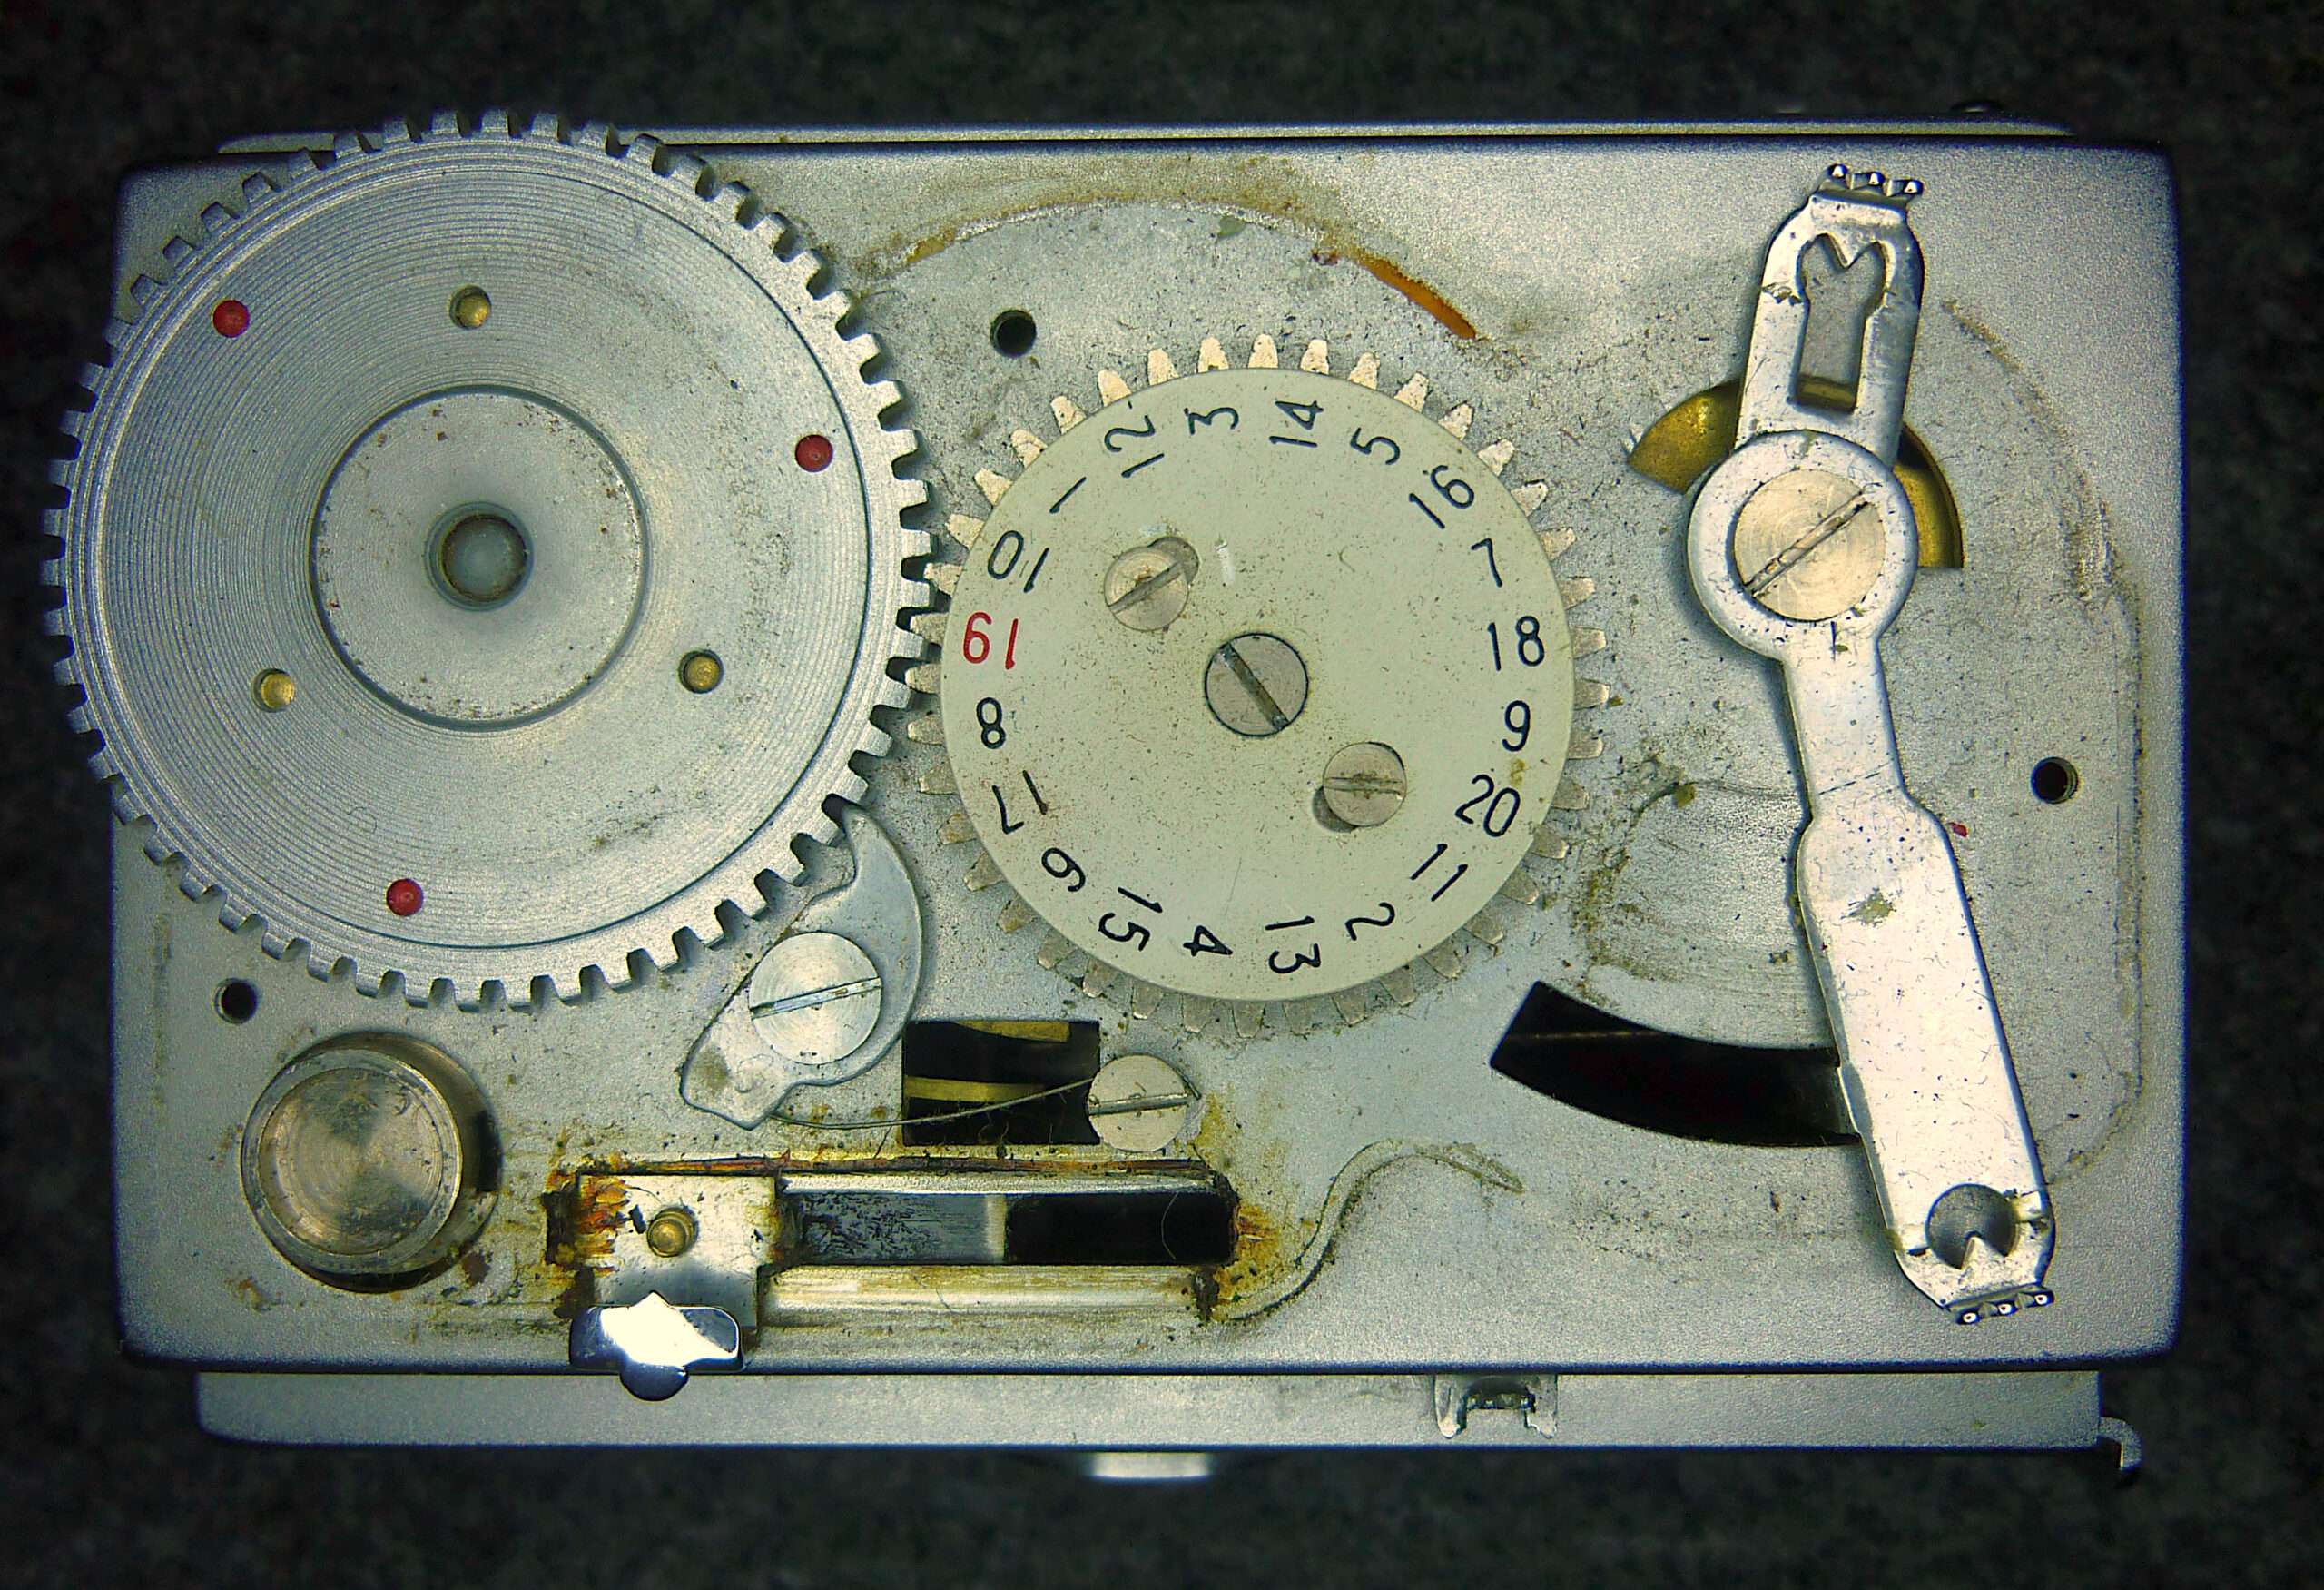
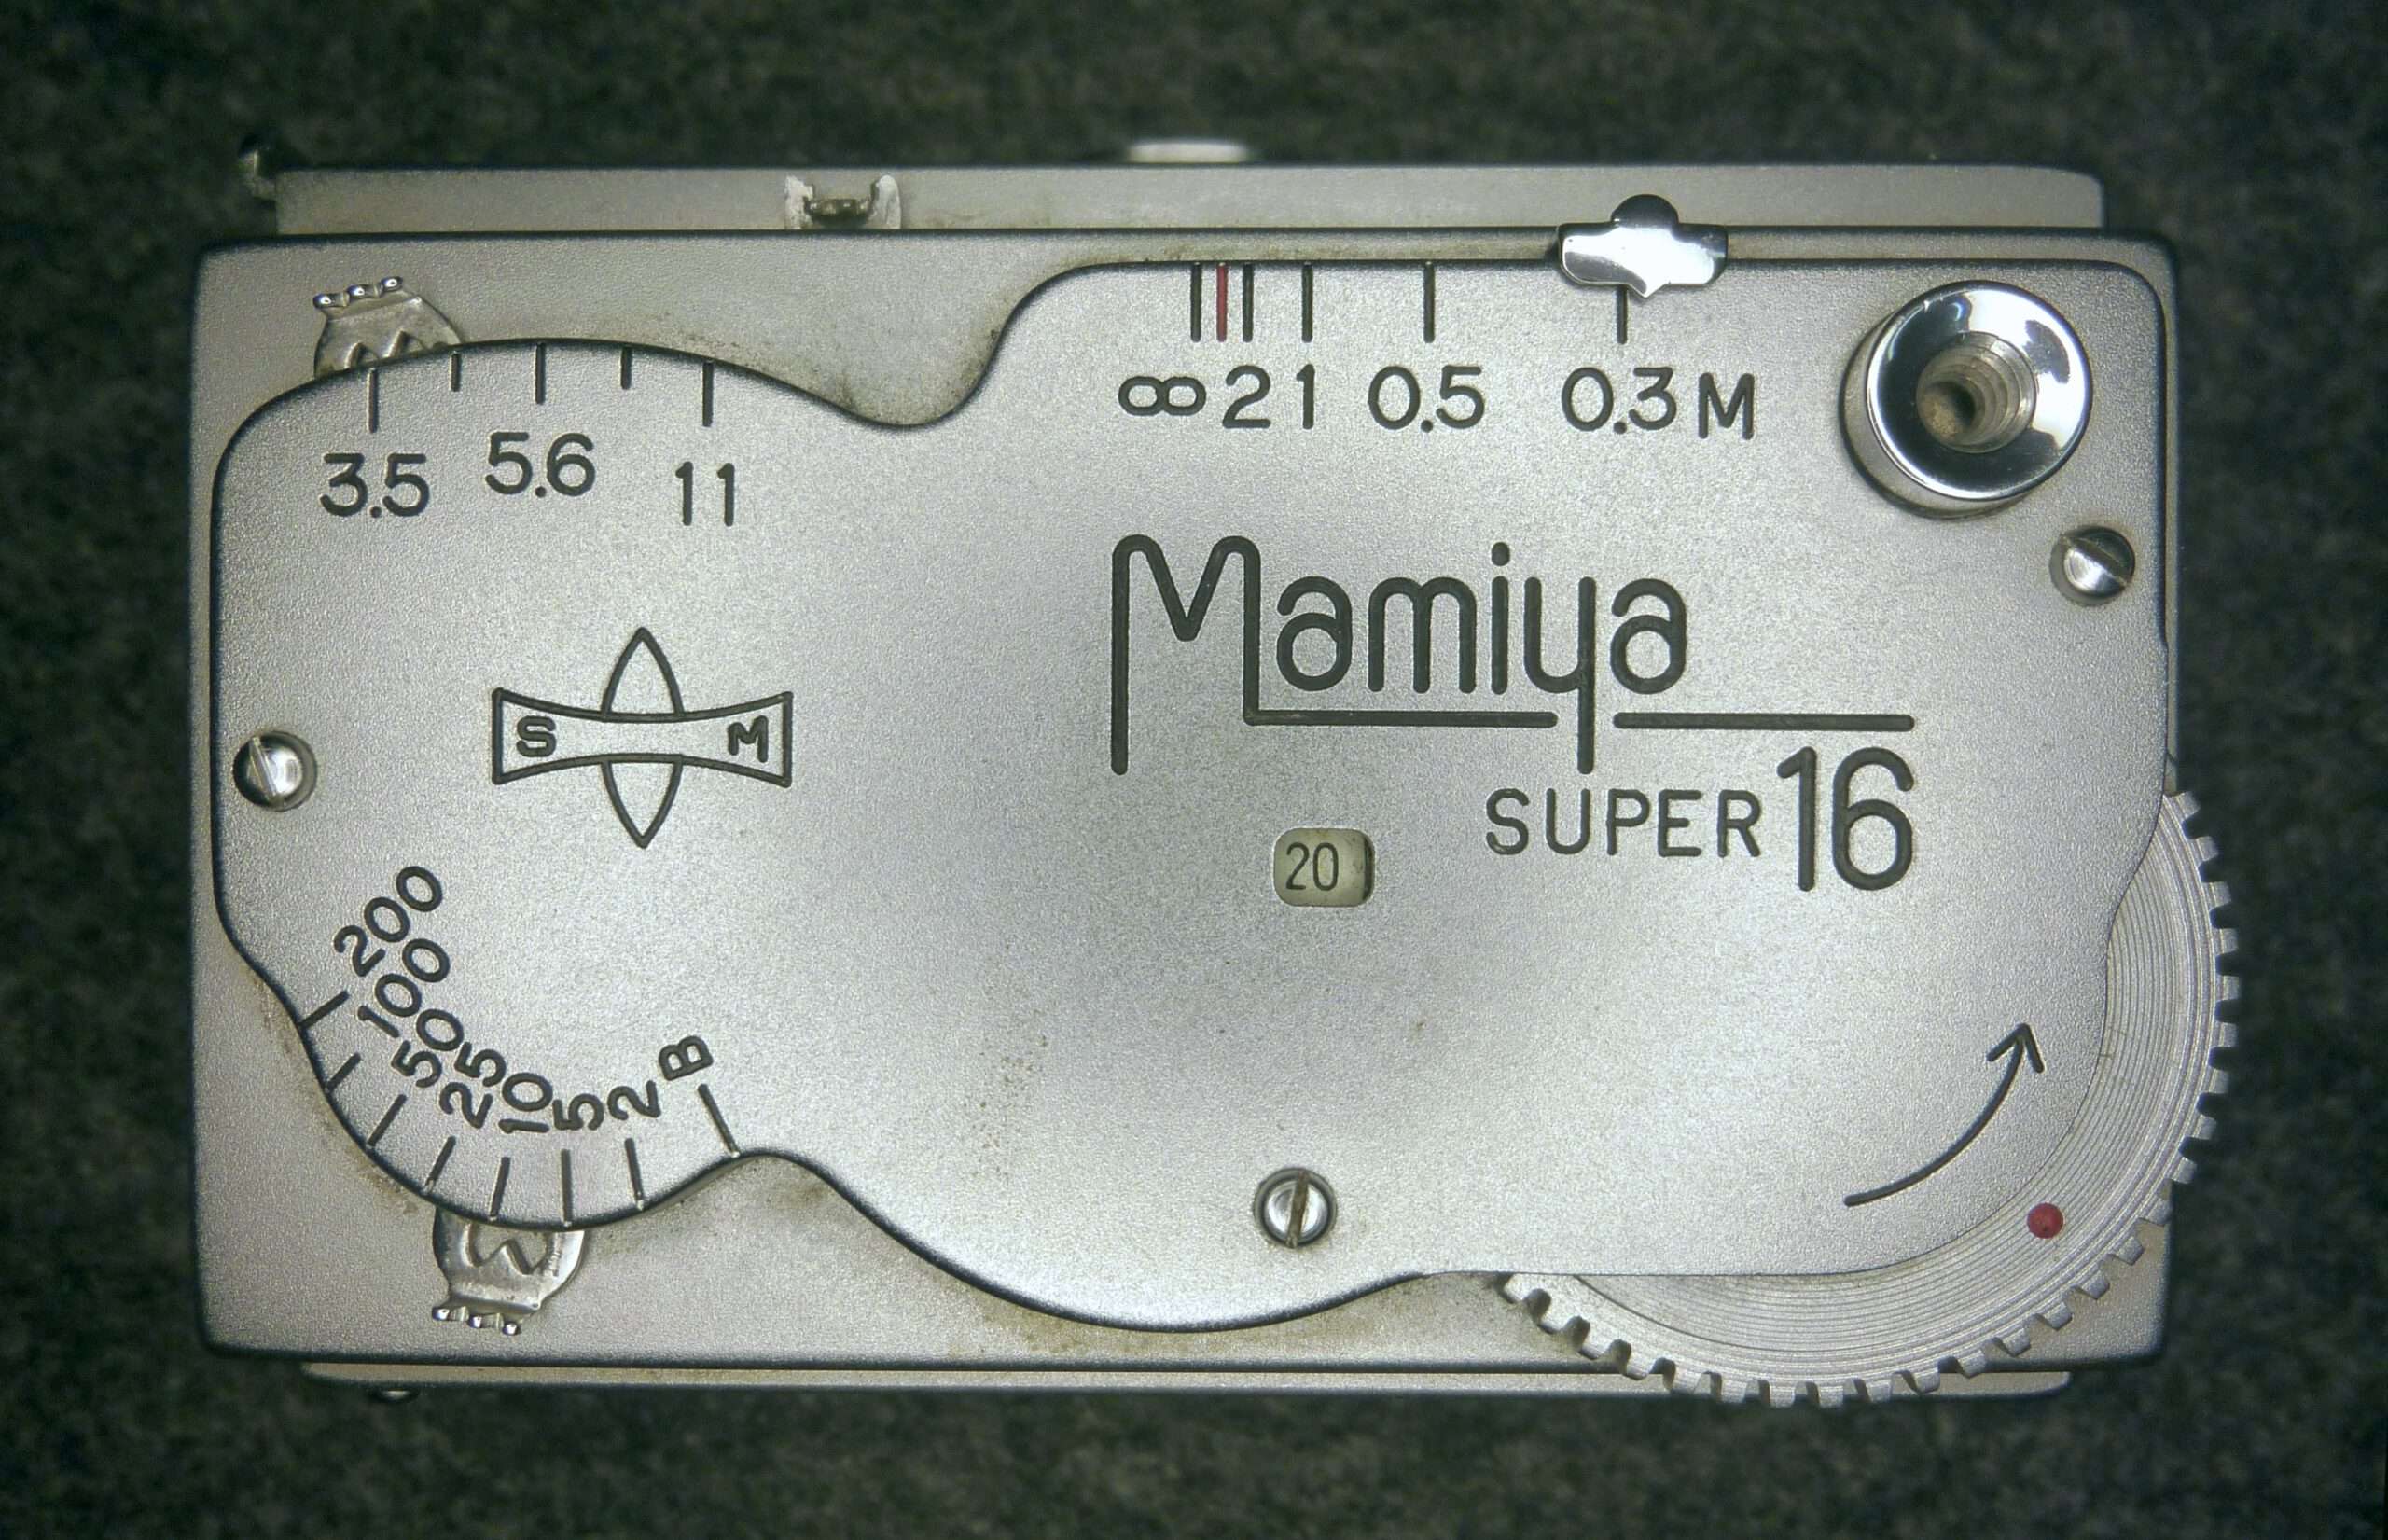
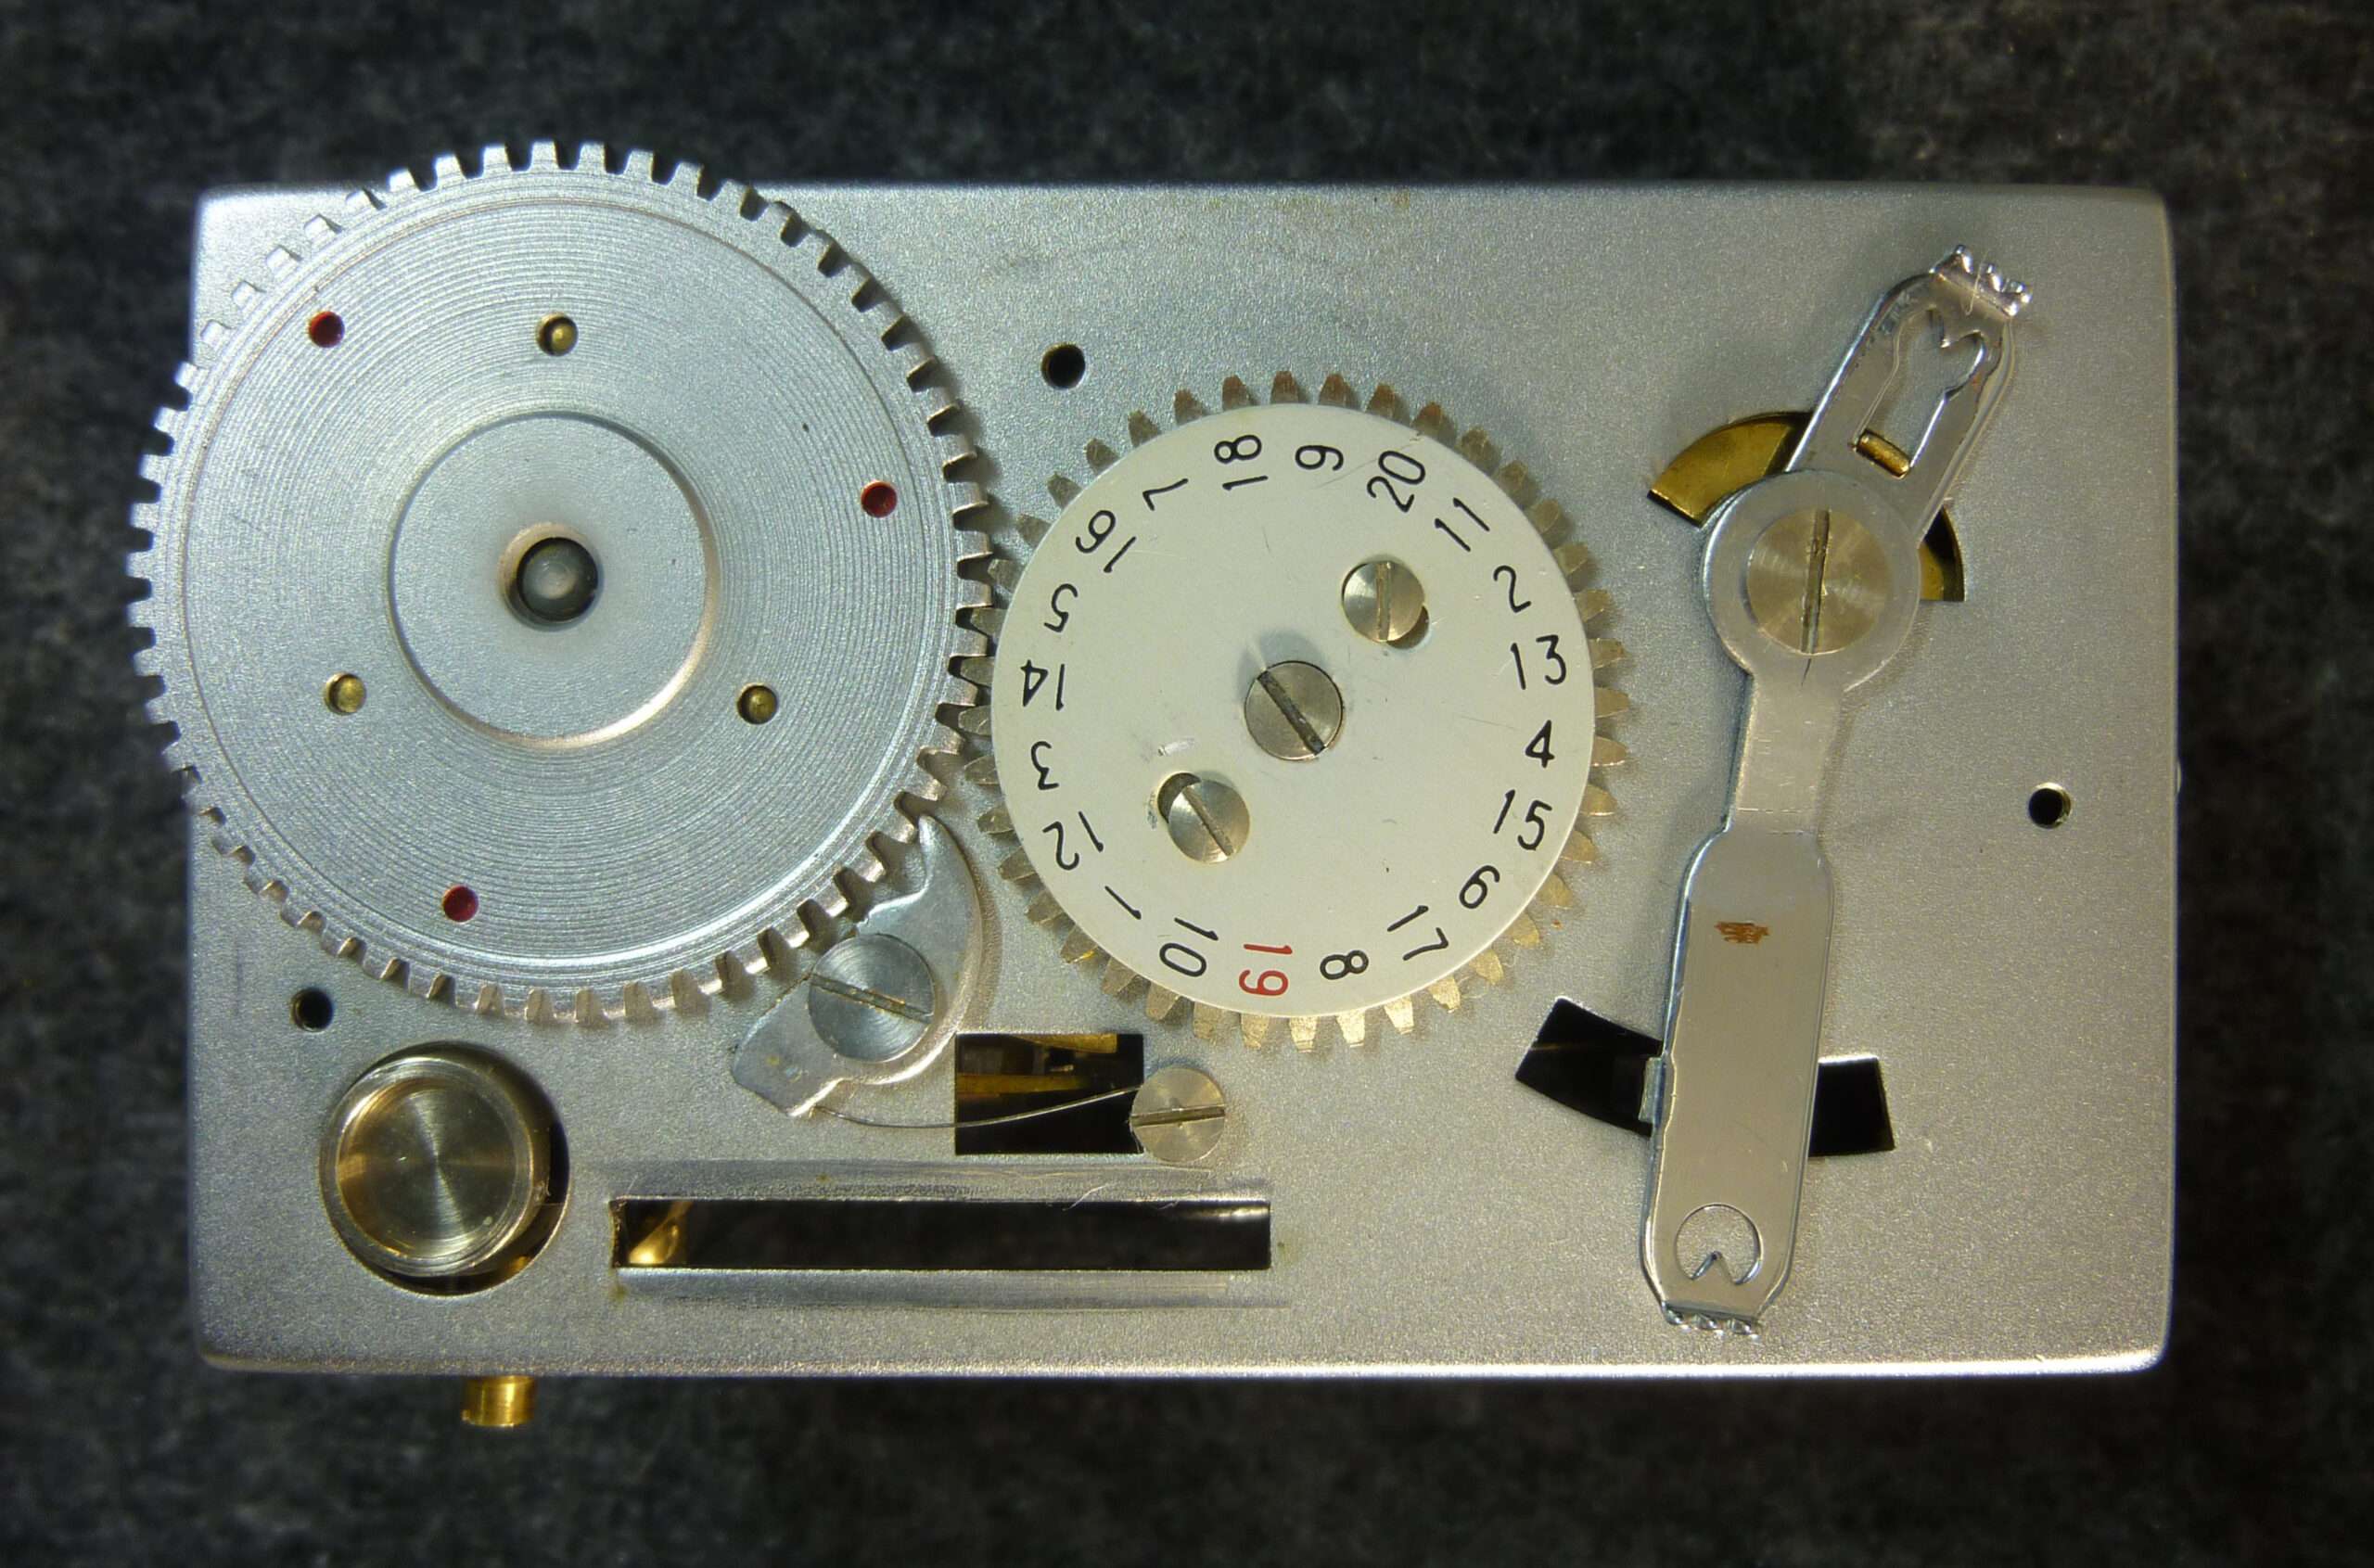
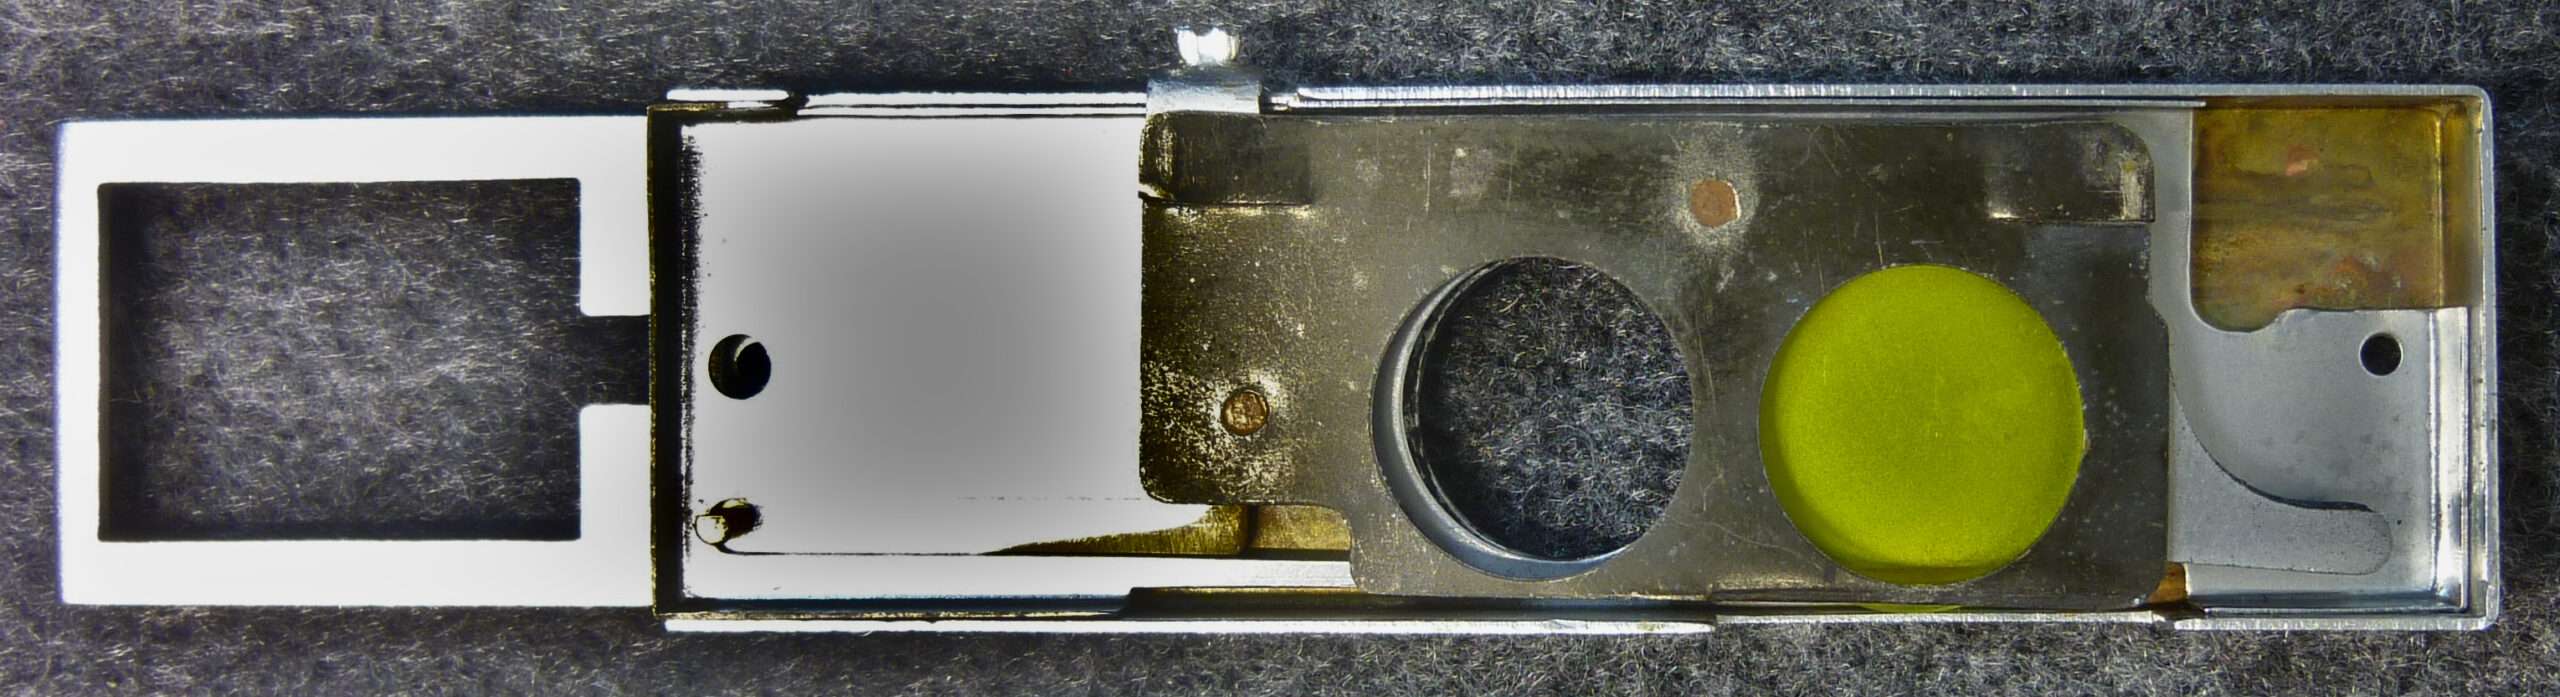
Now I can see the control center of my Mamiya super 16: the winding wheel, the frame counter wheel, and the ingenious sliding mechanisms.
The sight of the control levers, still bearing traces of decades-old, hardened grease, is not a sign of decay to me. It is an invitation.
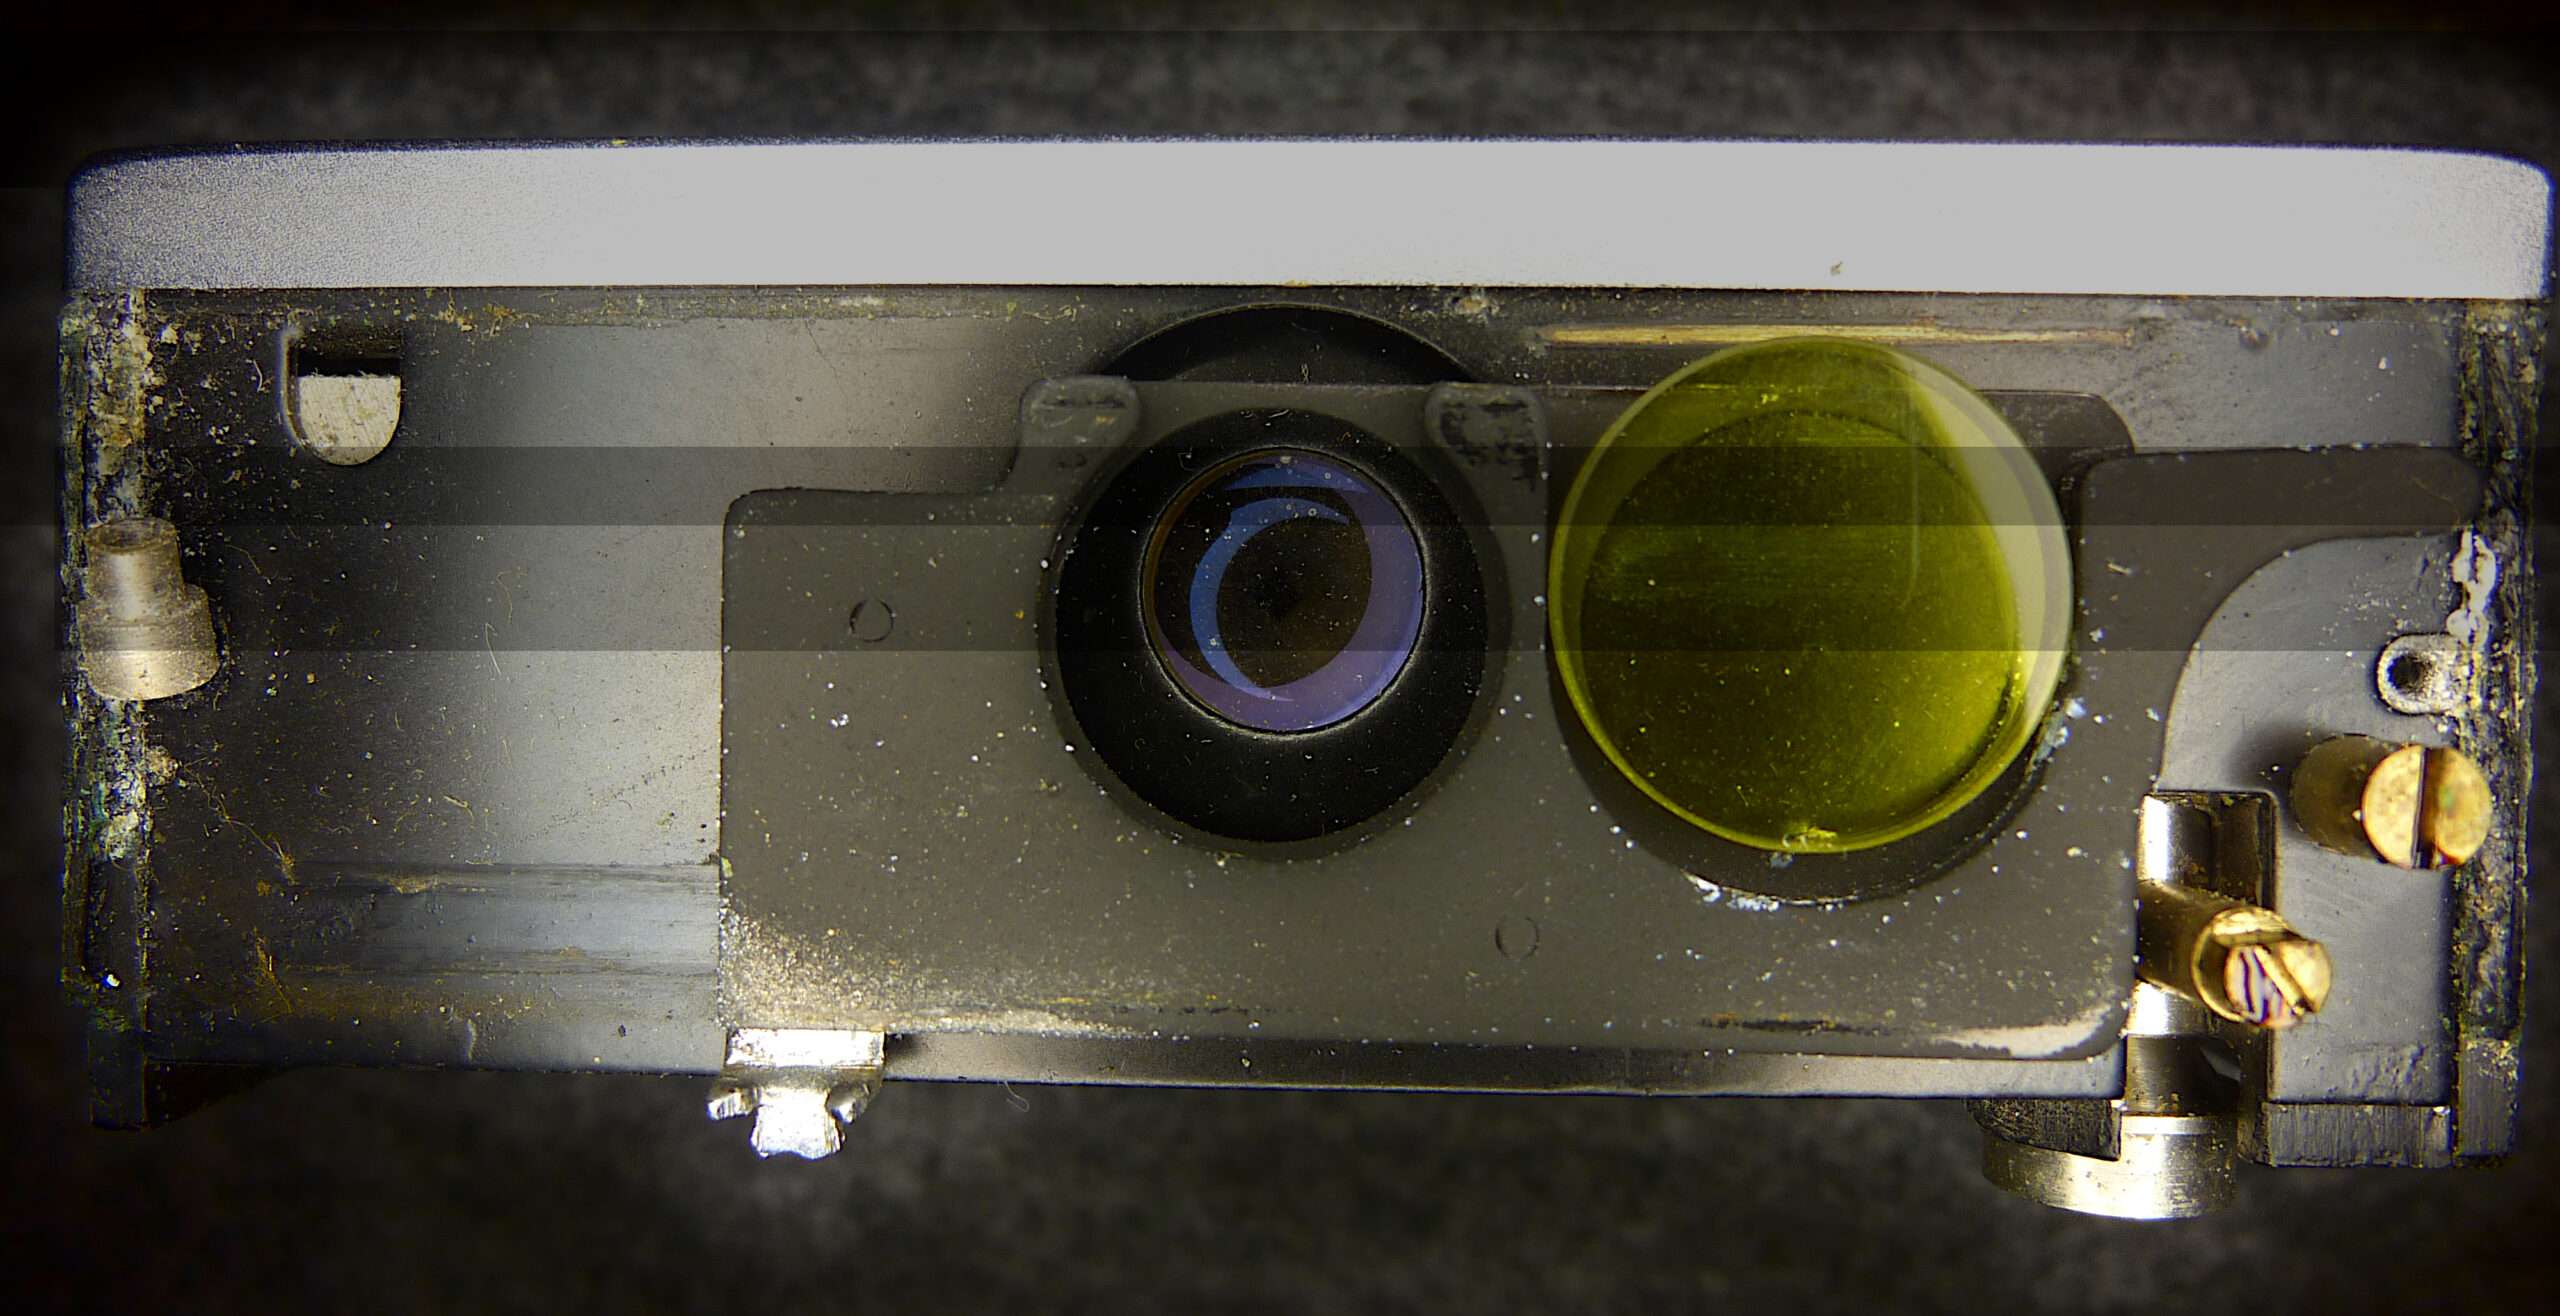
Next, I remove the front of the housing. Behind it, I can now see the lens directly for the first time. It is flawless. Next to it is the yellow filter, held in place by the sliding plate. This also looks quite good. However, the efflorescence on the outer edges does not bode well.
My next glance goes to the inside of the removed front panel. This also contains the metal plate of the front viewfinder window. Here you can also see the remains of the grease generously applied during manufacture and, in it, the track of the filter holder. After 75 years, the grease is now, of course, just a sticky mass.
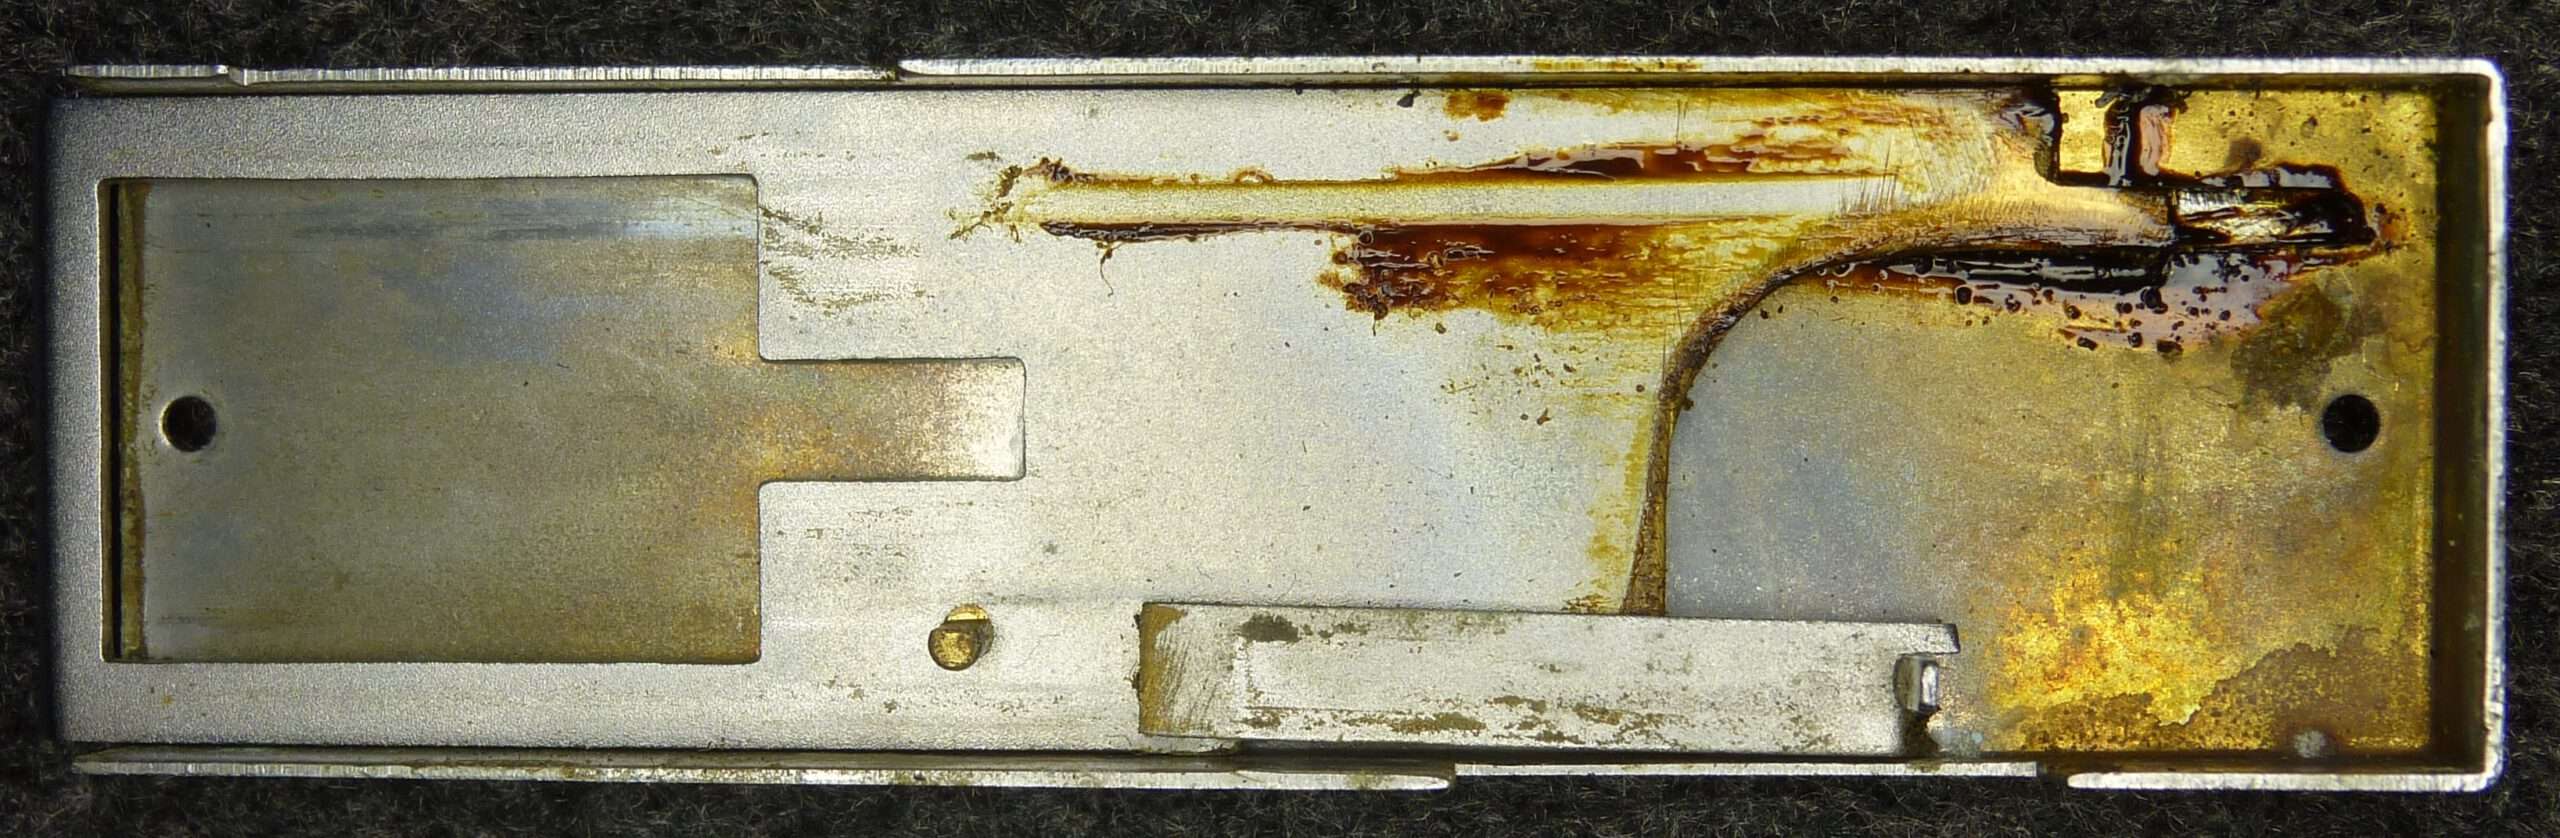
The situation is similar on the rear housing cover. It looks much tidier here. There is only the metal plate of the rear viewfinder. But here too, the situation is the same. A lot of sticky grease that now hinders the sliding out of the viewfinder rather than helping it.
Here, in the silence of the workroom, the cleaning process begins. The air is pleasantly filled with the scent of isopropanol, which I use to moisten the cotton swabs.
I can easily remove the old grease with this, but it takes time. How wonderful! In the end, there is a great sense of achievement once these parts are all clean again and glide easily, even without any grease. However, I will only add the grease at the very end during assembly.

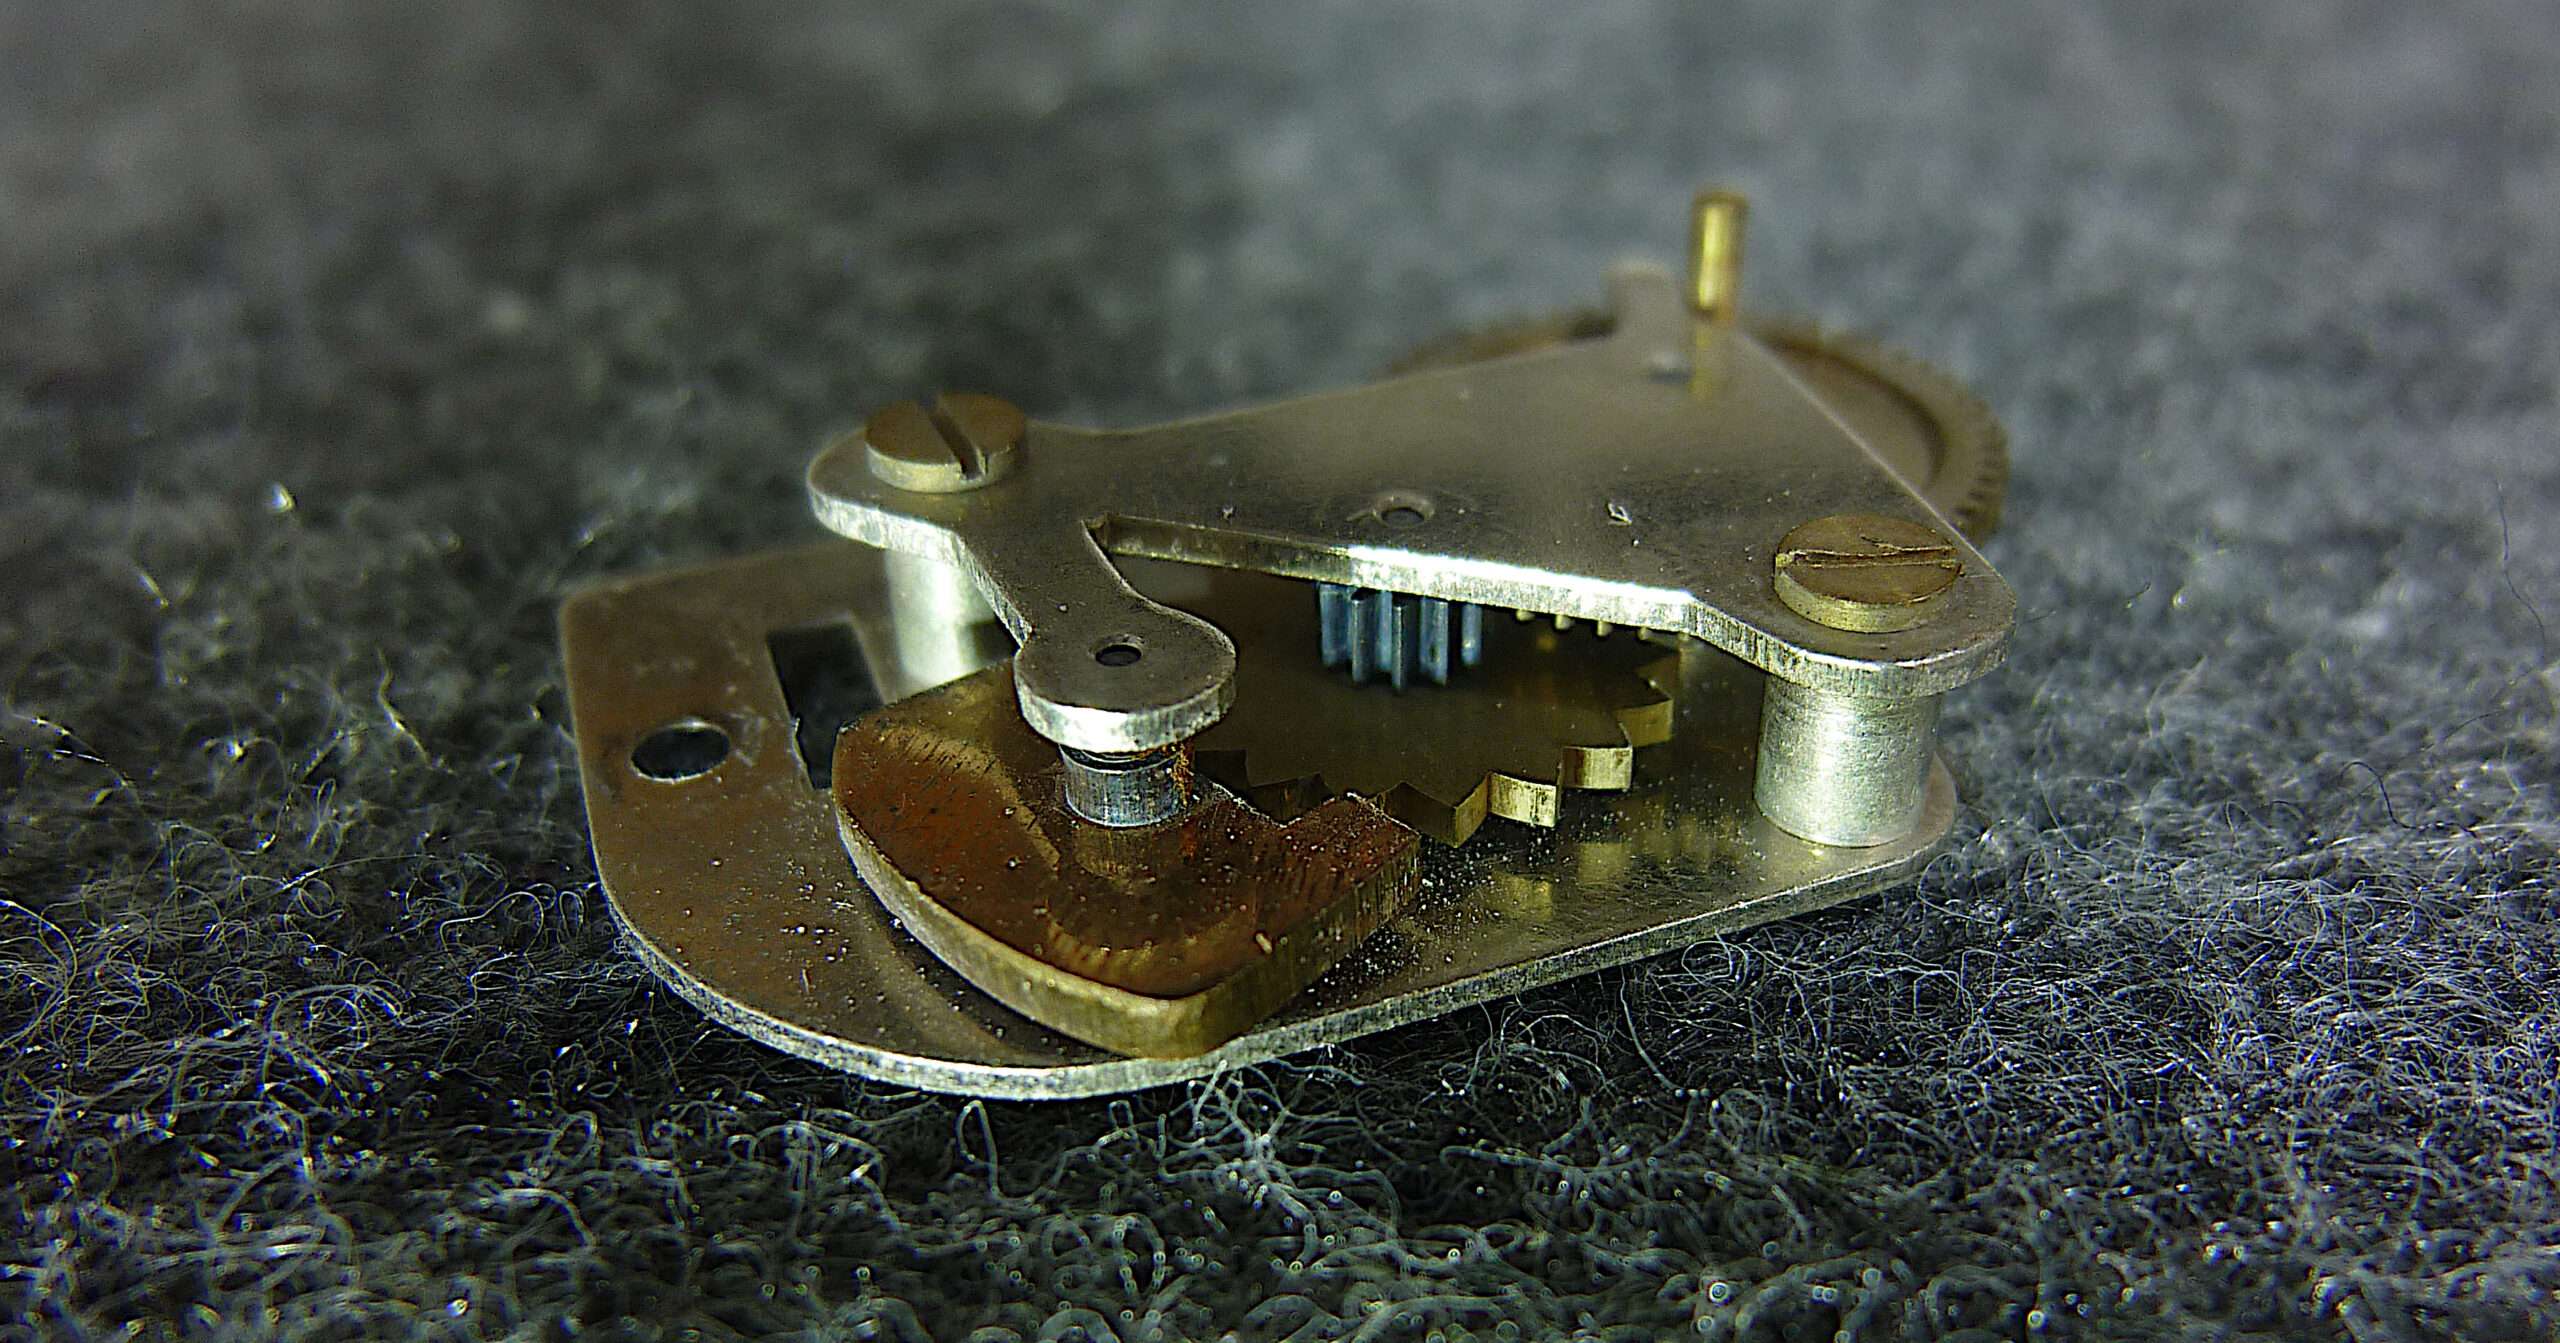
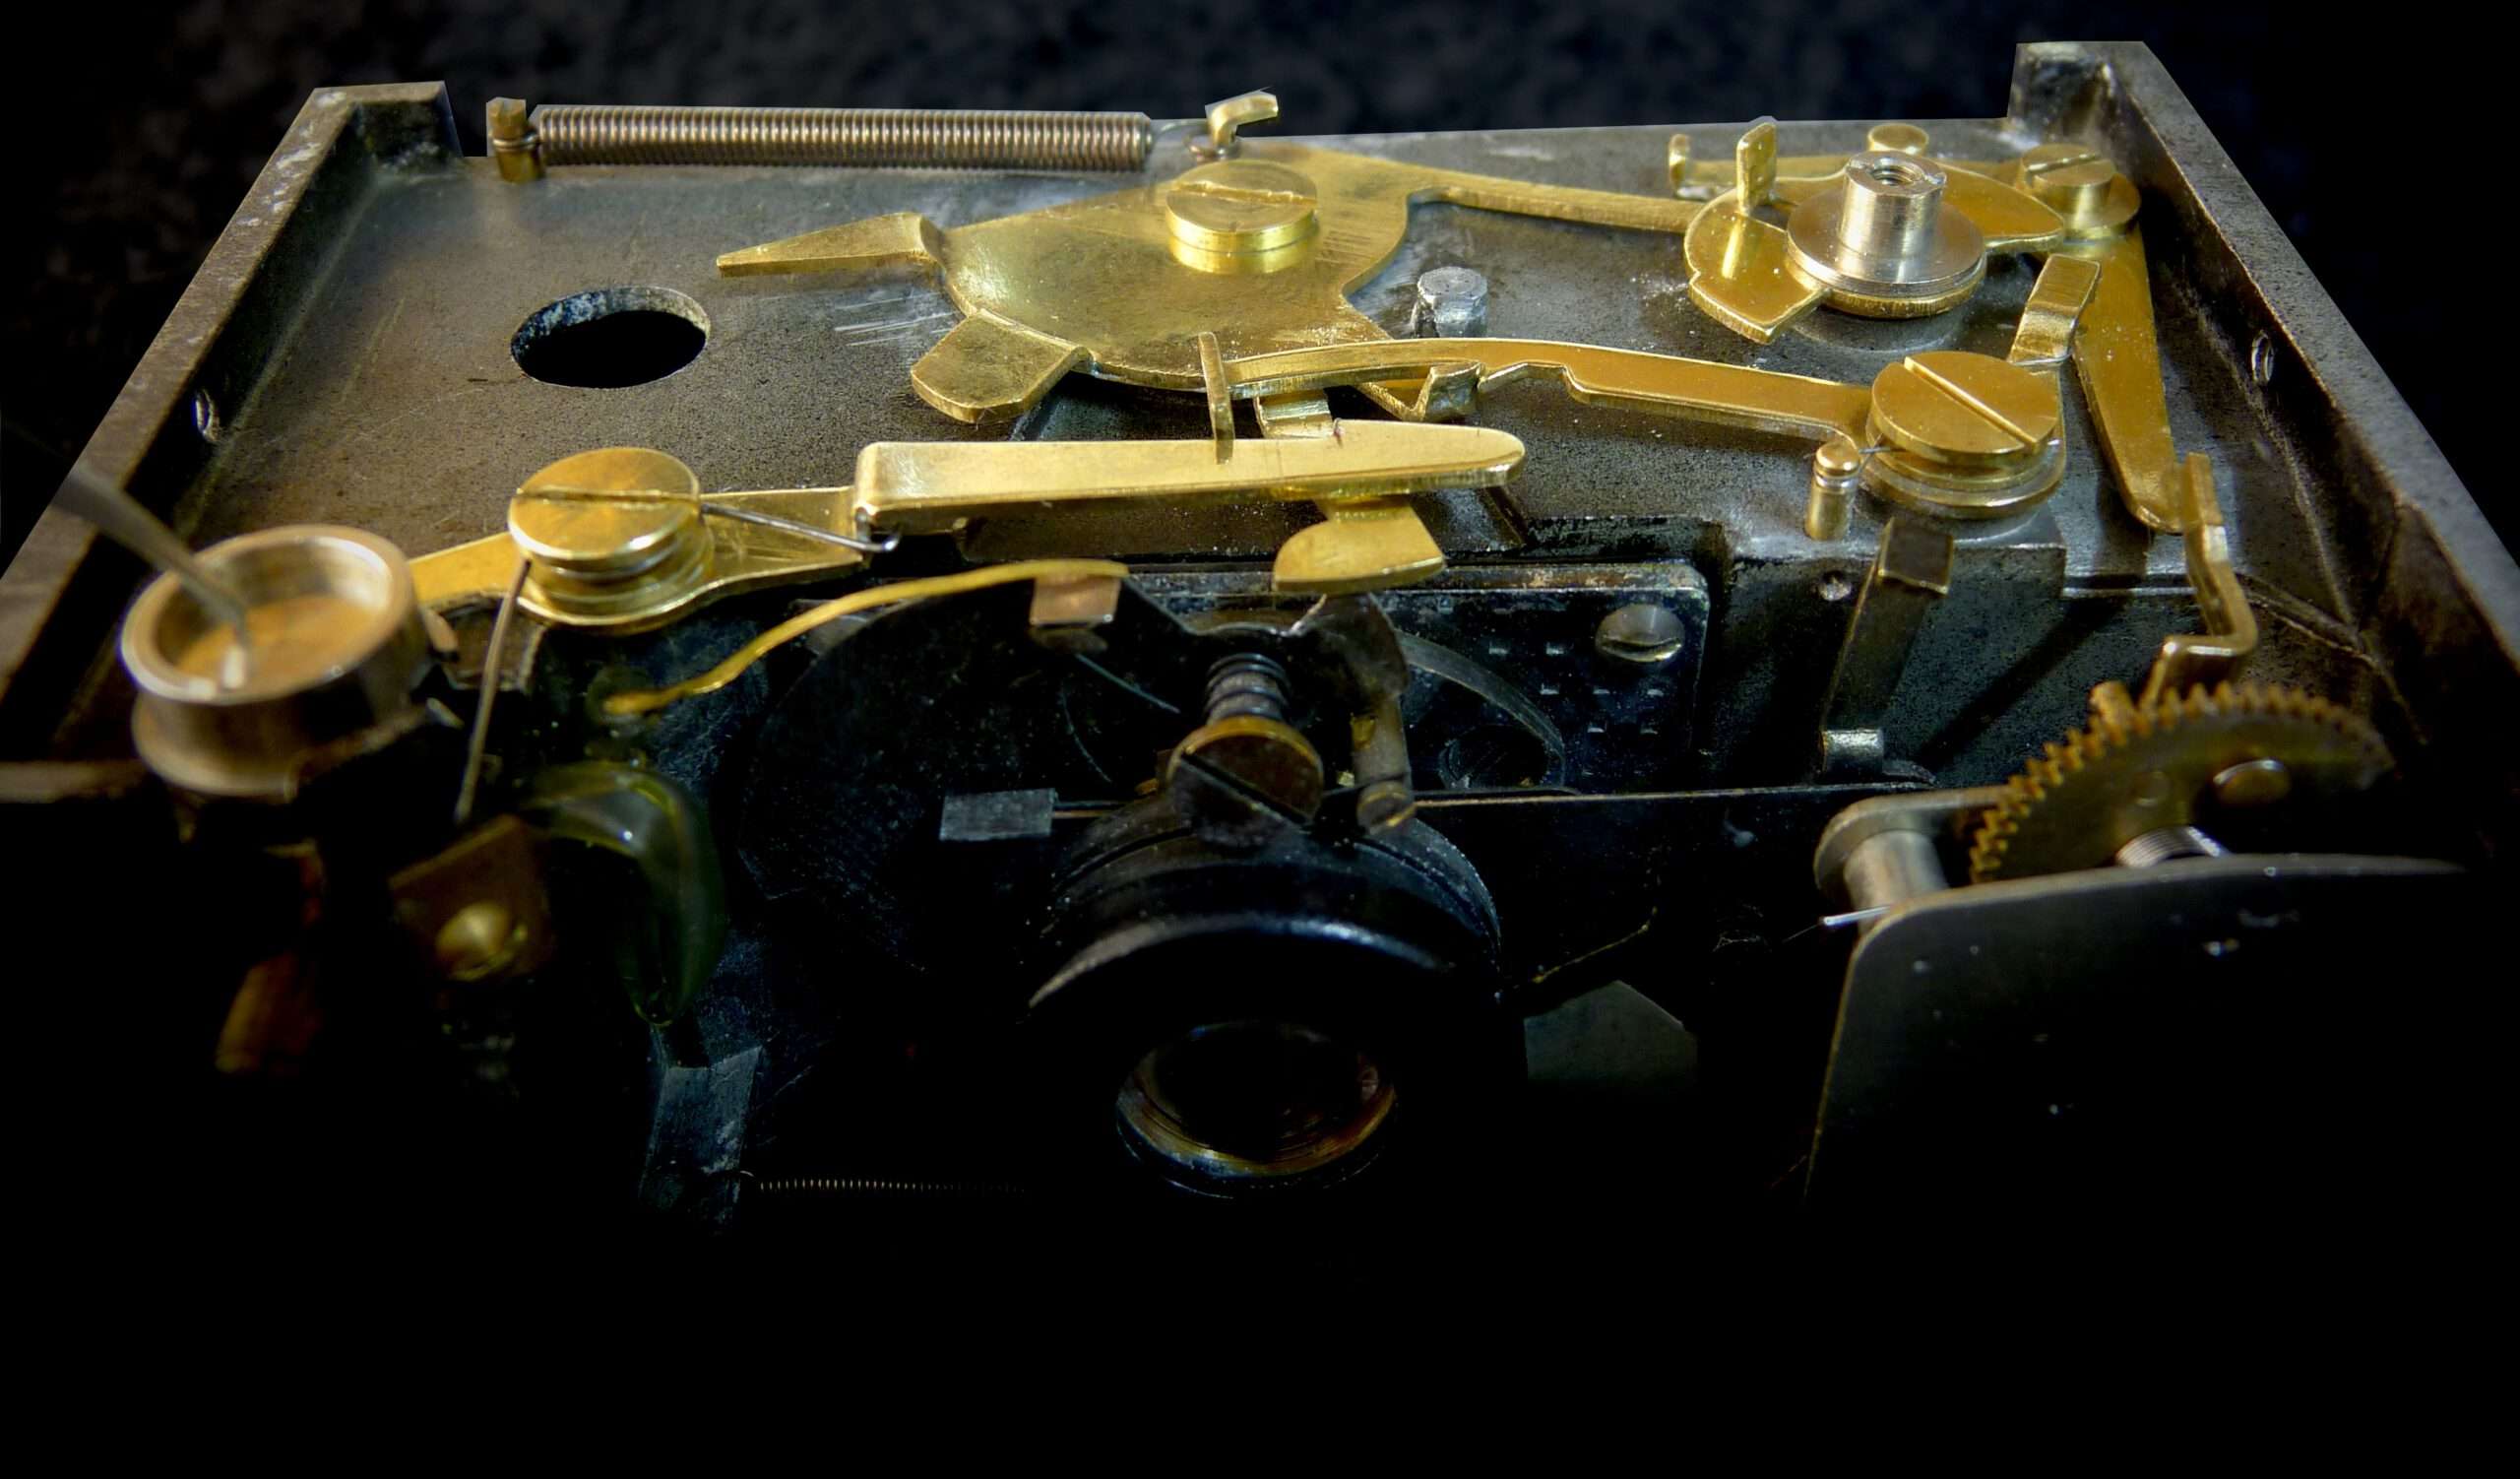
The big reveal: Lifting the control plate
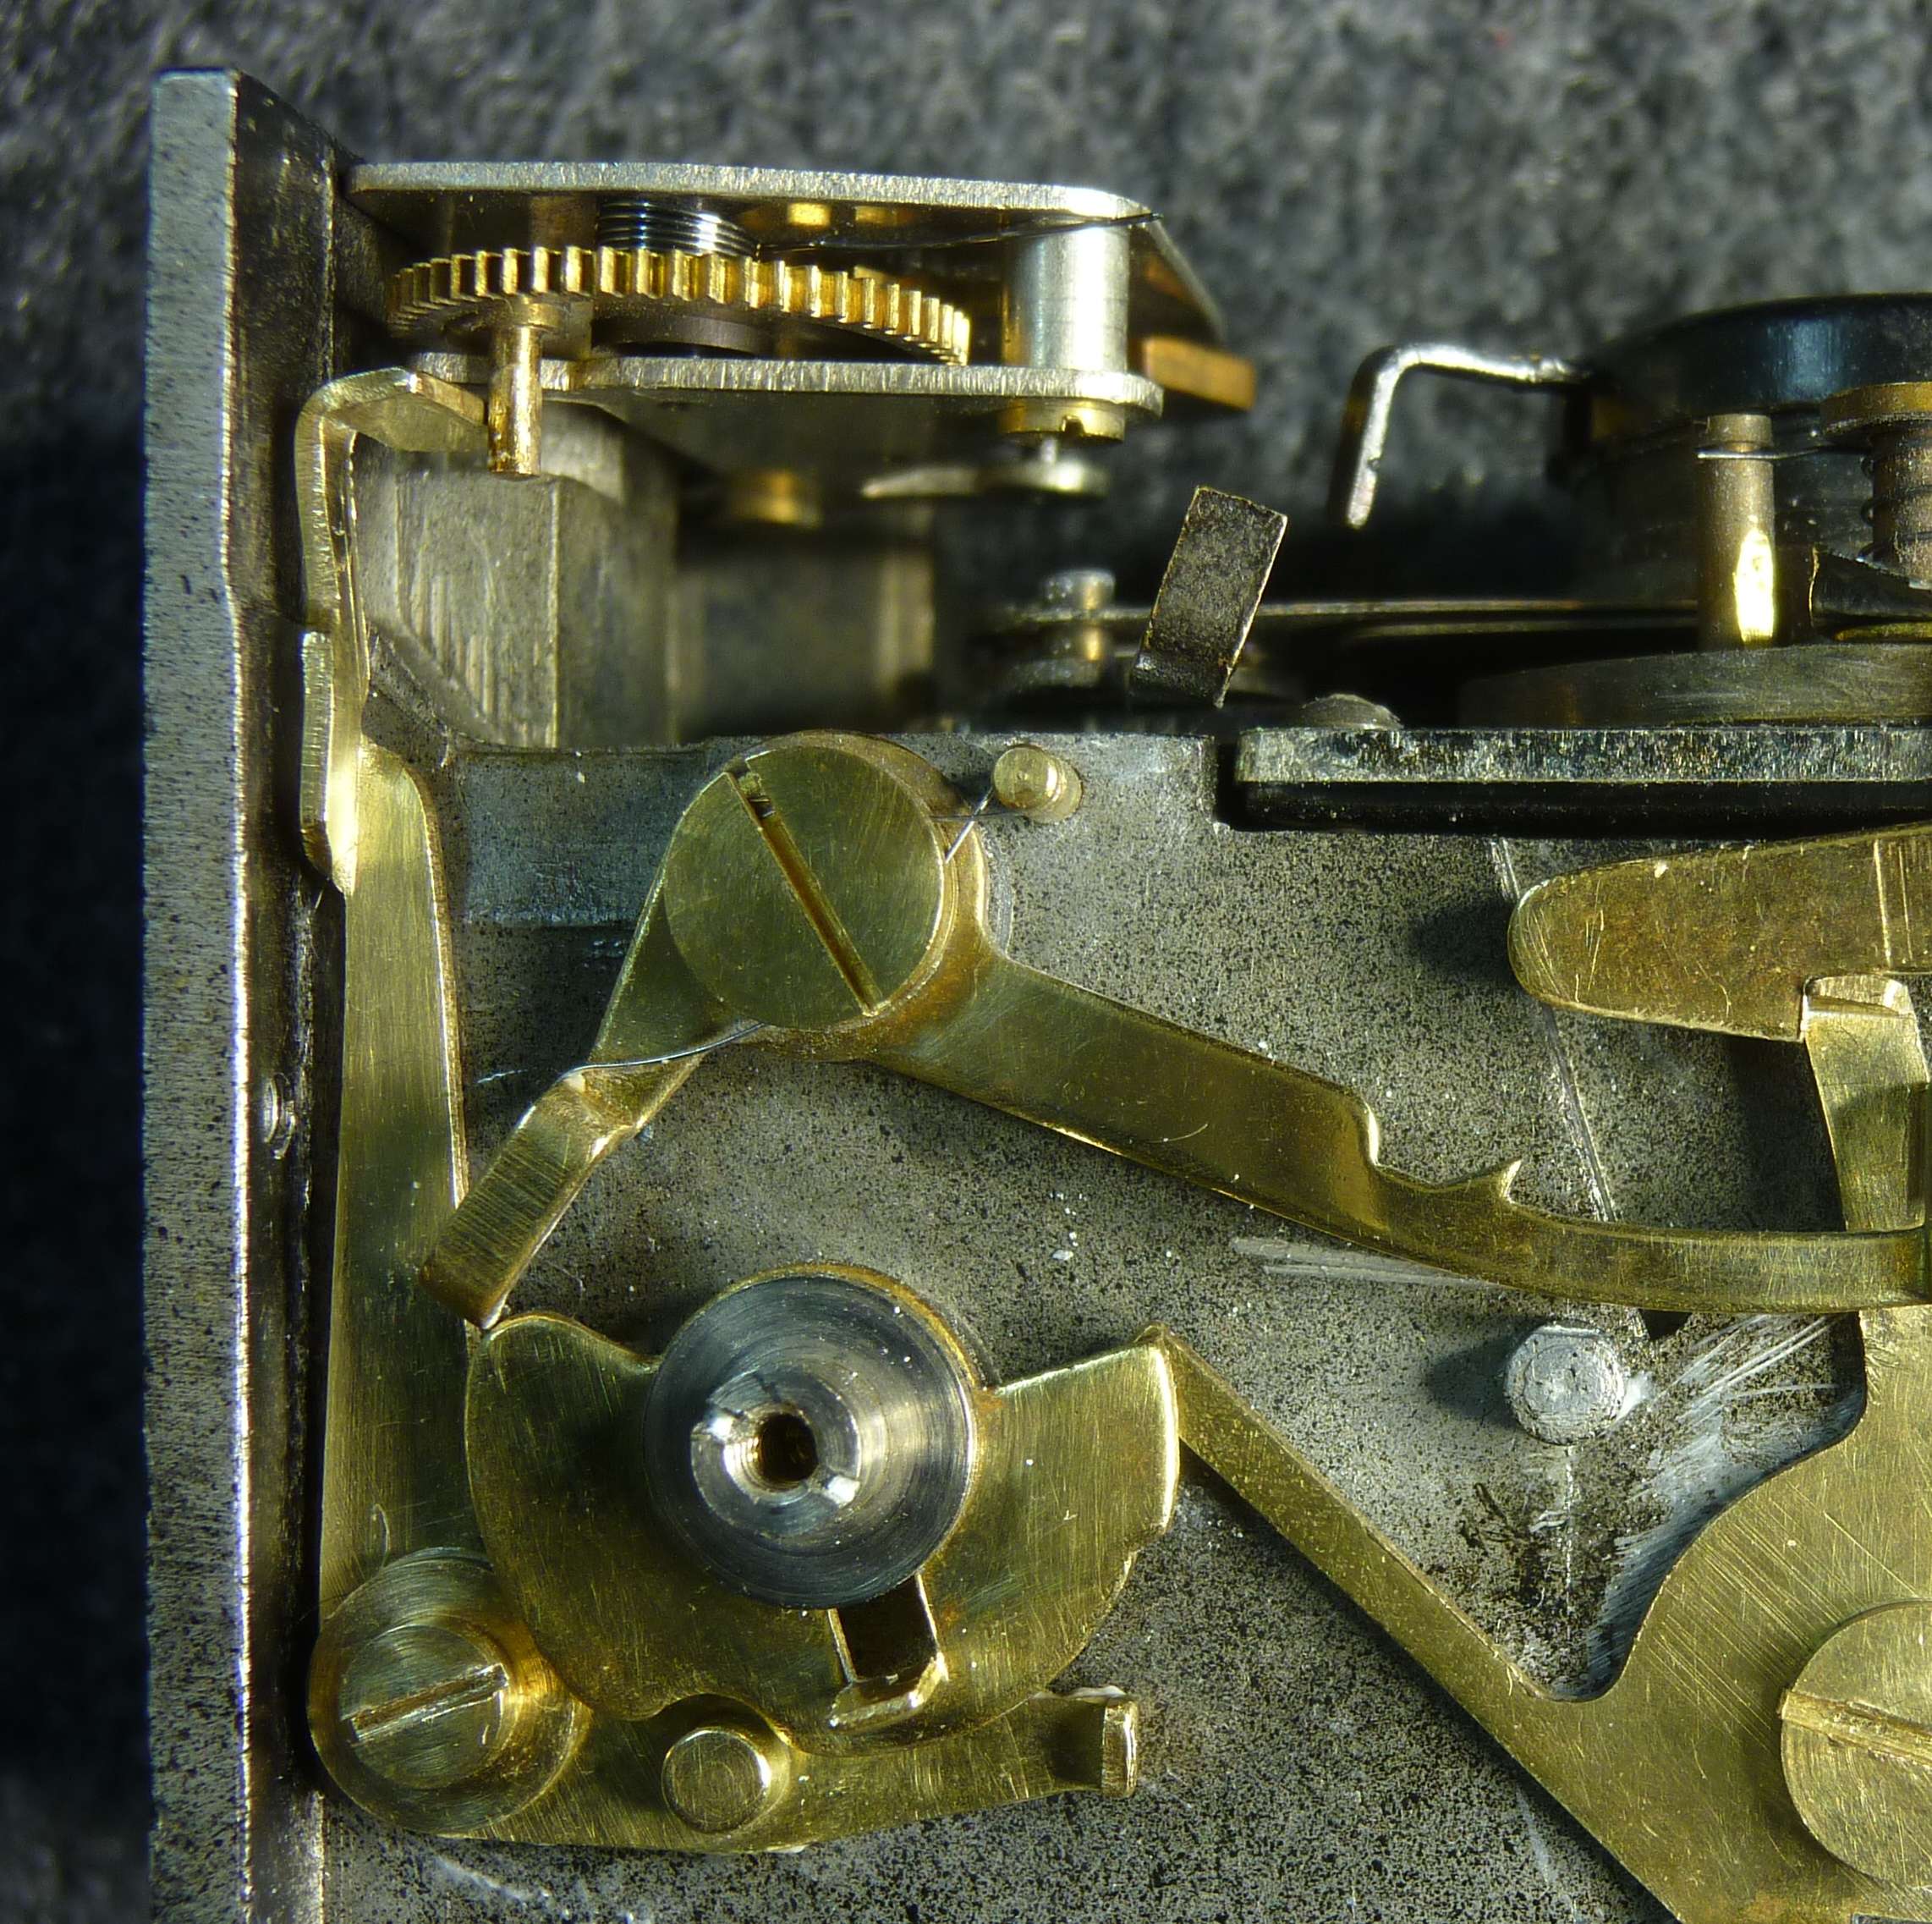
Now comes a singular, breath-holding moment in my Mamiya super 16 restoration: the removal of the internal control plate. Up until now, the camera has been a closed box of secrets. But as set aside the final screws and lift the plate gently, the “curtain” rises. Suddenly, you aren’t just looking at a camera anymore – you are looking at a mechanical microcosm.
Overview
Lying there, exposed to the light for perhaps the first time in over half a century, is the entire nervous system of the Mamiya super 16. It is a dense, silver-and-brass landscape where every millimeter of space is hard-earned. And yes, you can see what the ravages of time have done over the years: the white efflorescence on the light metal, the dull surfaces of the brass, and lots of dust:

It is an impressive sight. In an age of microchips and invisible software, the logic here is visible and tangible. You can sense the intention of the person who designed this layout on a drawing board decades ago.
Paths through the mechanism
Your eyes start to trace the paths:
- far left: the shutter release button, which sets the entire shutter mechanism in motion.
- to its right: the release lever, which locks the mainspring at the very back left.
- in the middle: the main lever, which coordinates everything with its many arms like an octopus.
- at the back right: the double lever for timing control and
- at the front right: the escapement mechanism for controlling the shutter speeds with its gears. This is the “brain” of the timing, a tiny, intricate clockwork heart that hums when the shutter fires.
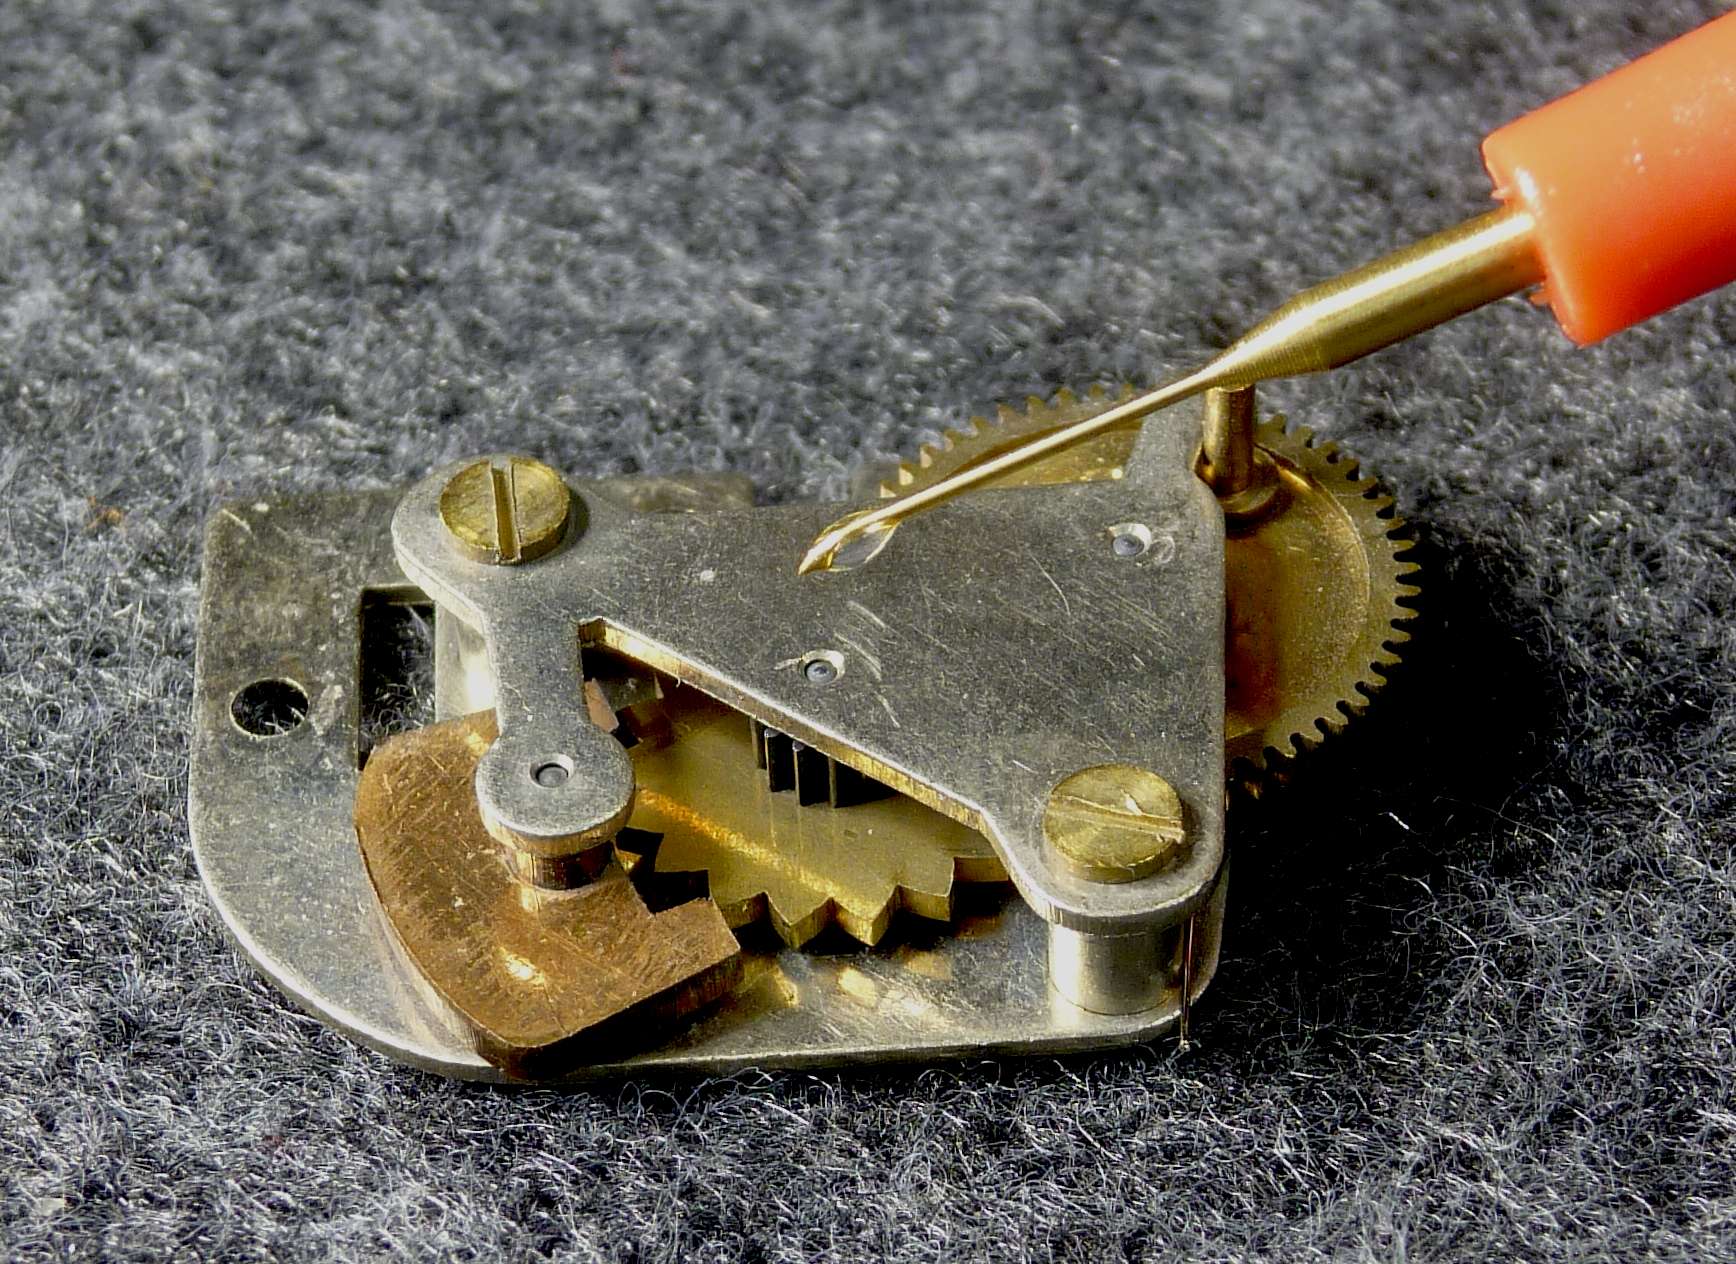
This is much more than a repair. I am not only cleaning metal, but gradually recognizing the logic represented by this mechanical masterpiece. I am fascinated by the thoughtful arrangement of brass and steel. Added to this is the joy of seeing the original shine of the brass reappear. But of course, it’s not just about the shine, it’s about getting this mechanical work of art up and running again.
Lubrification concept
As with the resinification of the grease we saw in the housing, the oil in the mechanism has also hardened and blocked it. I therefore want to disassemble all the moving parts, clean them, and re-oil them in the right places.
But first, I want to understand how the shutter of this camera actually works. There are two reasons for this. First, I want to understand this extremely elegant design. Because it is elegant, as you can see at first glance. Why? Because it reliably and accurately covers the entire range of speeds from 1/200 s to 1/2 s and B with just a few simple parts. Secondly, I need to understand the mechanism of the Mamiya super 16 so that I can later decide which parts need to be lubricated and how. With grease, thin oil, or not at all.
If you are not interested in how the shutter works, you can skip the following chapter.
How the Mamiya super 16 shutter works
The videos and photos in this section show the camera after it has been restored.
Like the entire camera, the shutter and its controls are clearly laid out. Nevertheless, you have to look at them in detail to understand the ingeniously simple concept. Here is a video that shows the entire process in slow motion:
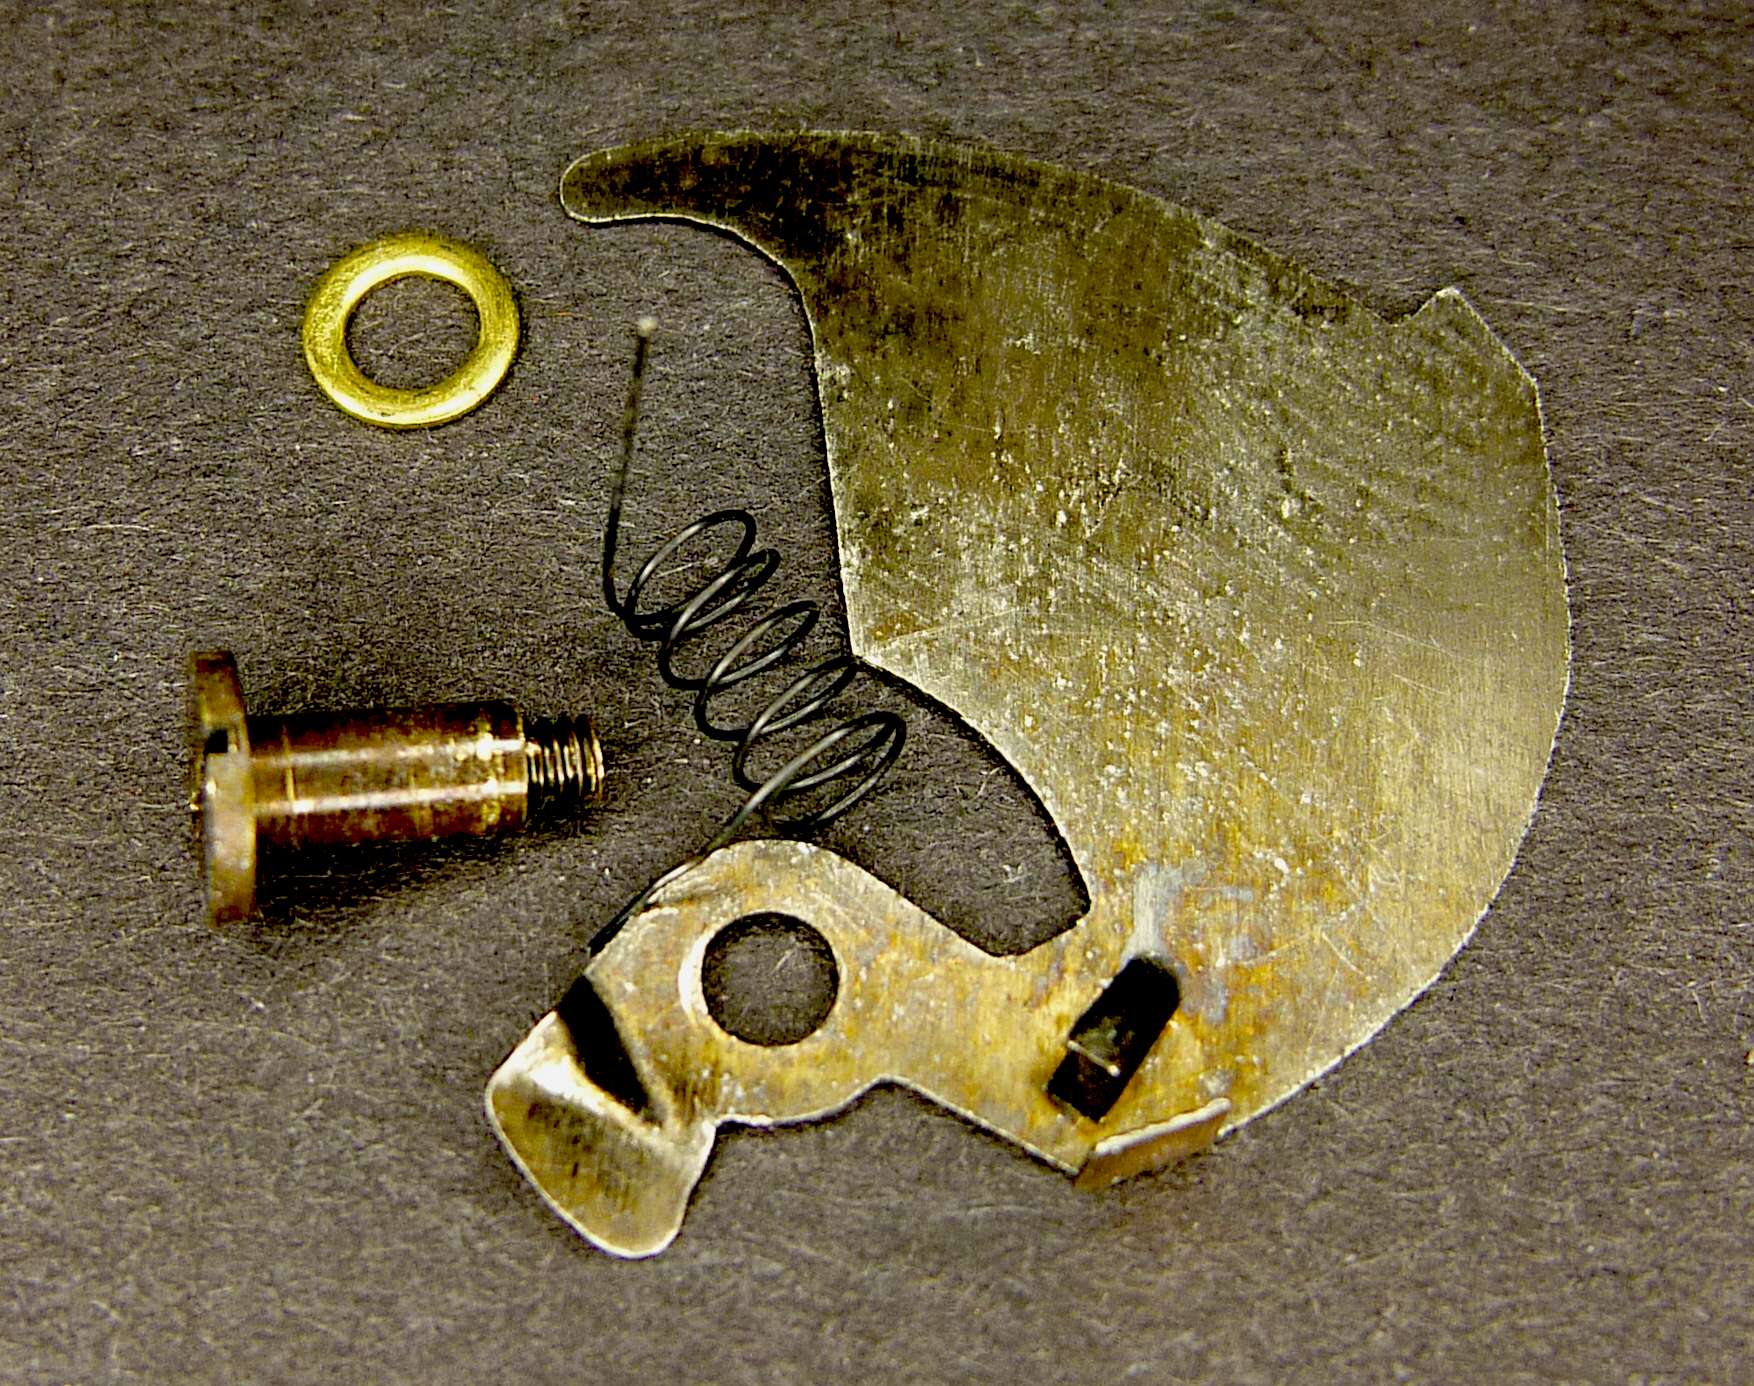
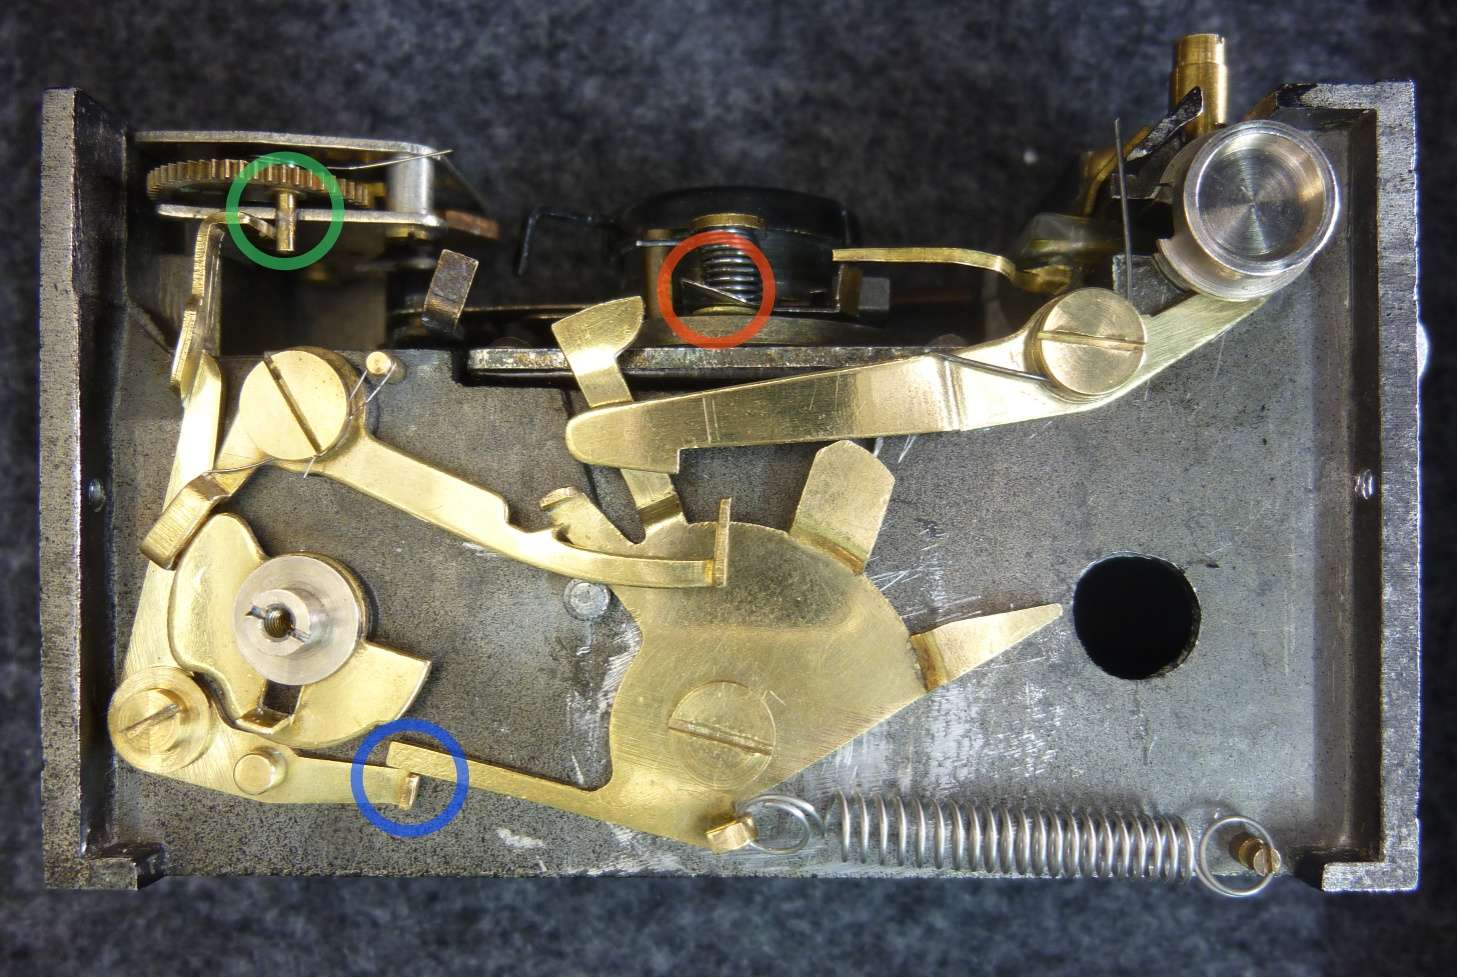
The shutter blade
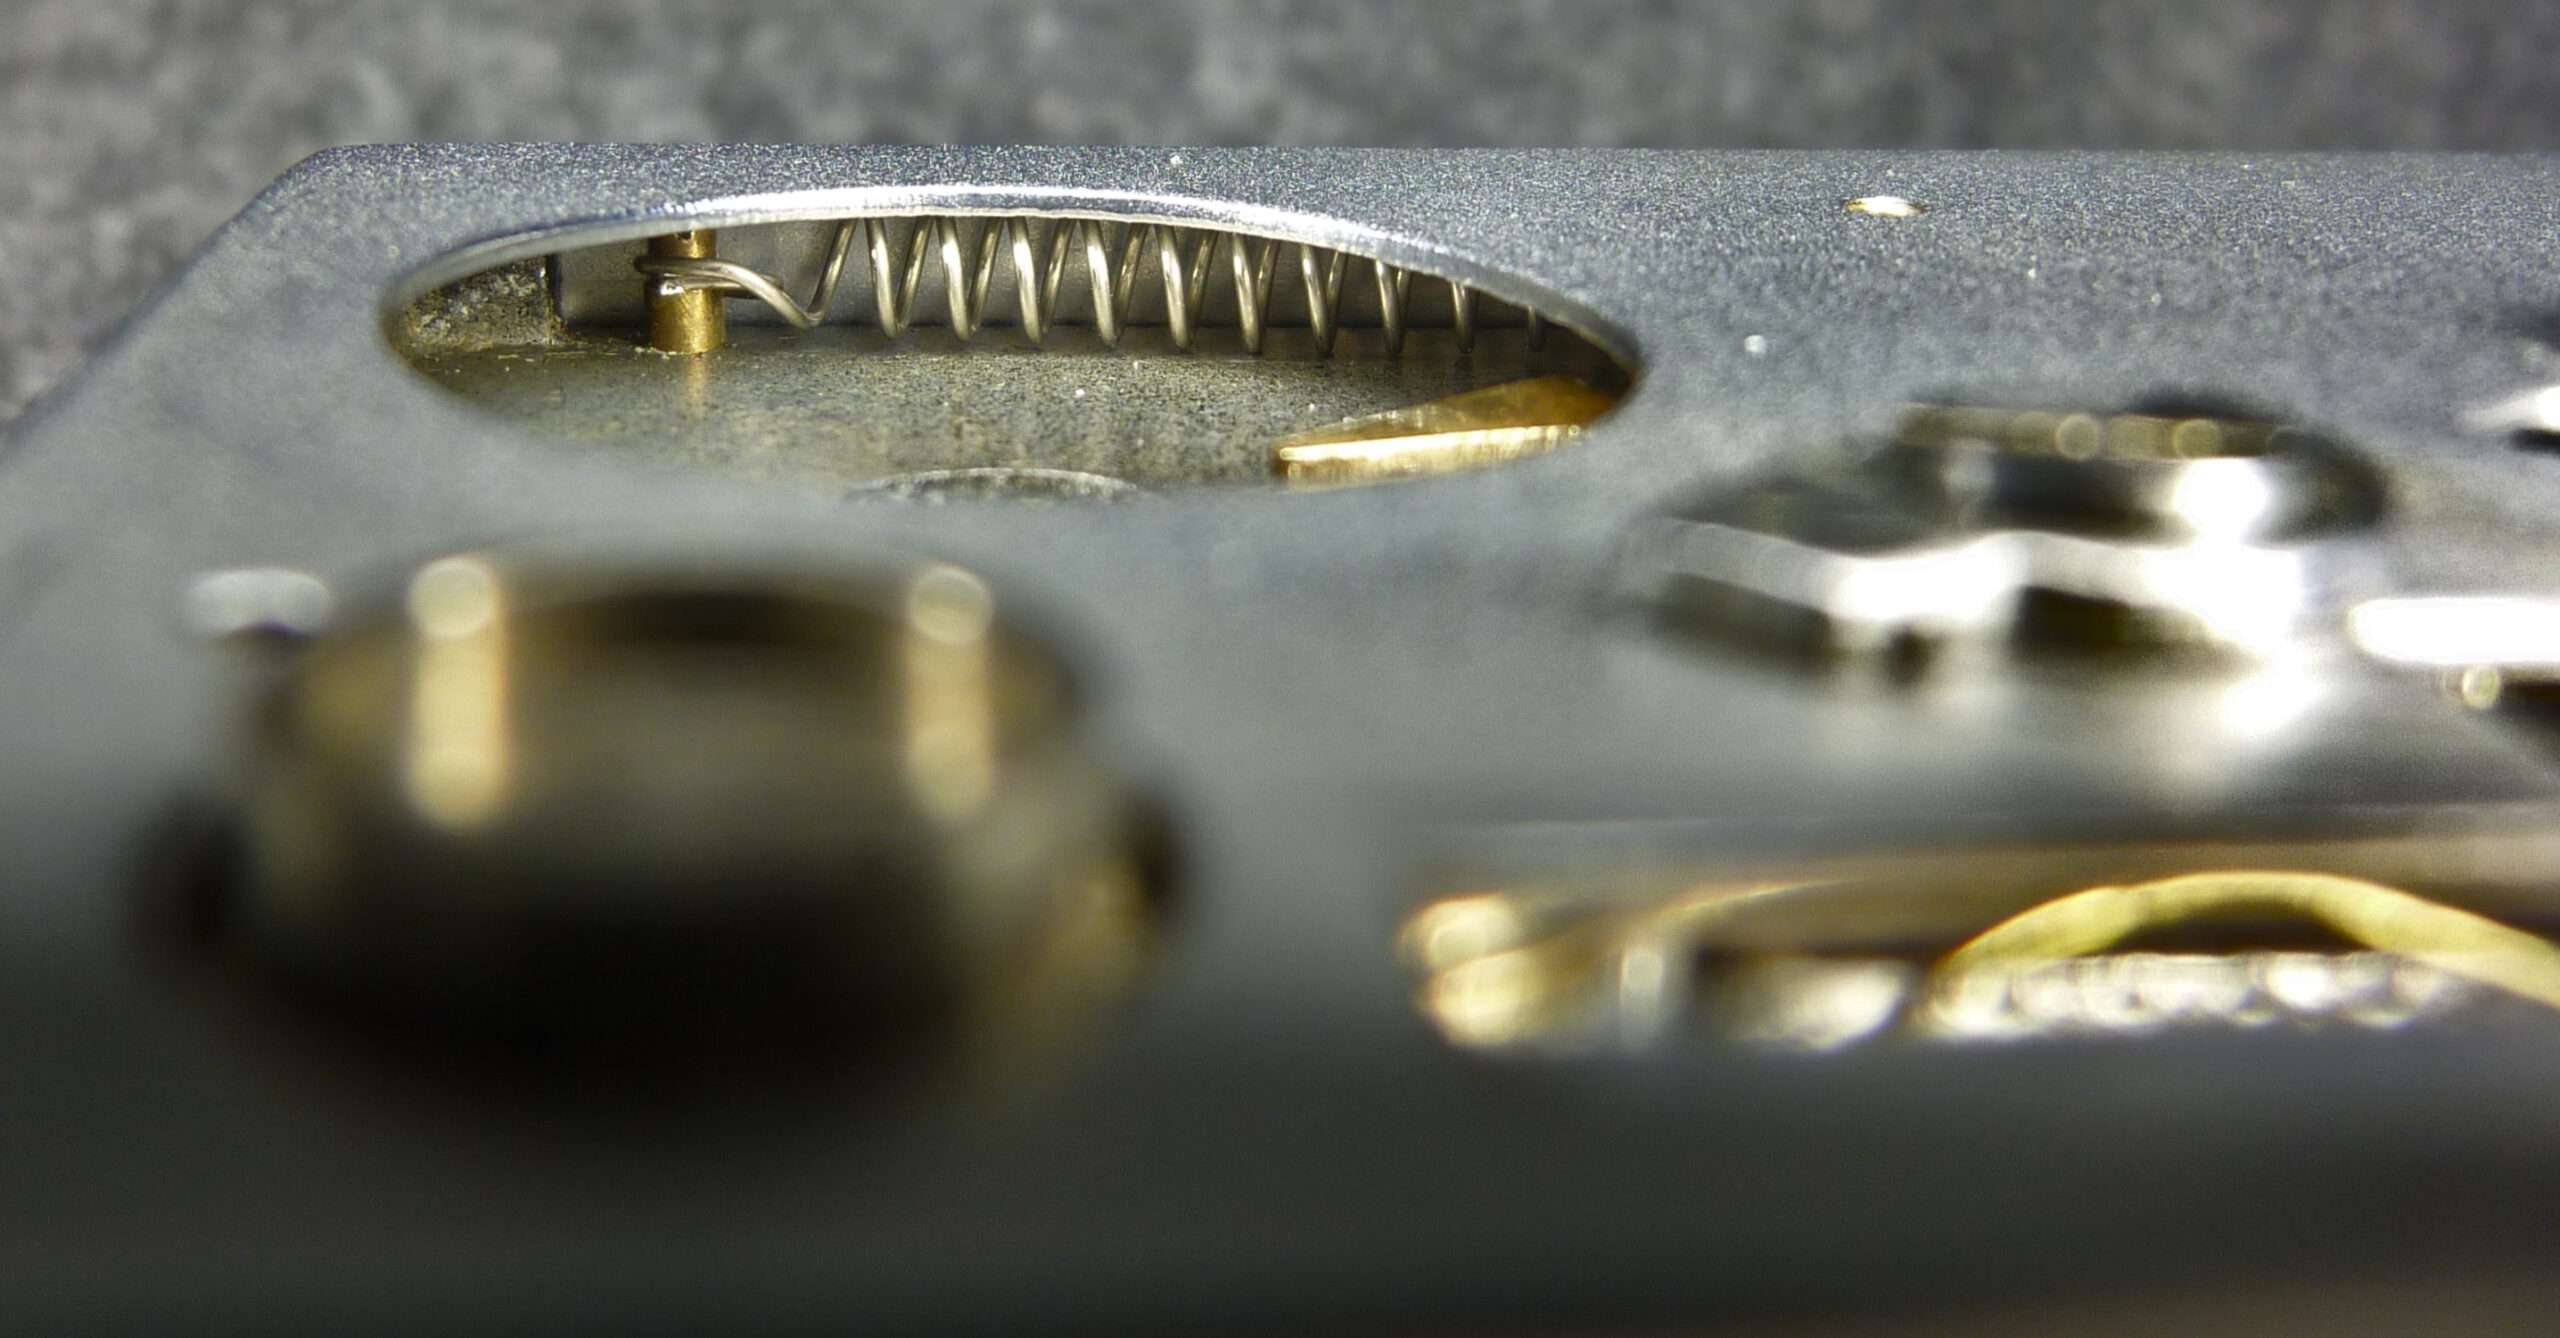
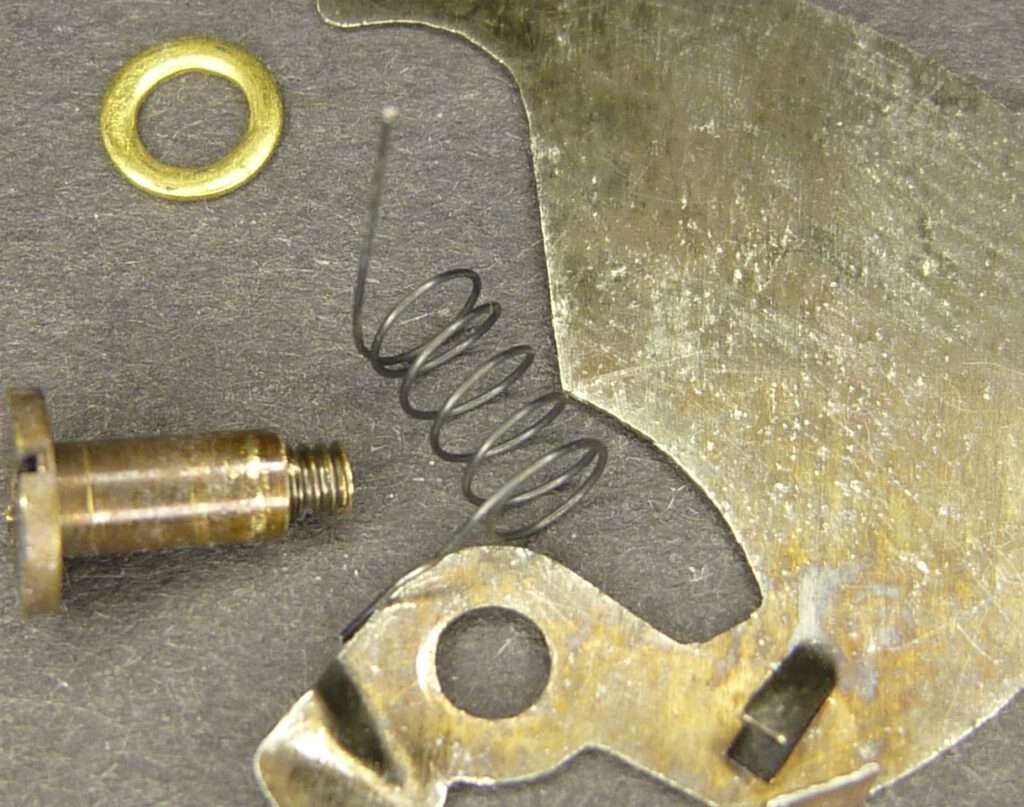
The shutter blade is located behind the lens. You can see it in action in the video above. It is mounted on a screw so that it can rotate and is pressed against the housing by a combined compression-torsion spring. The spring also serves to rotate the blade back after exposure. Here we see these tiny elements:
The shutter release process
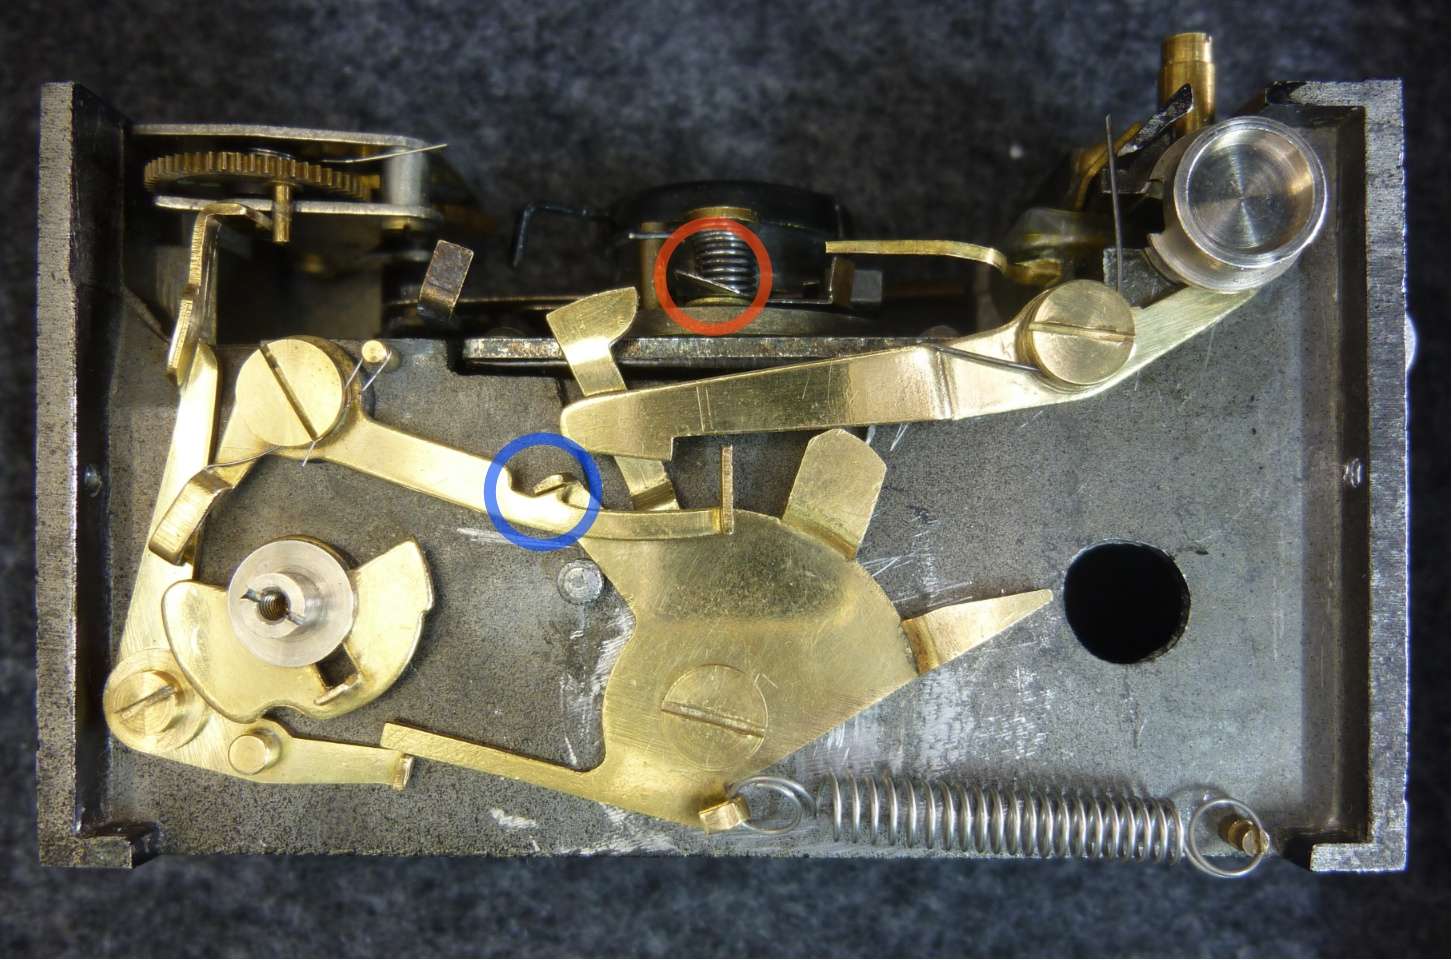
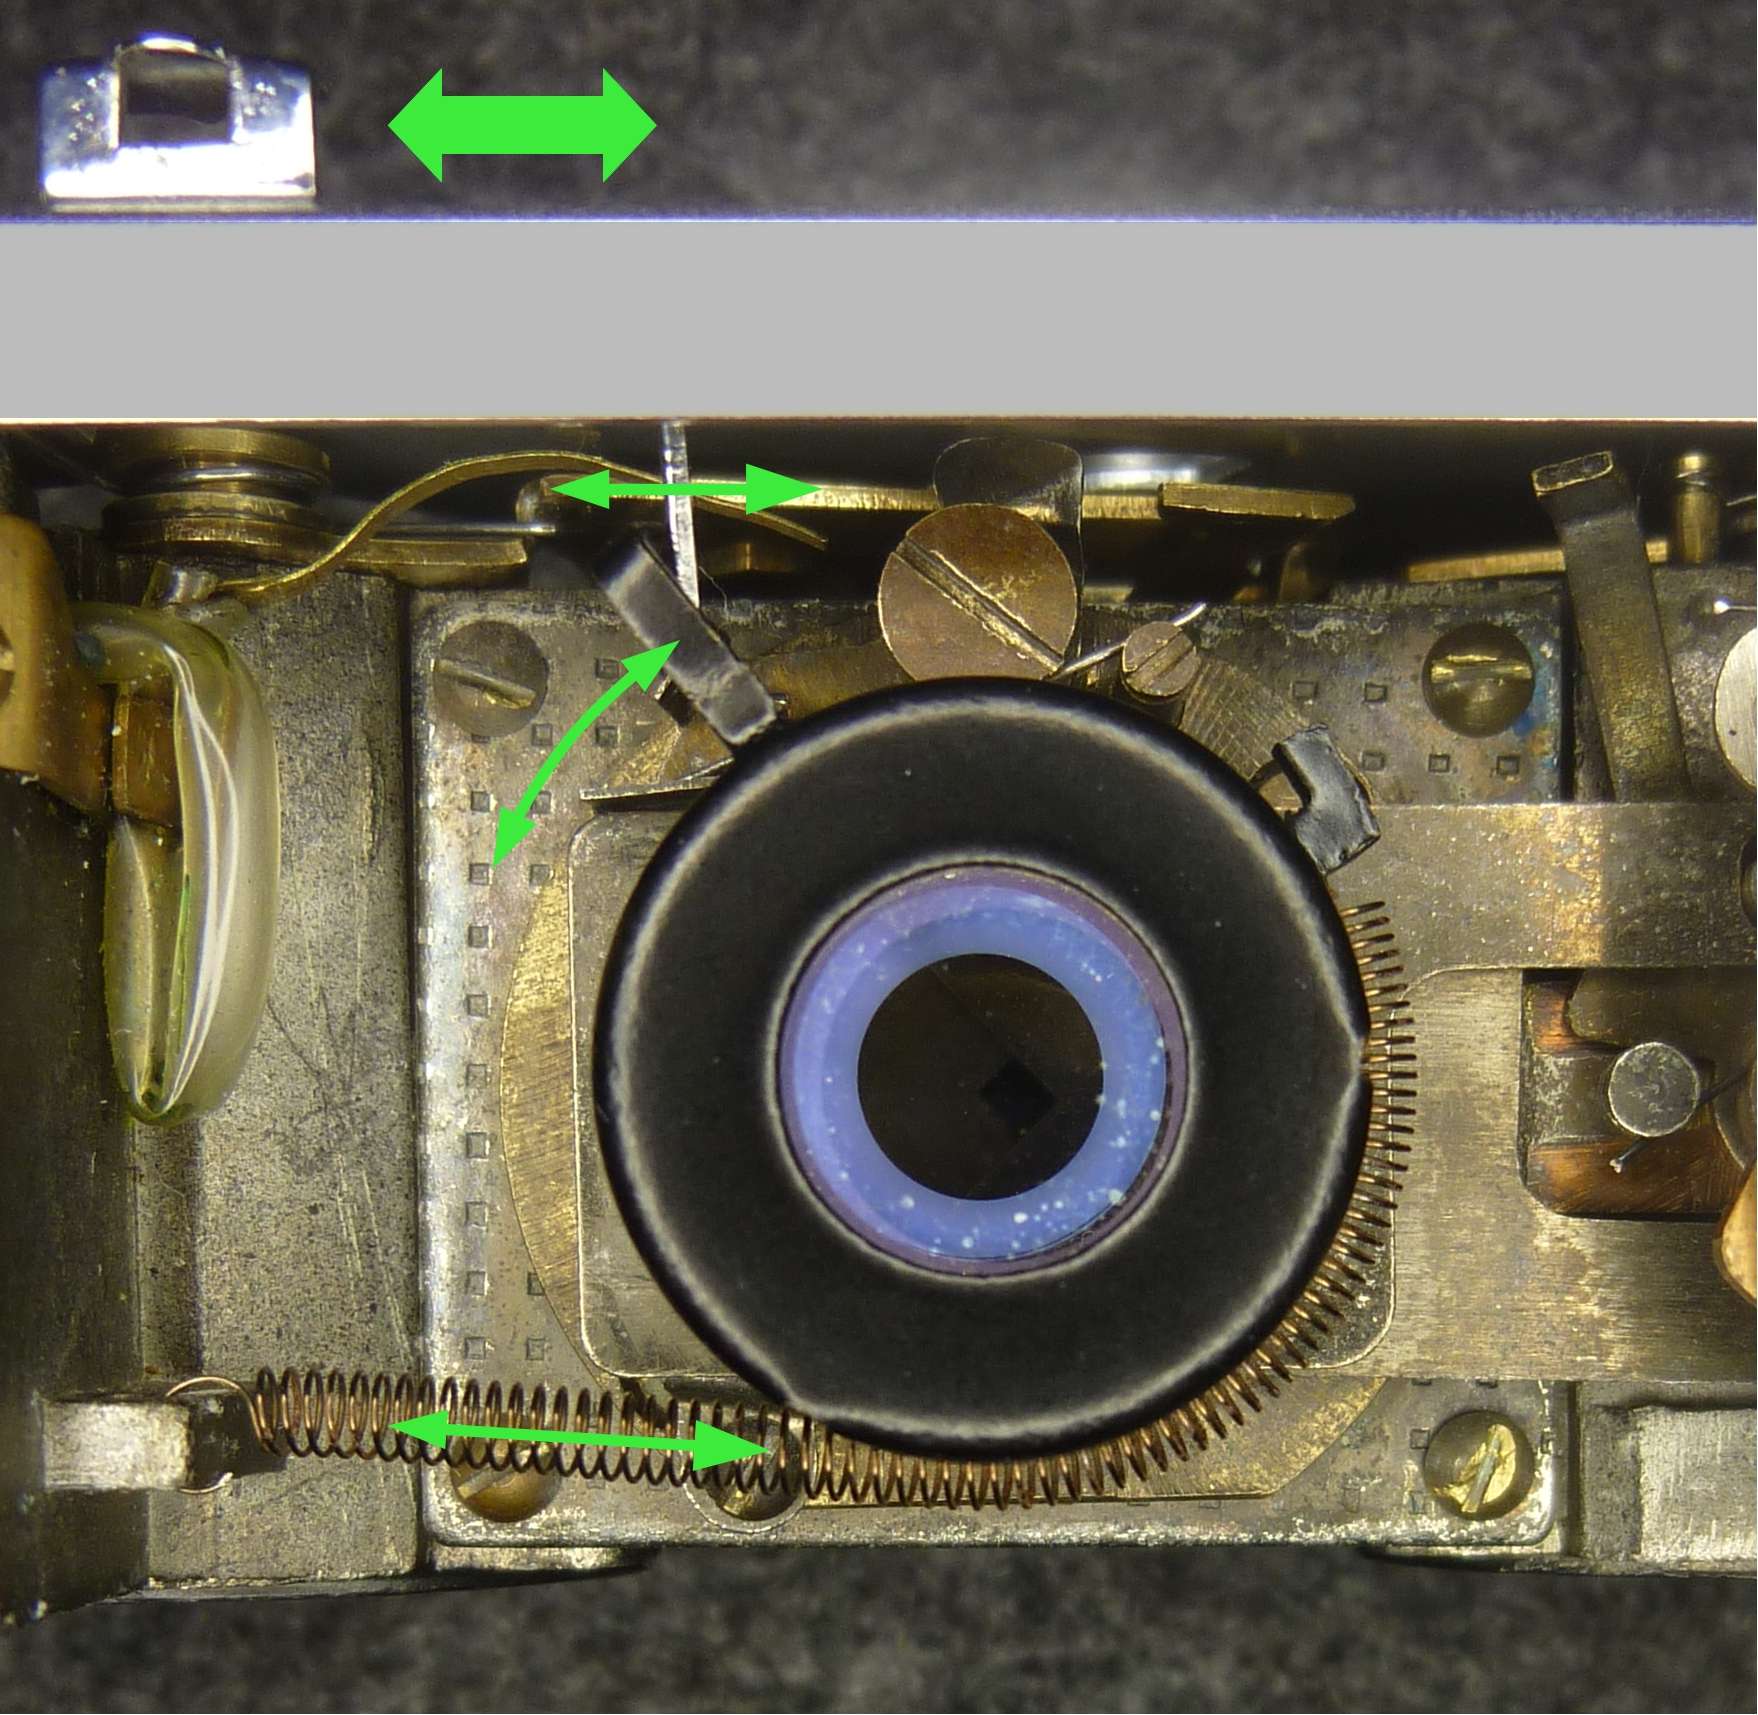
The Mamiya super 16 shutter mechanism has the task of turning the shutter blade away from the closed position in front of the lens for the exact duration of the exposure. The exposure time is set using the cam disc, see the next picture, at the bottom left (blue circle). This adjusts the left end of the double lever (at the tip of the green arrow at the bottom left).
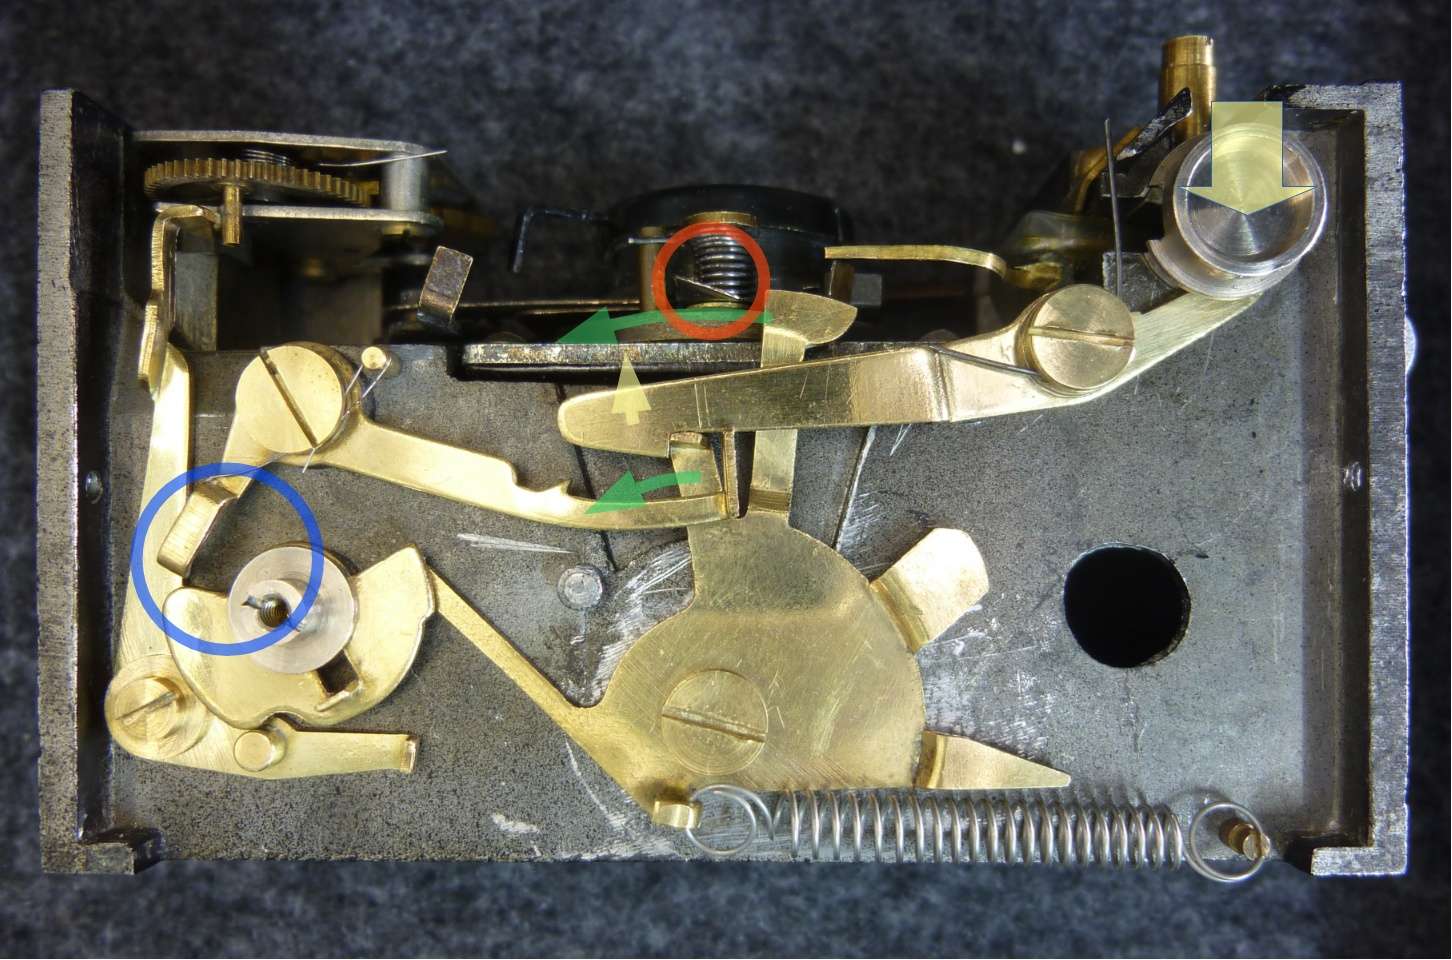
Shutter button pressed
To open the shutter, the blade has a tab (red circle) on its upper edge that must be pushed to the left. This is done by the blade arm of the main lever (green upper arrow) as the main lever turns to the left. The following image shows the situation when the shutter button is pressed (top right yellow arrow). The arrows indicate what happens next:
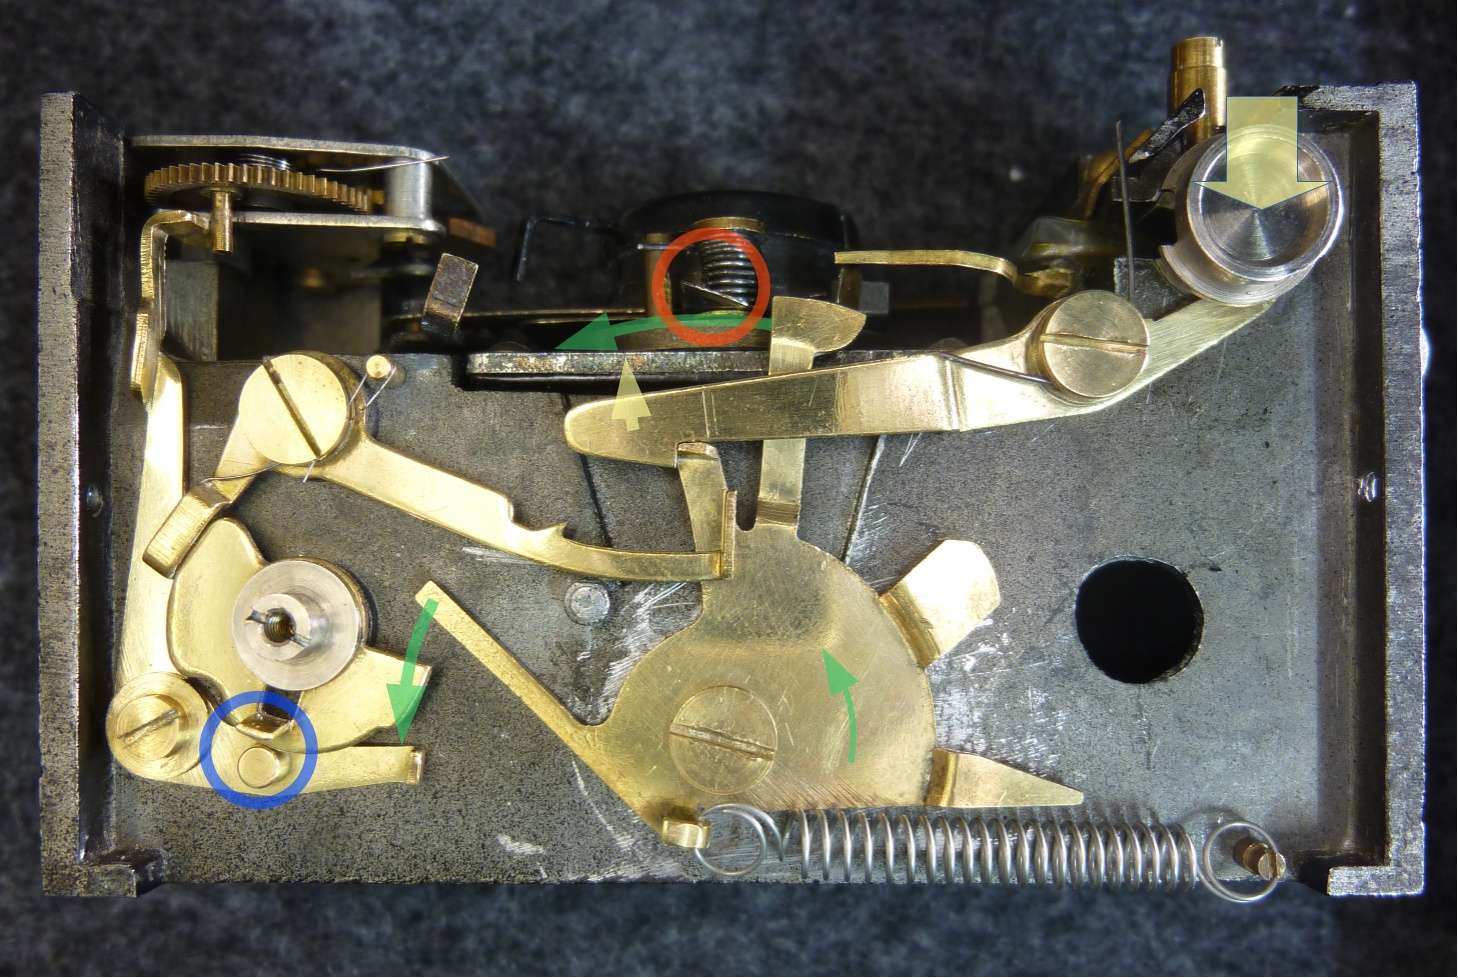
Pressing the shutter release button moves the release lever upwards in the direction of the yellow arrow. This releases its hook from the locking hook of the main lever.
Now, driven by the tension spring at the bottom right, the main lever begins to rotate counterclockwise. First, the upper end of the main lever presses against the tab of the shutter blade (red circle). This rotates the blade and releases the lens. The main lever continues to rotate until its brake arm hits the double lever (see picture above, green arrow at the bottom left).
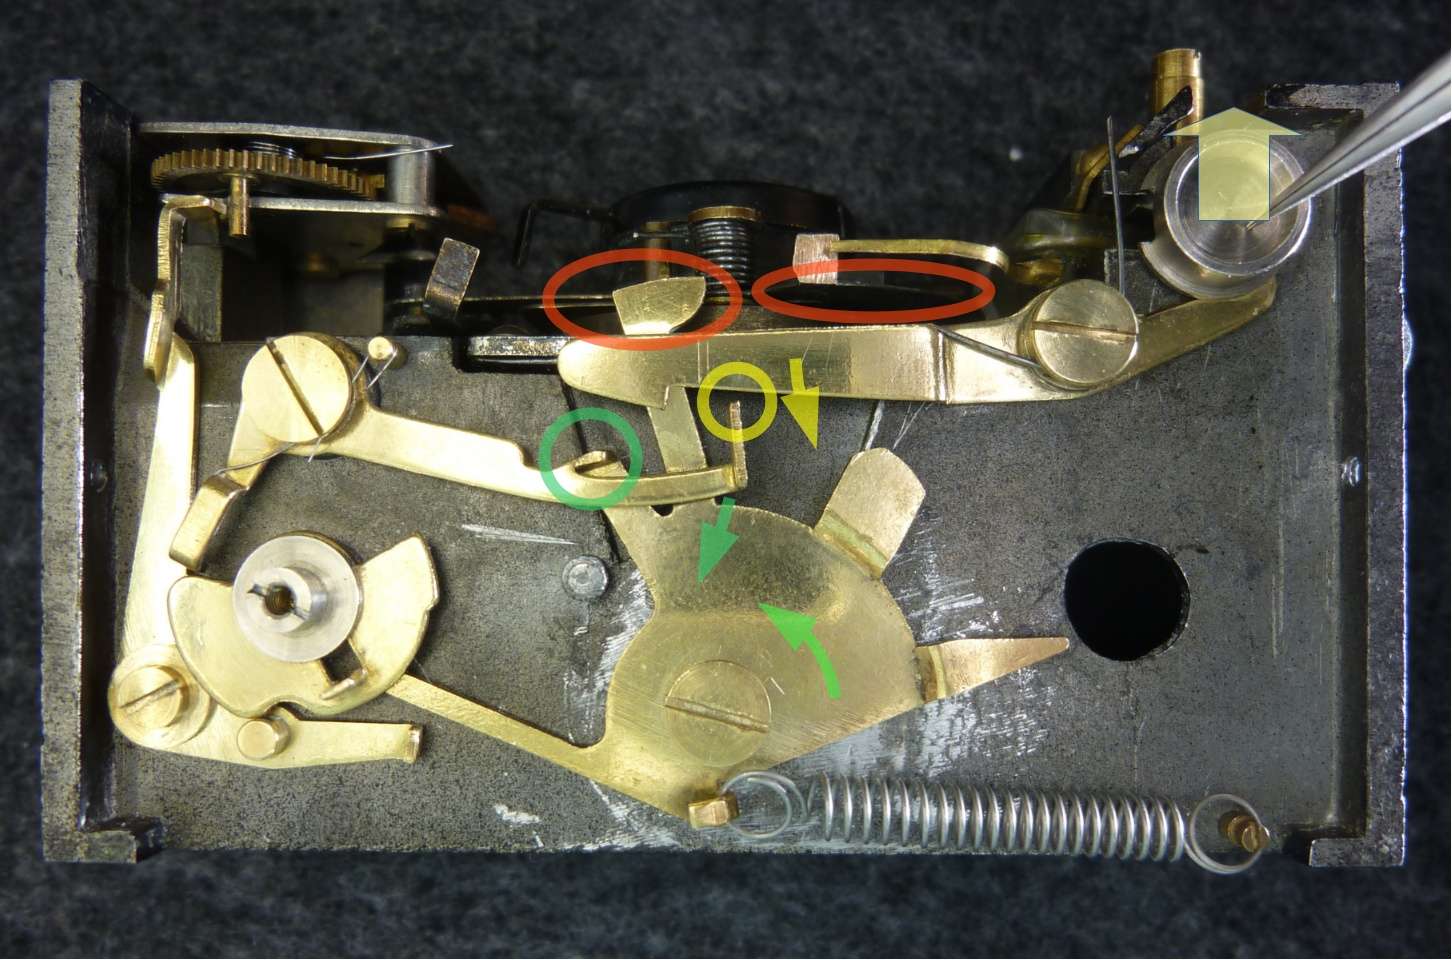
Shutter timing
Now the second phase begins. We can see the start moment in the following illustration:
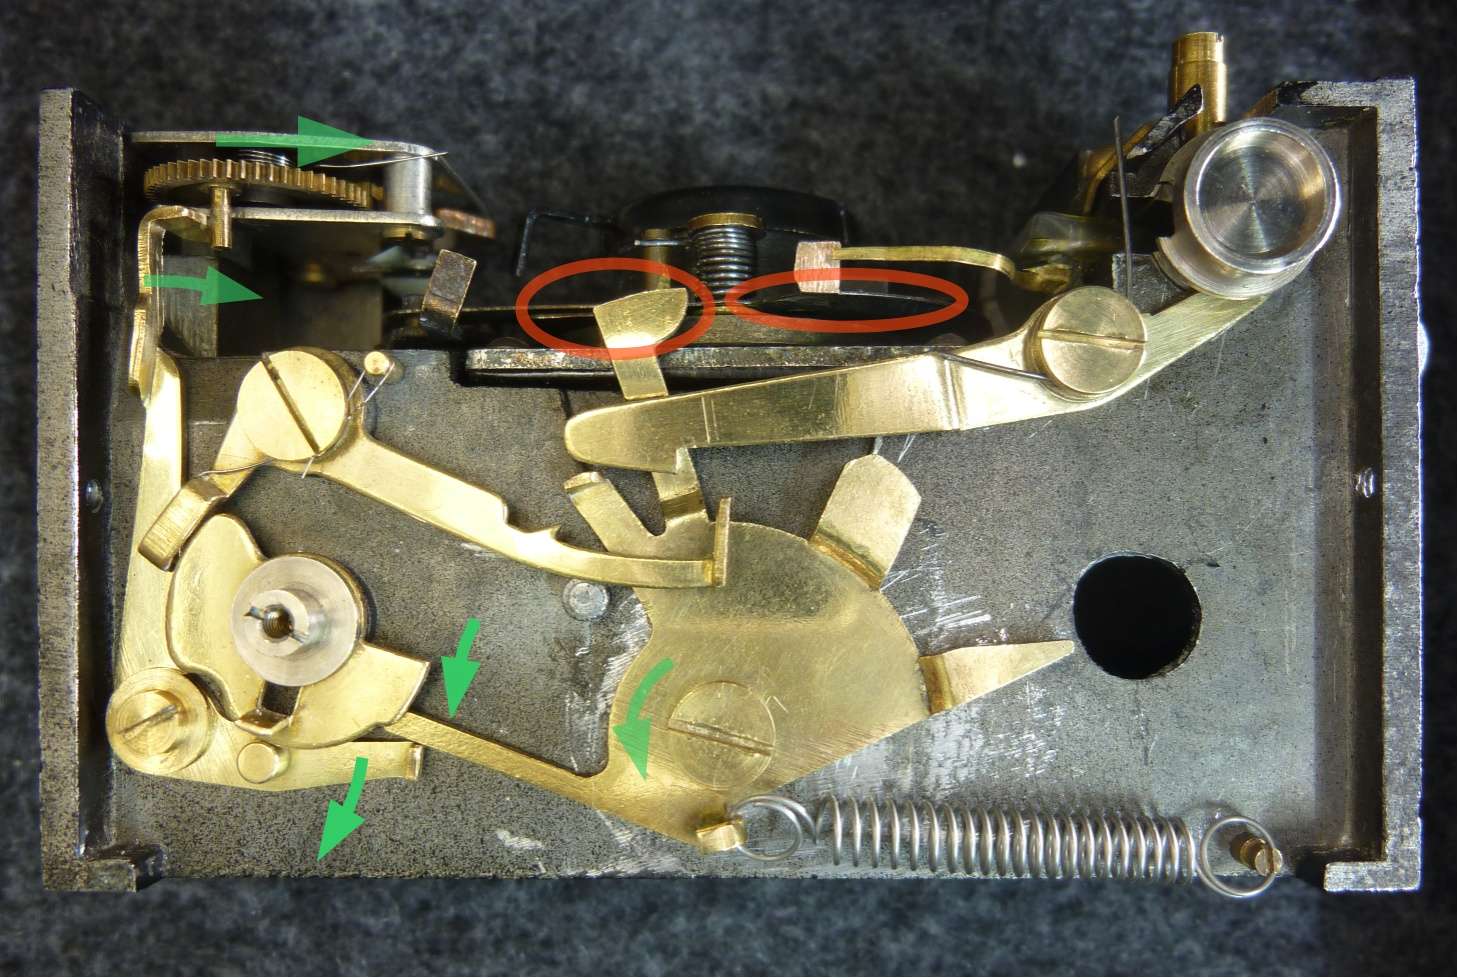
The upper end of the main lever (left red circle) holds the shutter blade open (right red circle). The brake arm now presses on the double lever (green arrow at bottom left).
The movement so far has been as fast as possible. Now the set exposure time takes effect. Still driven by the tension spring, the main lever’s brake arm now begins to turn the double lever. However, the other end of the double lever (green arrow top left) is braked by the gear wheel. As part of the escapement, the gear wheel can only turn at a fixed, slow speed.
Closing the shutter
The main lever now slowly continues to rotate until it reaches its end position:
The end position is achieved when the locking hook of the main lever hits the gray pin on the camera body (center of the image). At this precise moment, the blade arm releases the nose of the shutter blade (red circle) and the blade, driven by its torsion spring, rotates back in front of the lens.
Note the distance traveled by the double lever during this time (blue and green circles).
Cocking the shutter
The shutter can now be tensioned again. This is done by turning the main lever clockwise until it returns to its starting position. The rotation is performed by the winding wheel, which is not visible here, which presses down the pointed tension arm of the main lever (center right).
The shutter speed “B” (bulb)
A completely different process takes place for the shutter speed “B.” The time mechanism is disconnected. The double “B”-lever (top left) with a ratchet takes over control. The prerequisite is that the shutter speed “B” has been preset (blue circle). This puts the “B” lever in position.
When the trigger button is pressed (big yellow arrow), the release lever releases the main lever (small yellow arrow). The main lever begins to move in the direction of the green arrows to open the shutter (red circle). The following image shows the moment when the trigger is pressed:
However, the rotational movement of the main lever is then immediately catched by the ratchet of the “B” lever (green circle, see next image). The shutter remains open in this position (red circles, see next image). Note, the trigger is still pressed.
The following image shows the moment when the trigger is being released:
Immediately after the trigger is released, the trigger lever moves in the direction of the yellow arrow, driven by its torsion spring. In doing so, it pushes the “B” lever (yellow circle) and moves the “B” lever in the direction of the green arrow. This causes the ratchet (green circle) to release the main lever. The main lever immediately begins to rotate (green arrow). This releases the shutter blade, which immediately swings in front of the lens and closes it. This completes the “B” shutter process and brings the mechanism to its end position:
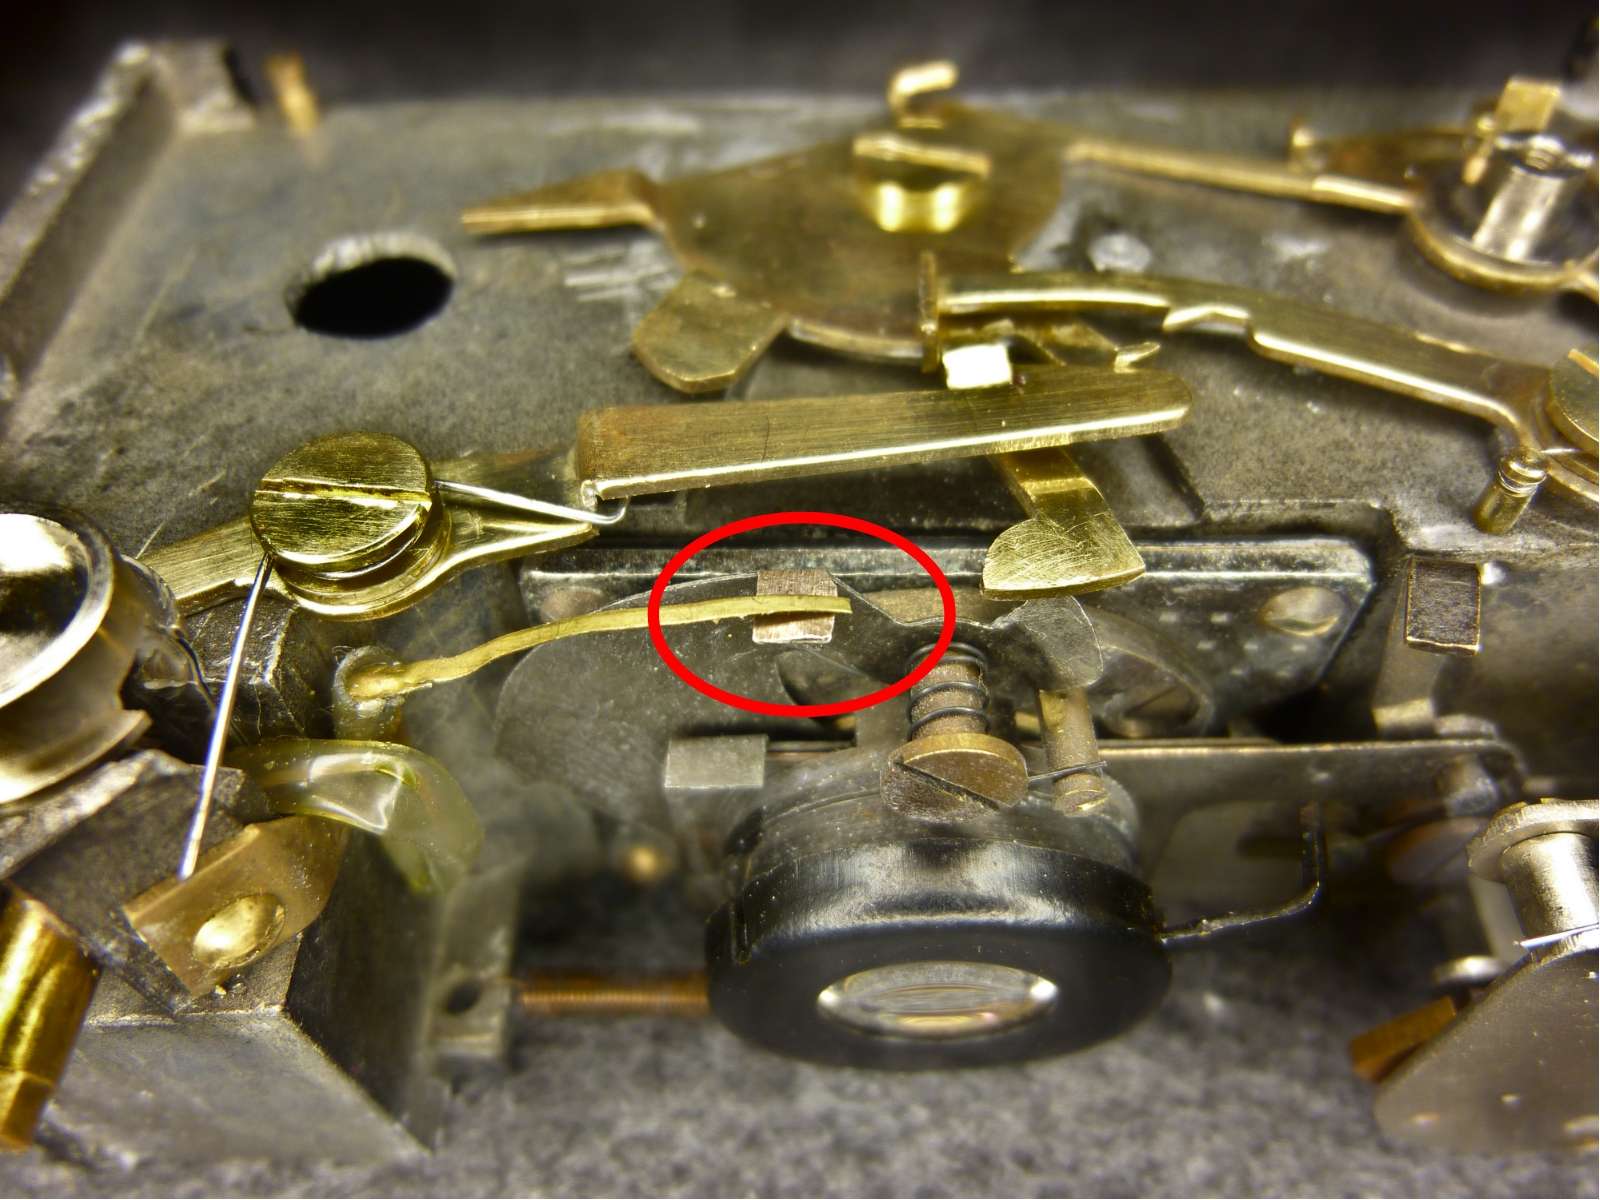
The flash syncronisation
Flash synchronization is another example of the simple and elegant design of the Mamiya super 16. The aim of this mechanism is to trigger the flash at the exact moment when the shutter is fully open.
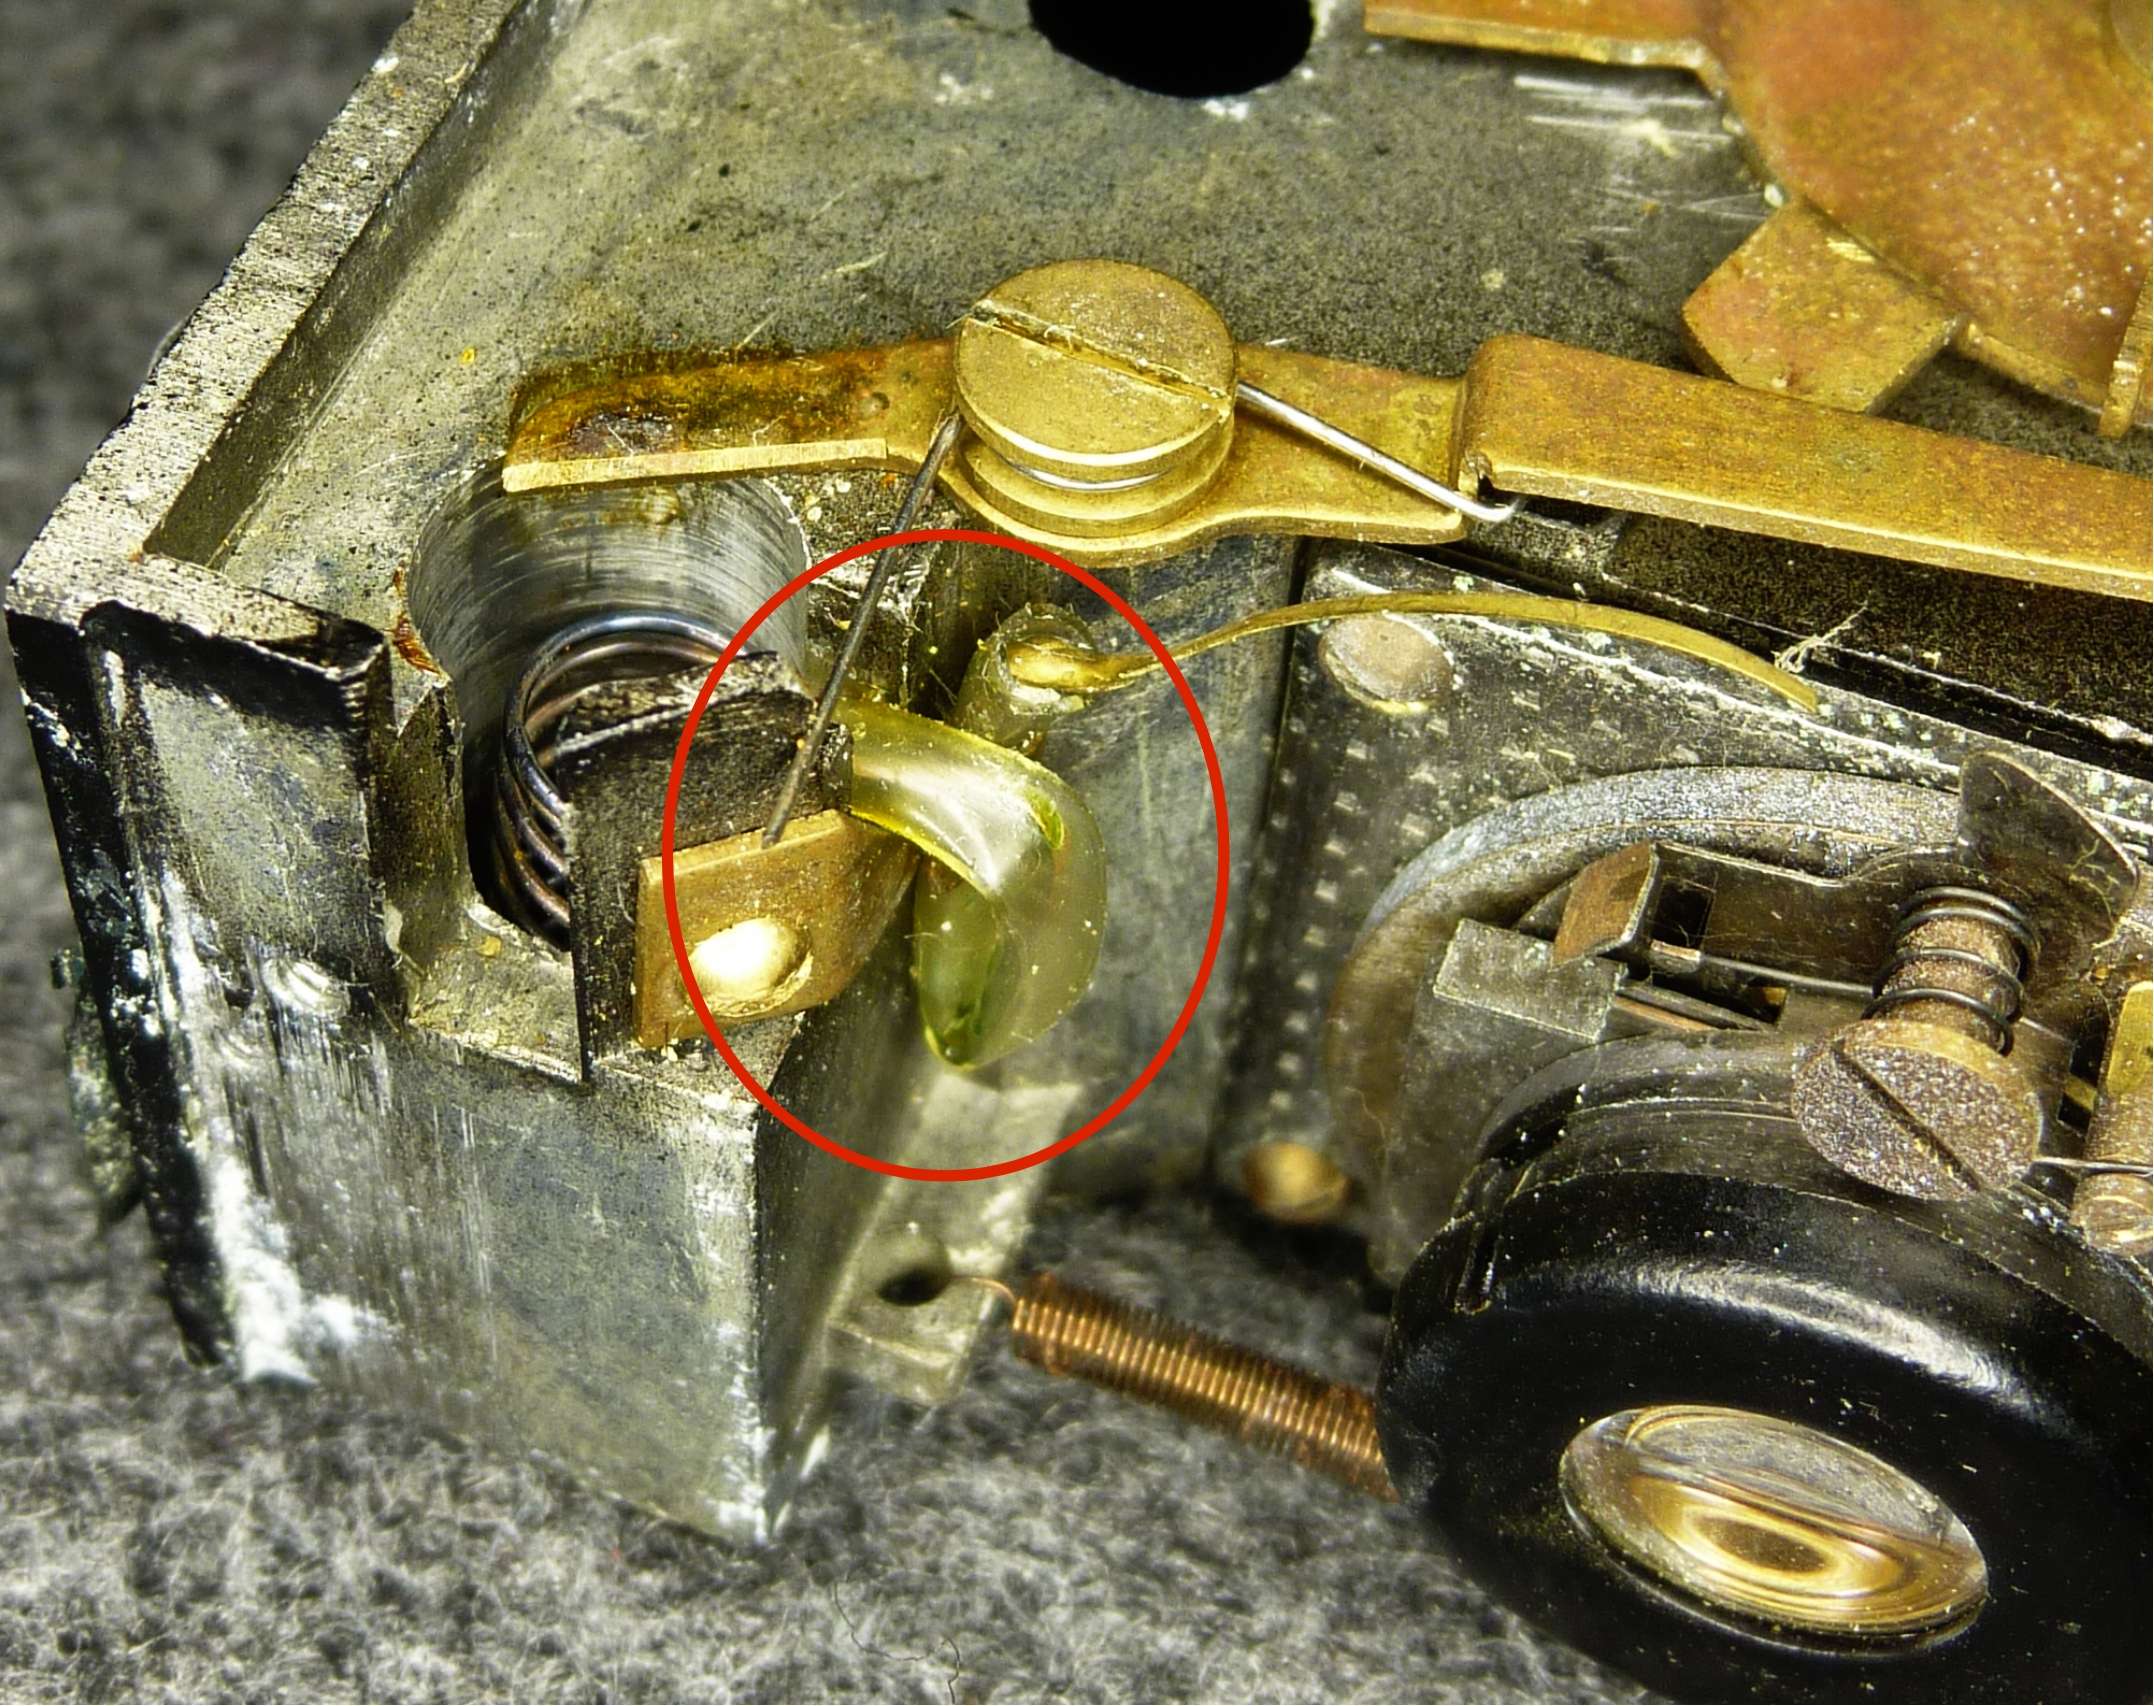
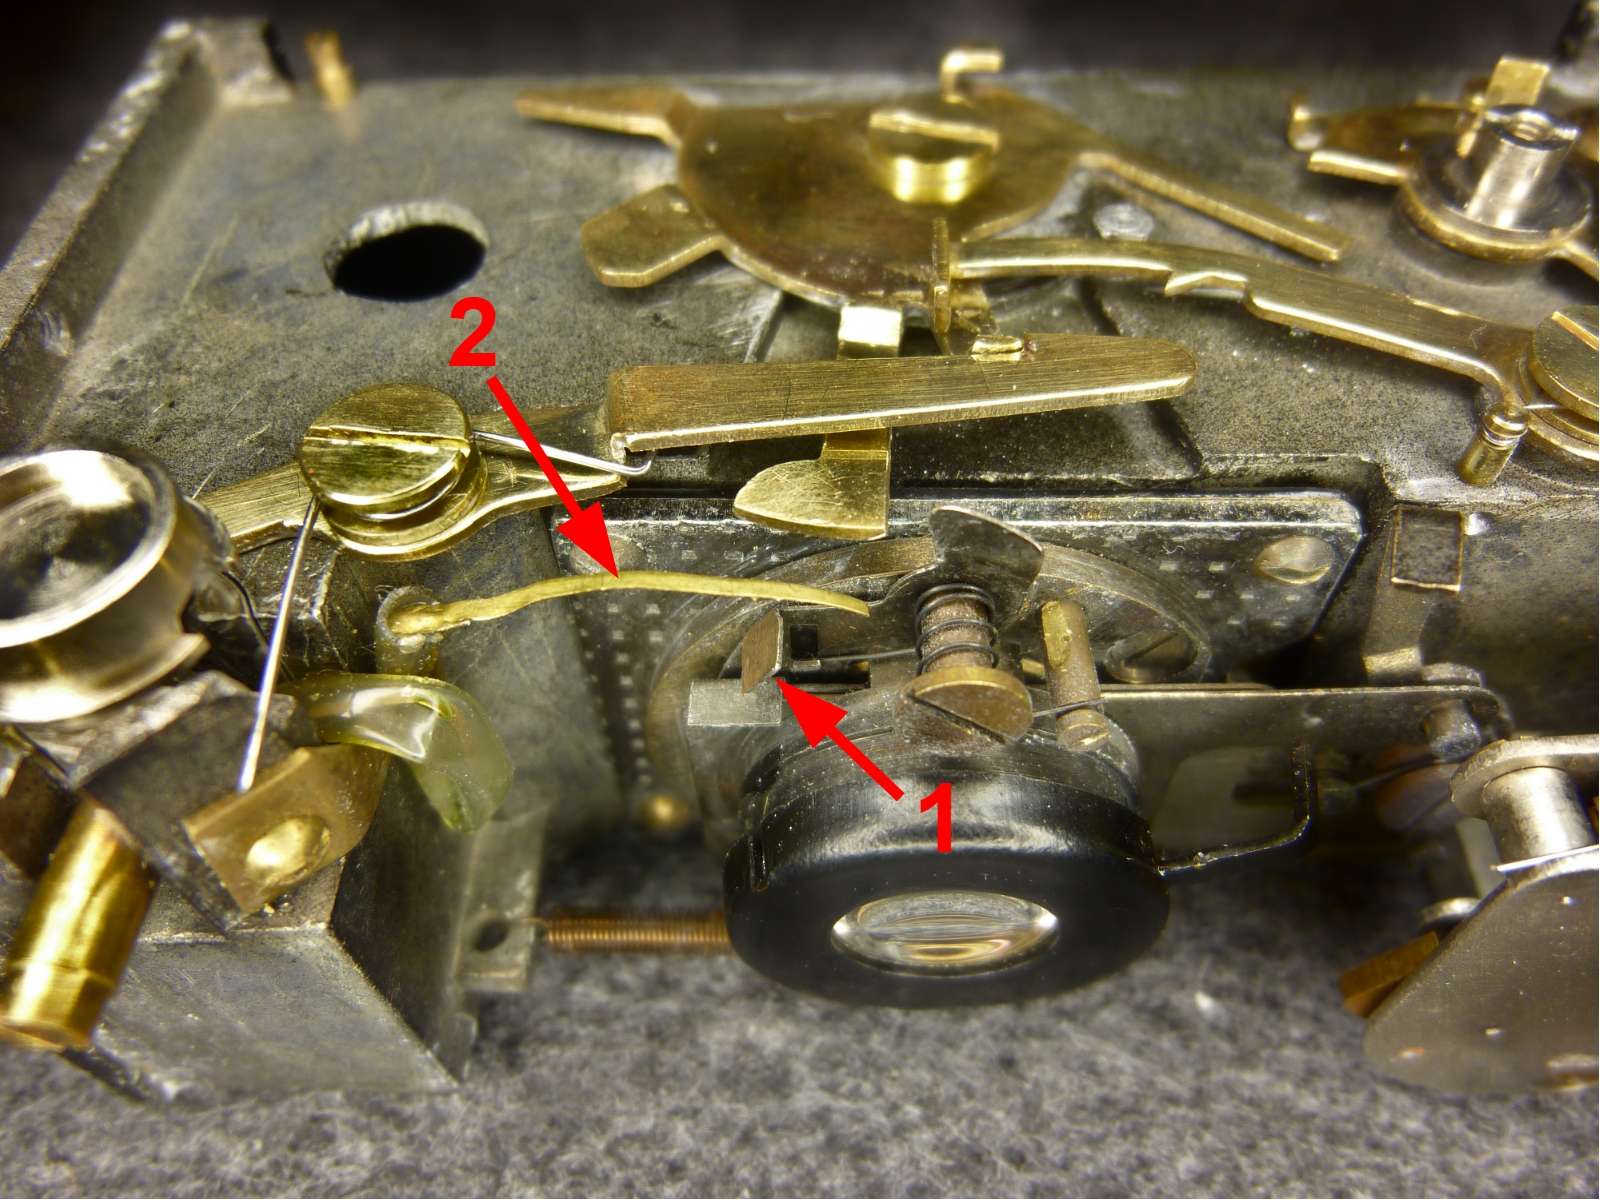
To do this, an electrical contact must be closed at the precise moment when the shutter is fully open. The two contacts of the switch are formed firstly by the camera body and secondly by an insulated cable connected to the inner contact of the flash shoe below the camera. At the other end, this cable is connected to a thin brass plate 2, the end of which hovers above the shutter blade, see image below.
The shutter blade has a tab 1 on its upper edge, which forms the second contact connected electrically to the camera body.
When the shutter blade is swivelled all the way up and the shutter is thus open, tab 1 presses against sheet 2 from below and closes the contact. The flash fires, see the following image on the right.
To illustrate this, here is a video showing this process in motion:
It is interesting to note that the contact remains closed as long as the shutter is open. Afterwards, the shutter blade swings back down and the contact opens.
Conclusion: The Engineering Logic of the Shutter
In summary, the shutter mechanism of the Mamiya Super 16 stands as a remarkably efficient solution to the challenges of subminiature photography. Seiichi Mamiya compressed a fully adjustable, multi-speed shutter into a constrained footprint.
The true brilliance lies in its elegant mechanical simplicity. Every timing interval is governed by the physical interaction of brass gears, tiny tension springs, and meticulously balanced levers. Despite its diminutive scale, the shutter provides a tactile responsiveness and accuracy that rivaled many professional full-size cameras of the period.
Documenting this mechanism also serves as a reminder that the Mamiya super 16 was built as a high-precision instrument. It represents what purely mechanical engineering can achieve in a pocket-sized format – a tiny, beating heart of clockwork that, with proper maintenance, remains as functional today as it was decades ago.
Cleaning the escapement
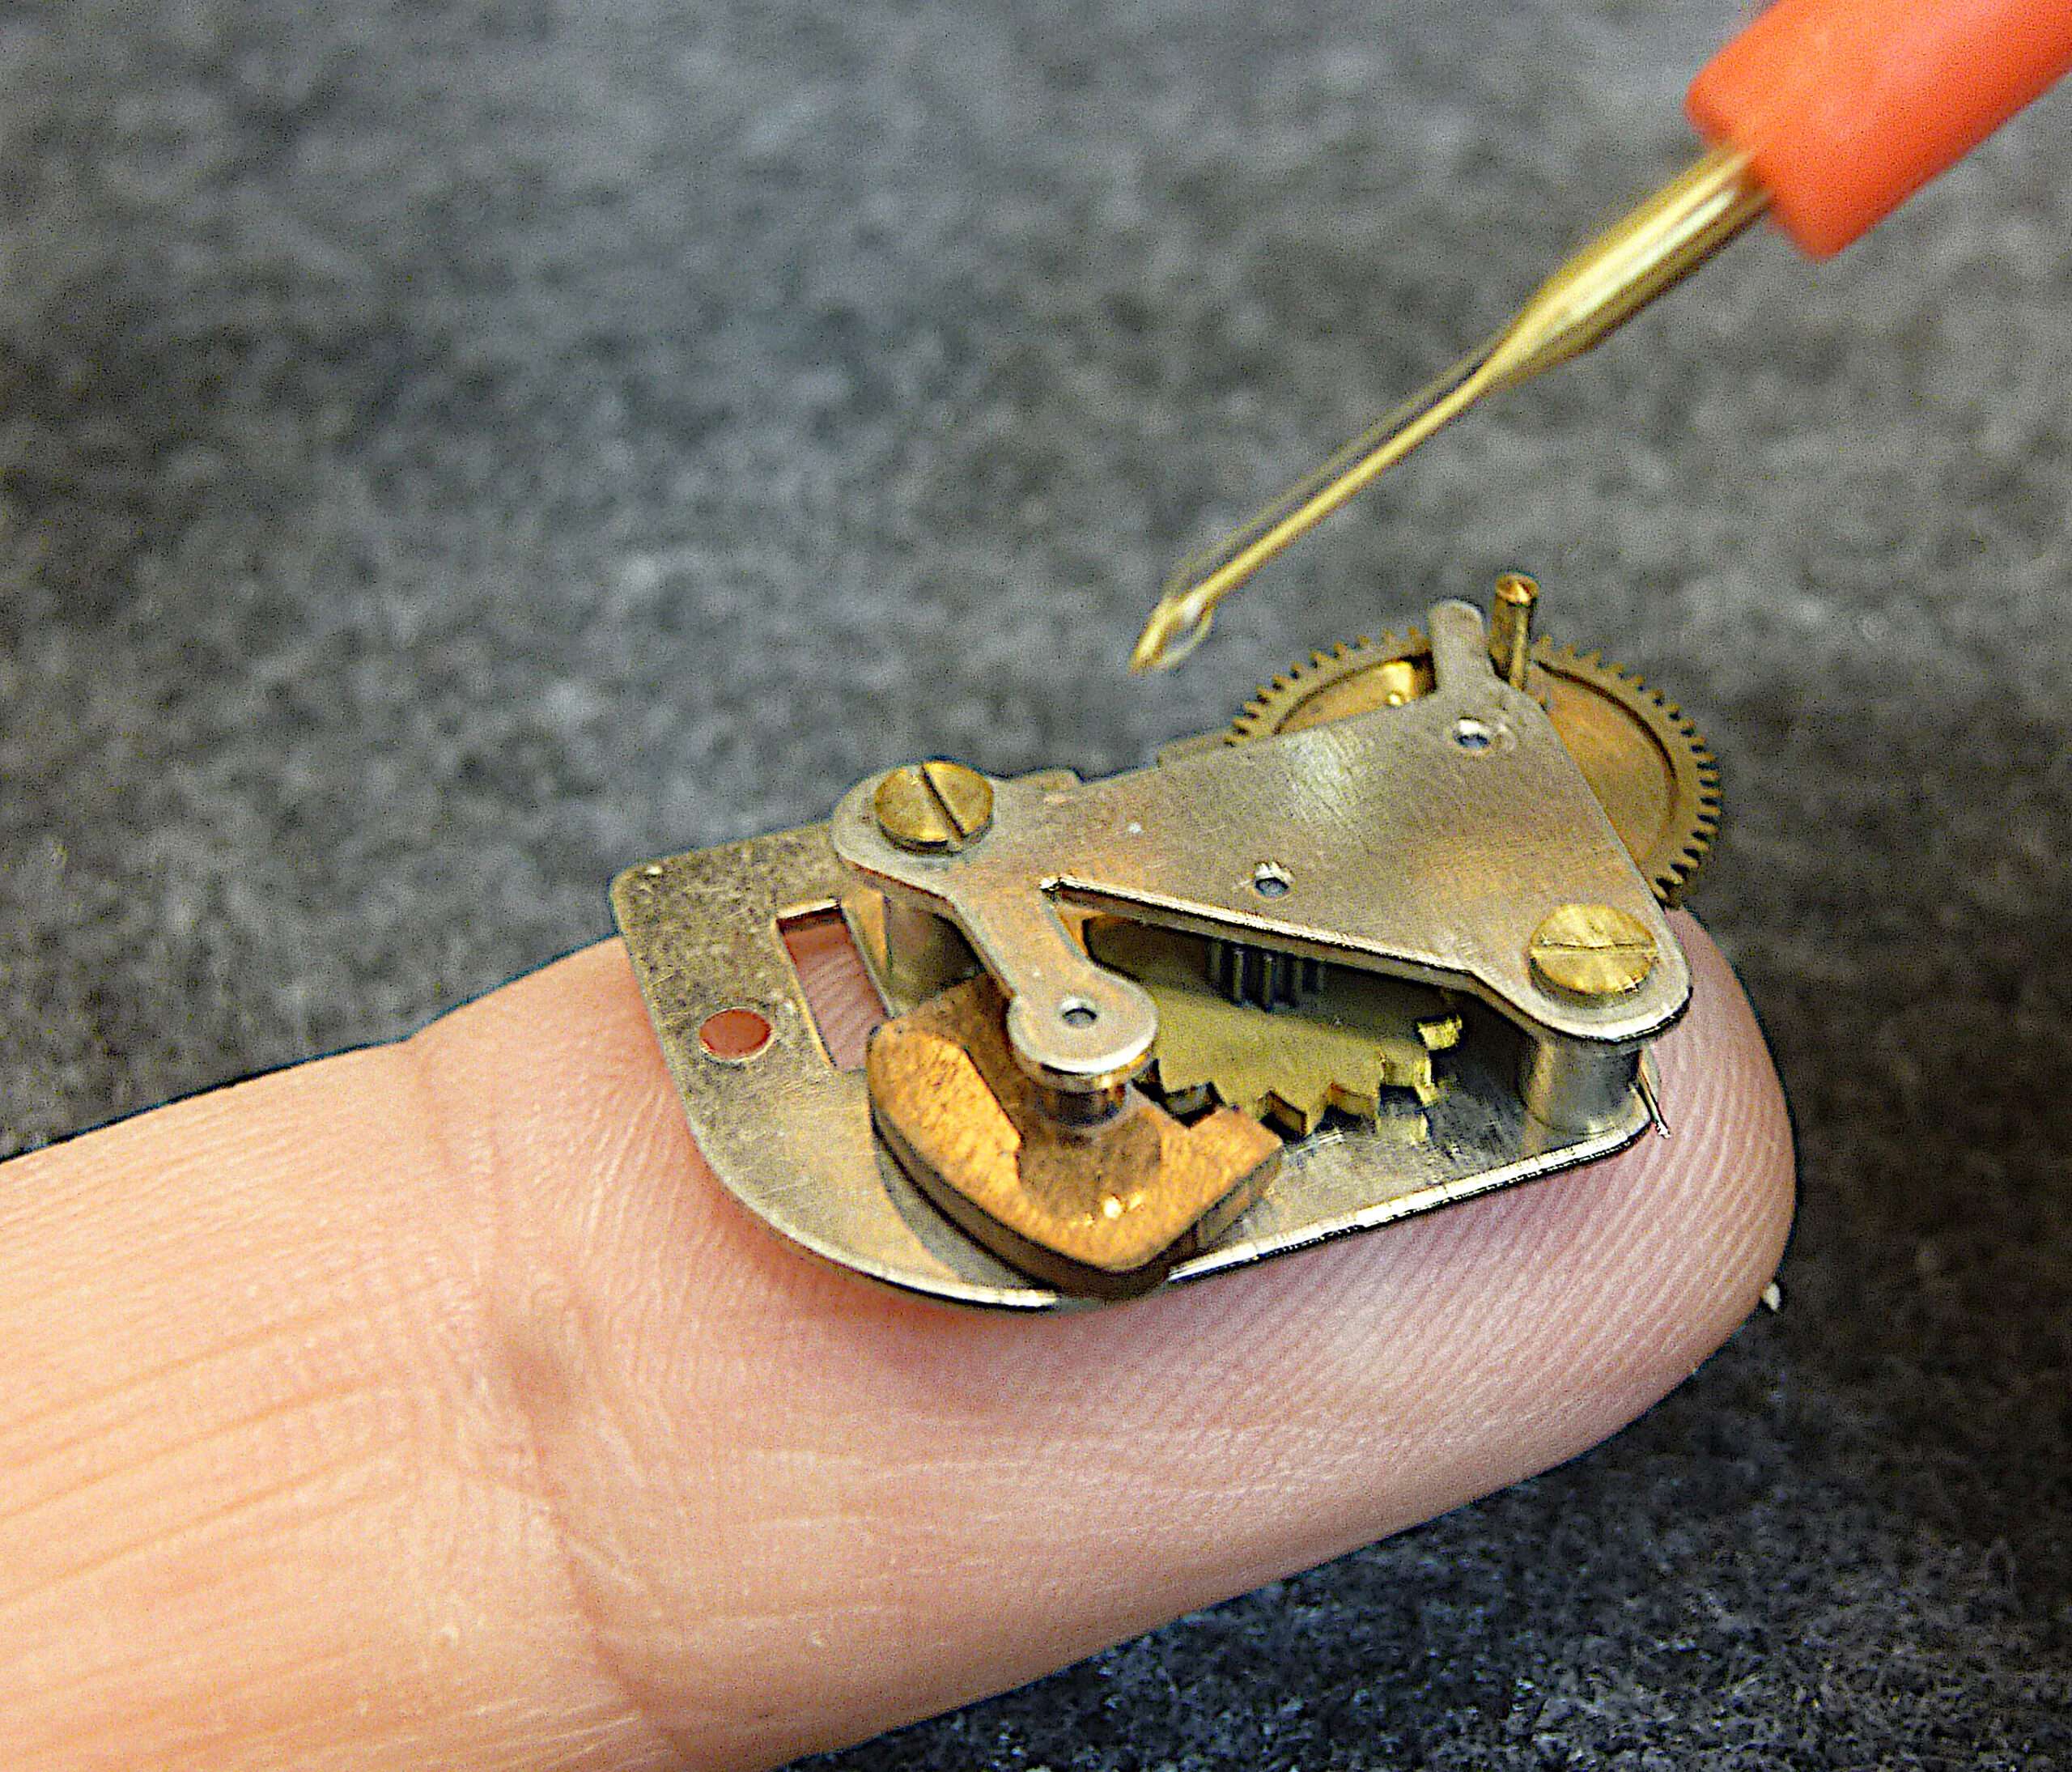
Since the shutter on my camera opens but no longer closes, the escapement is probably also stuck with old oil. It needs to be made functional again. This is a nice and not too difficult job with the Mamiya because the mechanism can be easily removed. It is tiny, but of excellent quality.
But before I oil it, I have to clean it meticulously first so that the old oil and dust don’t mix with the new oil.
Why does the Mamiya super 16 need an escapement?
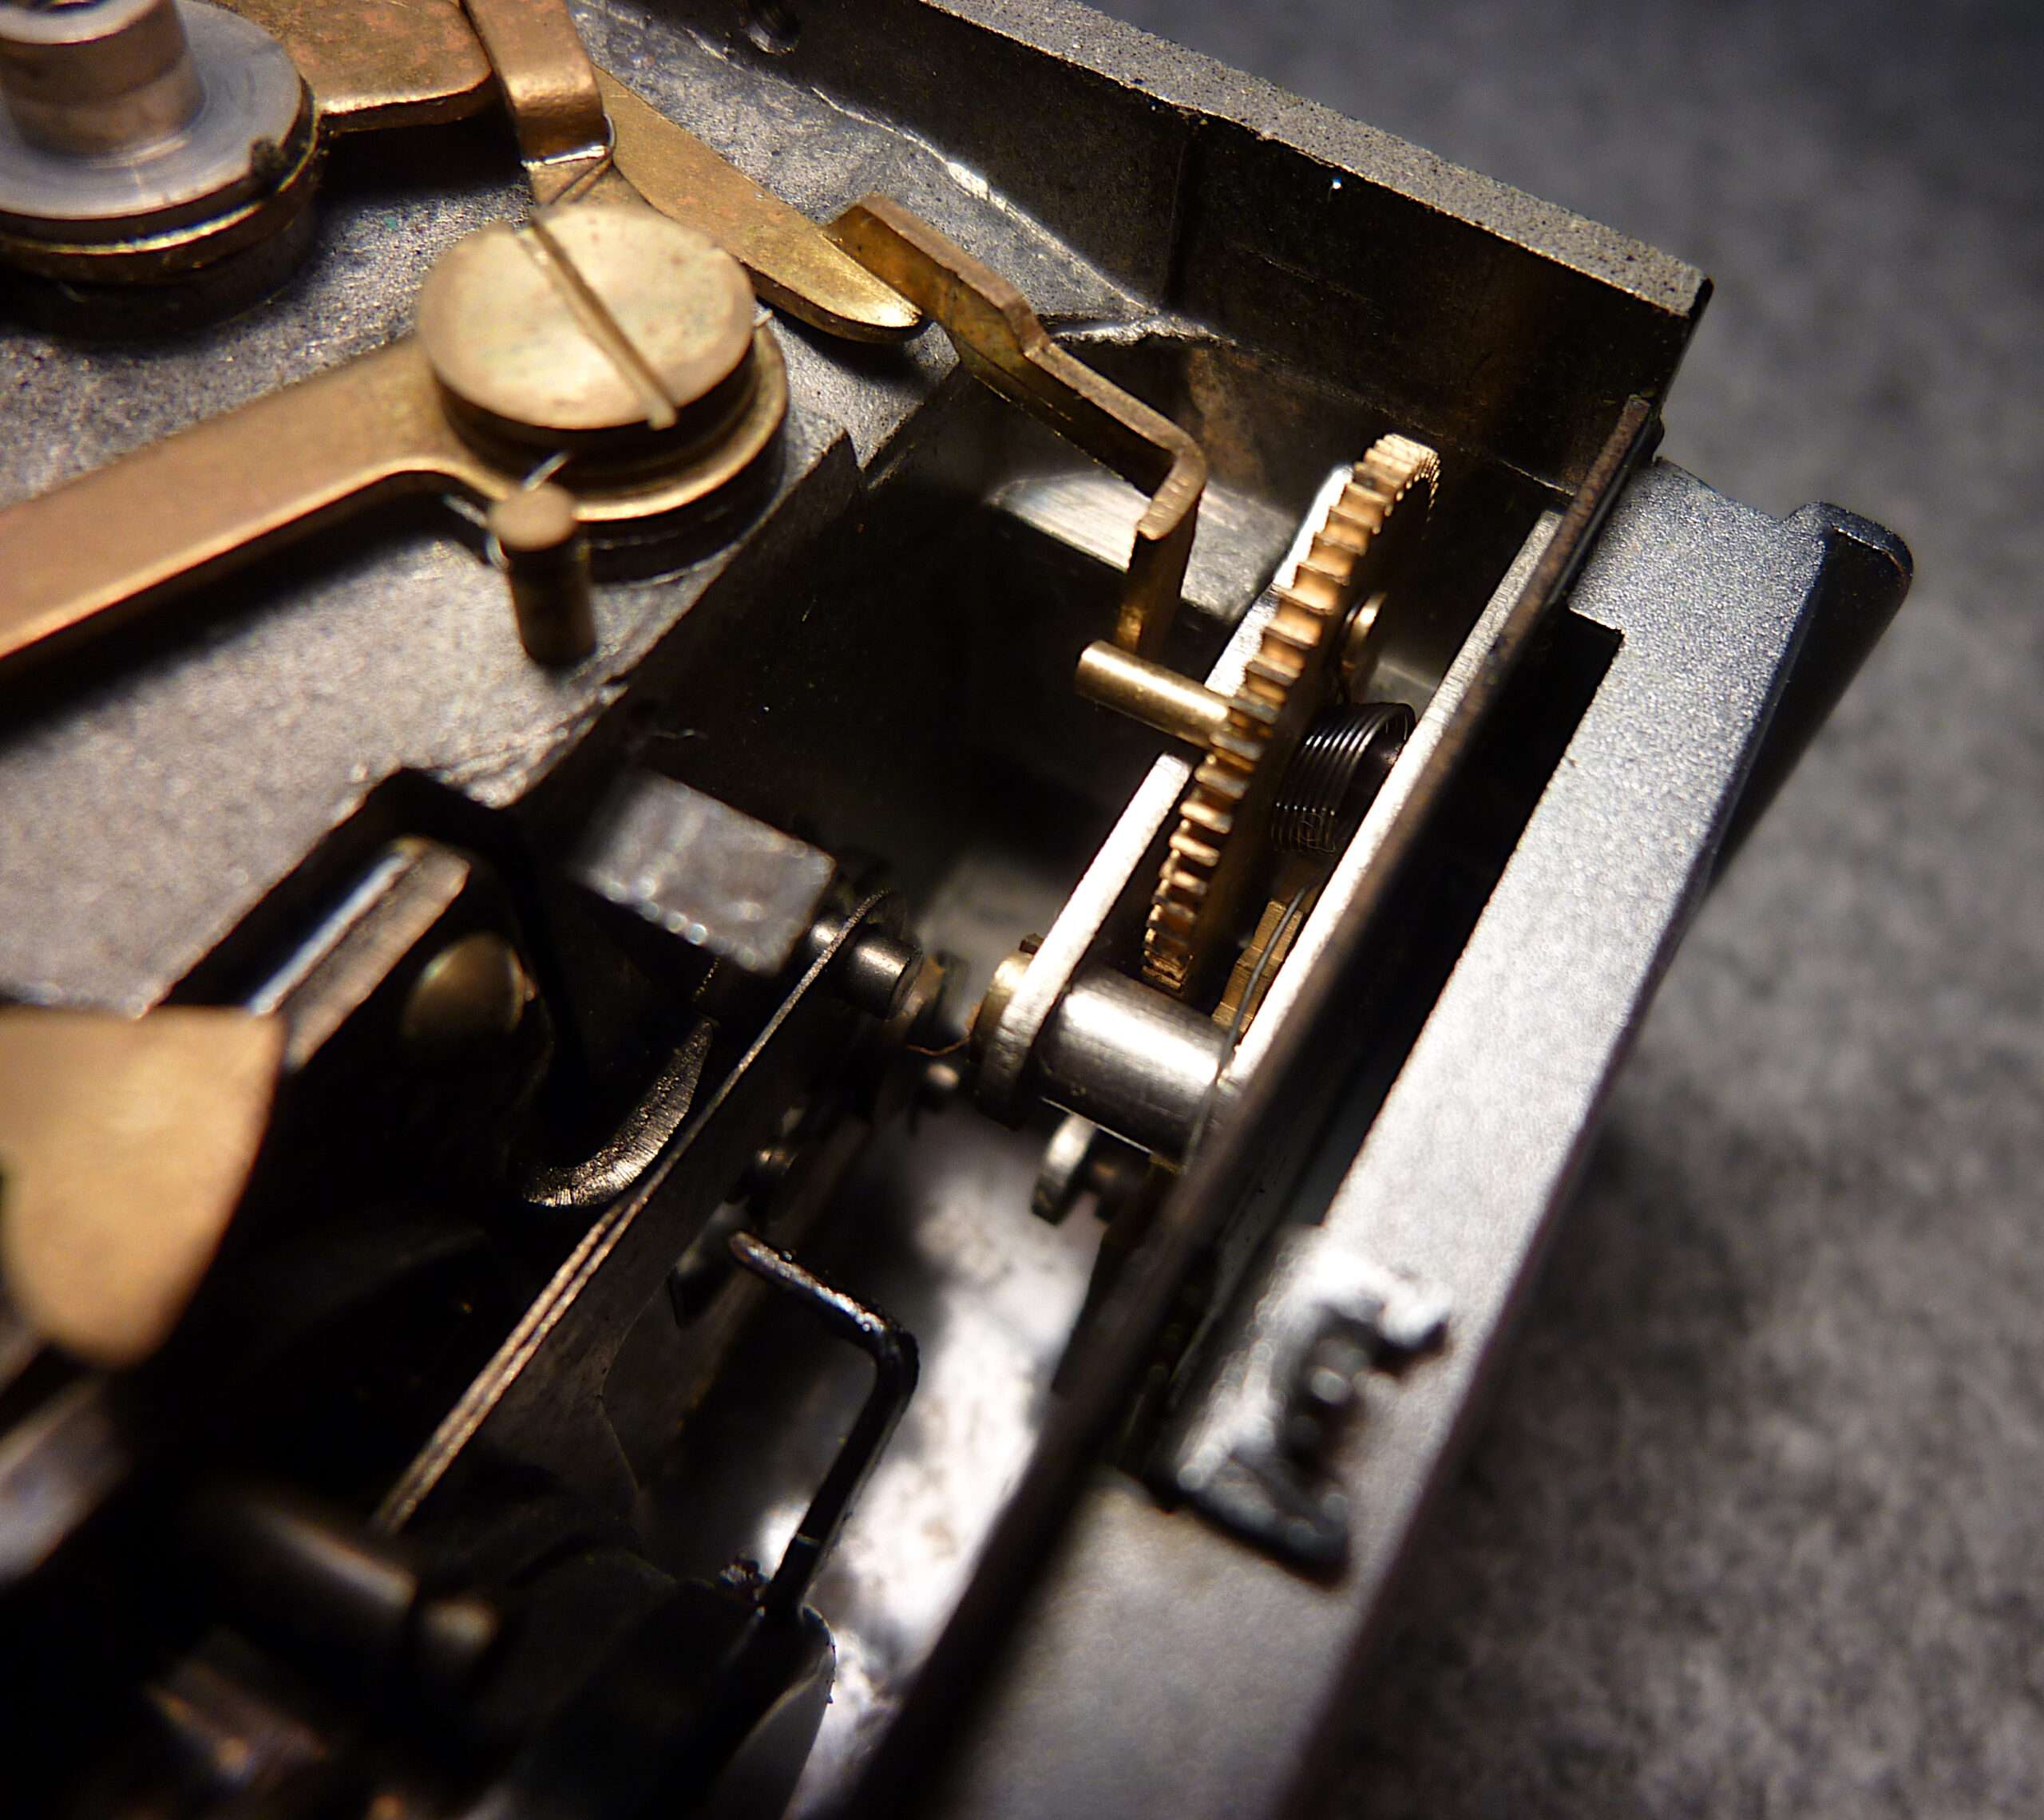
If you simply let go of the main lever preloaded by a spring , it pushes the shutter blade so quickly that the 1/200 s occurs. If you want the shutter to stay open longer, you have to control the movement of the blade locking arm differently in terms of speed.
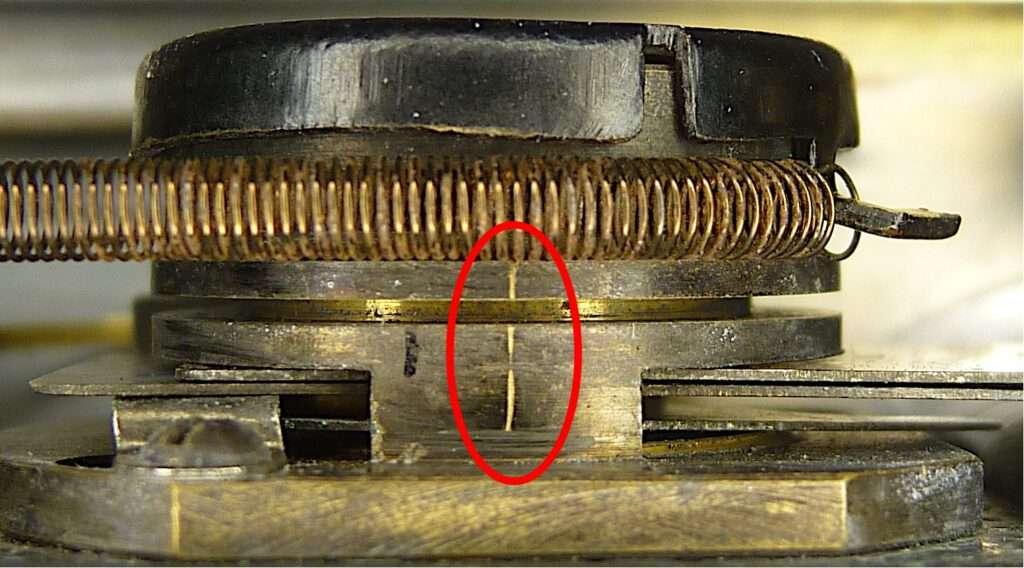
The picture on the right shows how the arm of the brake lever drives the gear wheel of the escapement. However, the gear wheel can only rotate at a speed determined by the anchor in the escapement. This forces the brake lever to rotate slowly.
How does an anchor escapement work?
The idea of the anchor escapement is to use a spring-mass system for torsional oscillation. The oscillation system provides a highly precise period of oscillation that drives a double lever (anchor) that controls the rotation of the escape wheel. If want to learn more about this, read my article here.
The Path of maintenance: Meditation on the escapement
The Release: I approach the escapement with a spirit of non-attachment. As I loosen the final screws, feel the decades of old, hardened oil. I lift the assembly with a steady hand, as if picking up a sleeping bird. There is no rush. The metal knows its place, and my red-inked checklist is the guide that ensures its return.
Breathe. Before me lies the pulse of the Mamiya – the escapement. It is a tiny universe of tension and release. To clean it is not a chore; it is an act of restoration for both the machine and the mind.
The Purification: I lower the gears into the bath of lighter fluid. As the ultrasonic waves begin their dance, I visualize the microscopic debris of time dissolving away. The clouds of old oil and dust vanish into the liquid, leaving the brass and steel in their primal, intended state. In the hum of the machine, I find your own stillness. When I lift the escapement out, it is reborn – clean, bright, and free of the friction of the past.
The Single Drop: Now comes the moment of ultimate focus. Take your finest oiler. A single, microscopic bead of thin watch oil sits at the tip – a tiny pearl of potential.
Do not flood the mechanism. Seek only the pivot points, the hidden junctions where the tiny axles meet the plates. One touch. One tiny, glistening mark of lubrication. Like a single drop of dew on a leaf, it is enough. To add more is to invite the dust of the future; to add just enough is to honor the mechanical balance.
The Return: Watch as the gears begin to spin once more, frictionless and silent. The shutter’s heartbeat is steady again. I have not just repaired a camera; I have restored the flow of time within a pocket of steel.
Now that the escapement is running optimally again, I can reinstall it and turn my attention to the rest of the shutter mechanism.
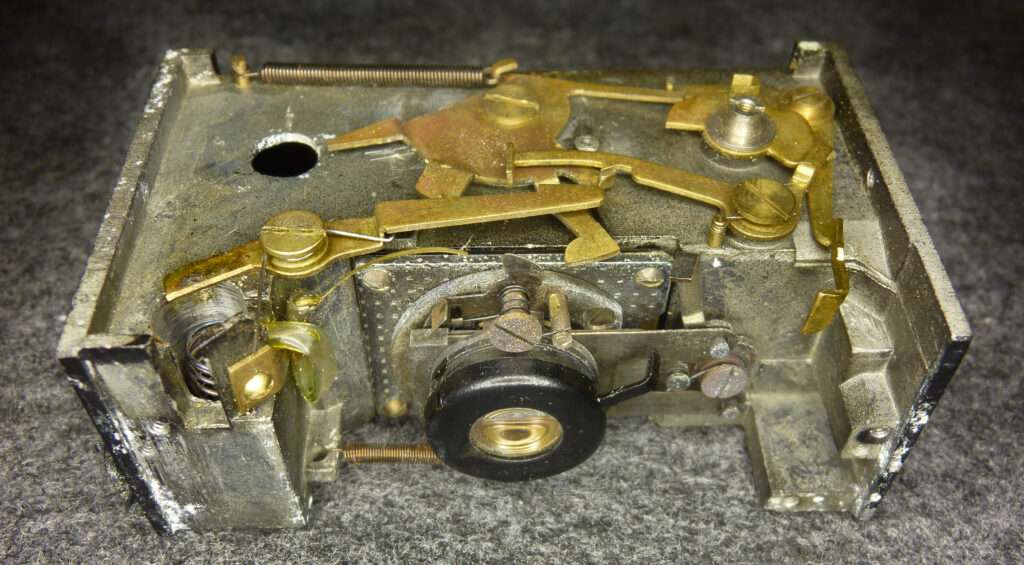
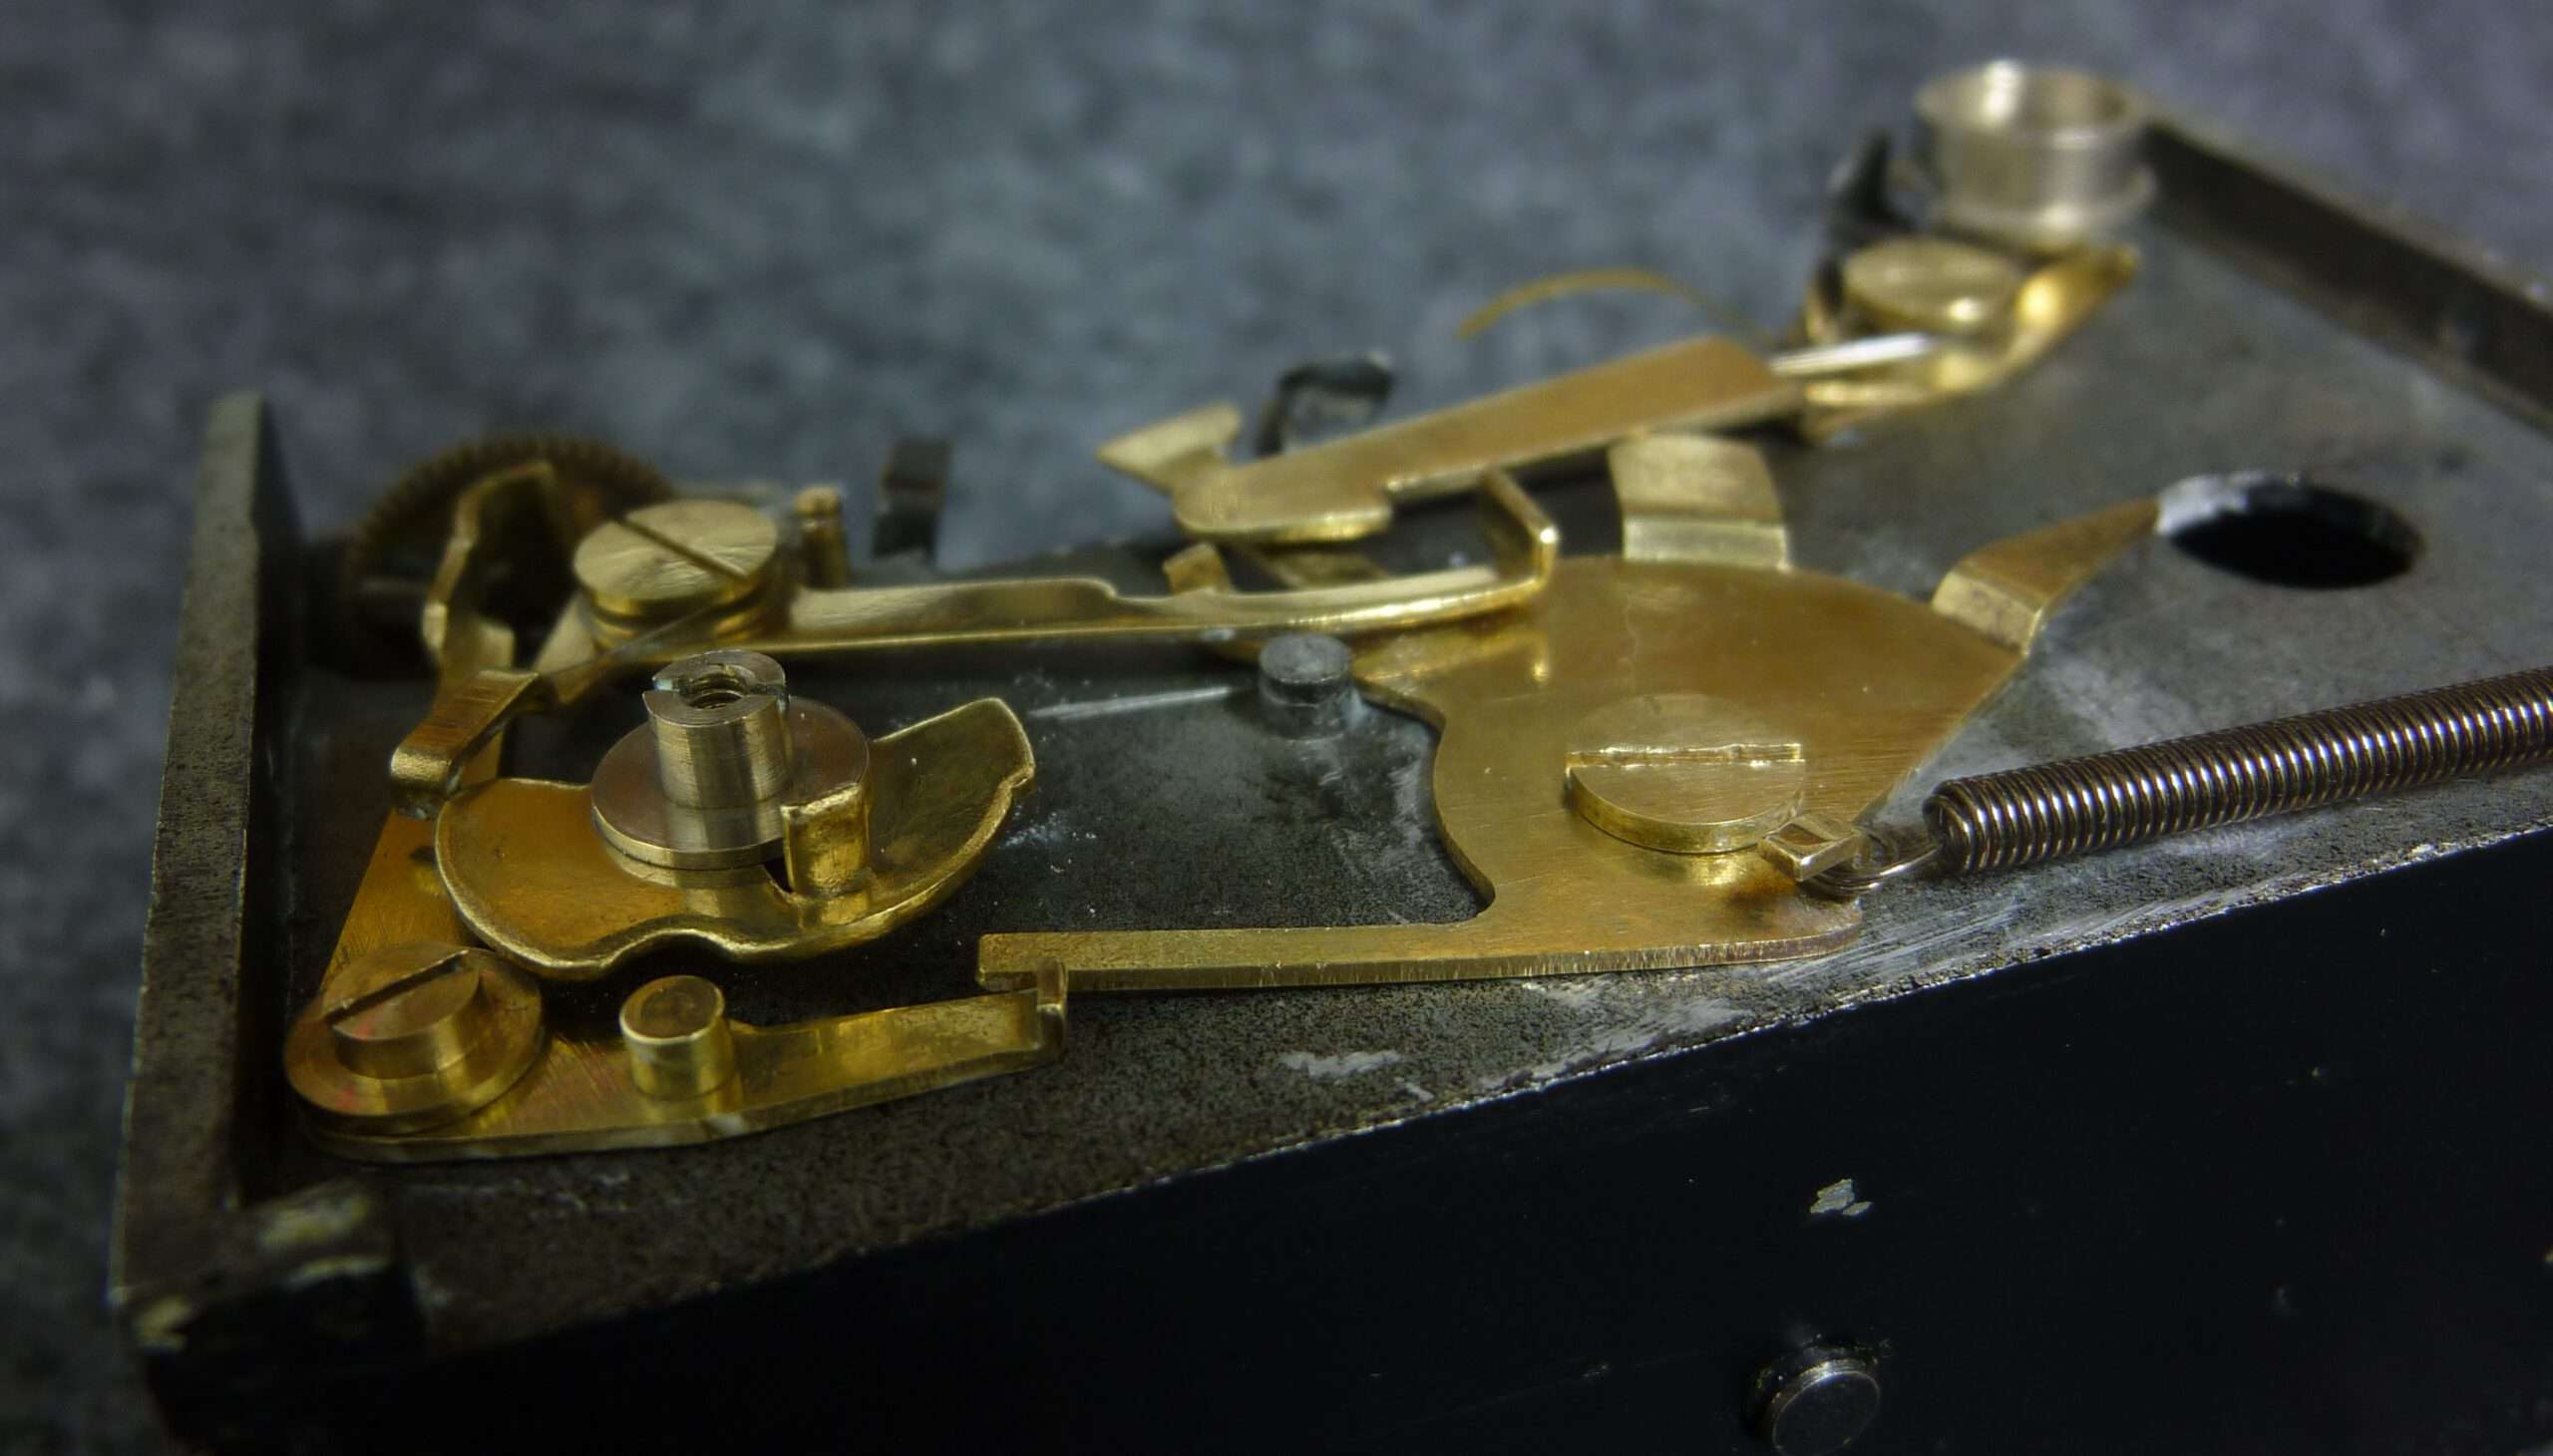
Brass and steel: Restoration of the shutter assembly

The body of the Mamiya lies open before me – a complex landscape of levers and interlocking plates. To disassemble this mechanical web is an exercise in deep mindfulness. Every lever follows its own path; every spring holds the memory of decades of tension.
Now that I understand how the individual components of the lock work together, I can determine the lubricants to use. All bearing points of the levers move at very high speeds, driven by springs. So I will use thin watchmaker’s oil there. I use synthetic oil to prevent future resinification.
Where the levers meet and slide against each other, I will use high-performance gun grease. This grease contains ceramic particles that maintain lubrication when the levers strike each other at high speed.
I will use acetone to completely remove all grease from the large friction surface where the main lever touches the camera body. This component runs most smoothly when dry.
The ritual of cleaning and polishing a Mamiya super 16
With patience, I begin the complete teardown. One by one, I lift the levers and springs from their posts. I choose not to use an ultrasonic bath; instead, I patiently hand-rub each individual part with isopropanol. I can feel forty years of oxidized oil and the dust of forgotten journeys finally letting go.
Then comes the step that transcends mere function: using metal polishing paste, I bring the dull, tarnished brass to a mirror finish. Technically, this high-gloss polish inside the housing isn’t necessary – no one will ever see it. But for me, it is an act of profound respect. Through this perfect aesthetic, I honor the brilliant designer and the workers in the Japanese manufactory who originally crafted this precision instrument. The metal now reflects a light it has never shown before. It is no longer just a component; it is a jewel:
Lubrication
The final phase is the most delicate: the return of motion. With my finest oiler and a touch of specialized grease, I approach the friction points.
A microscopic drop of oil for the high-speed pivots, a thin, almost invisible film of grease for the sliding tracks of the main levers. This is the breath of the machine. As I reunite the levers, they move with a ghostly smoothness. The springs click into place with a sound that is simultaneously crisp and soft – the very heartbeat of mechanical perfection.
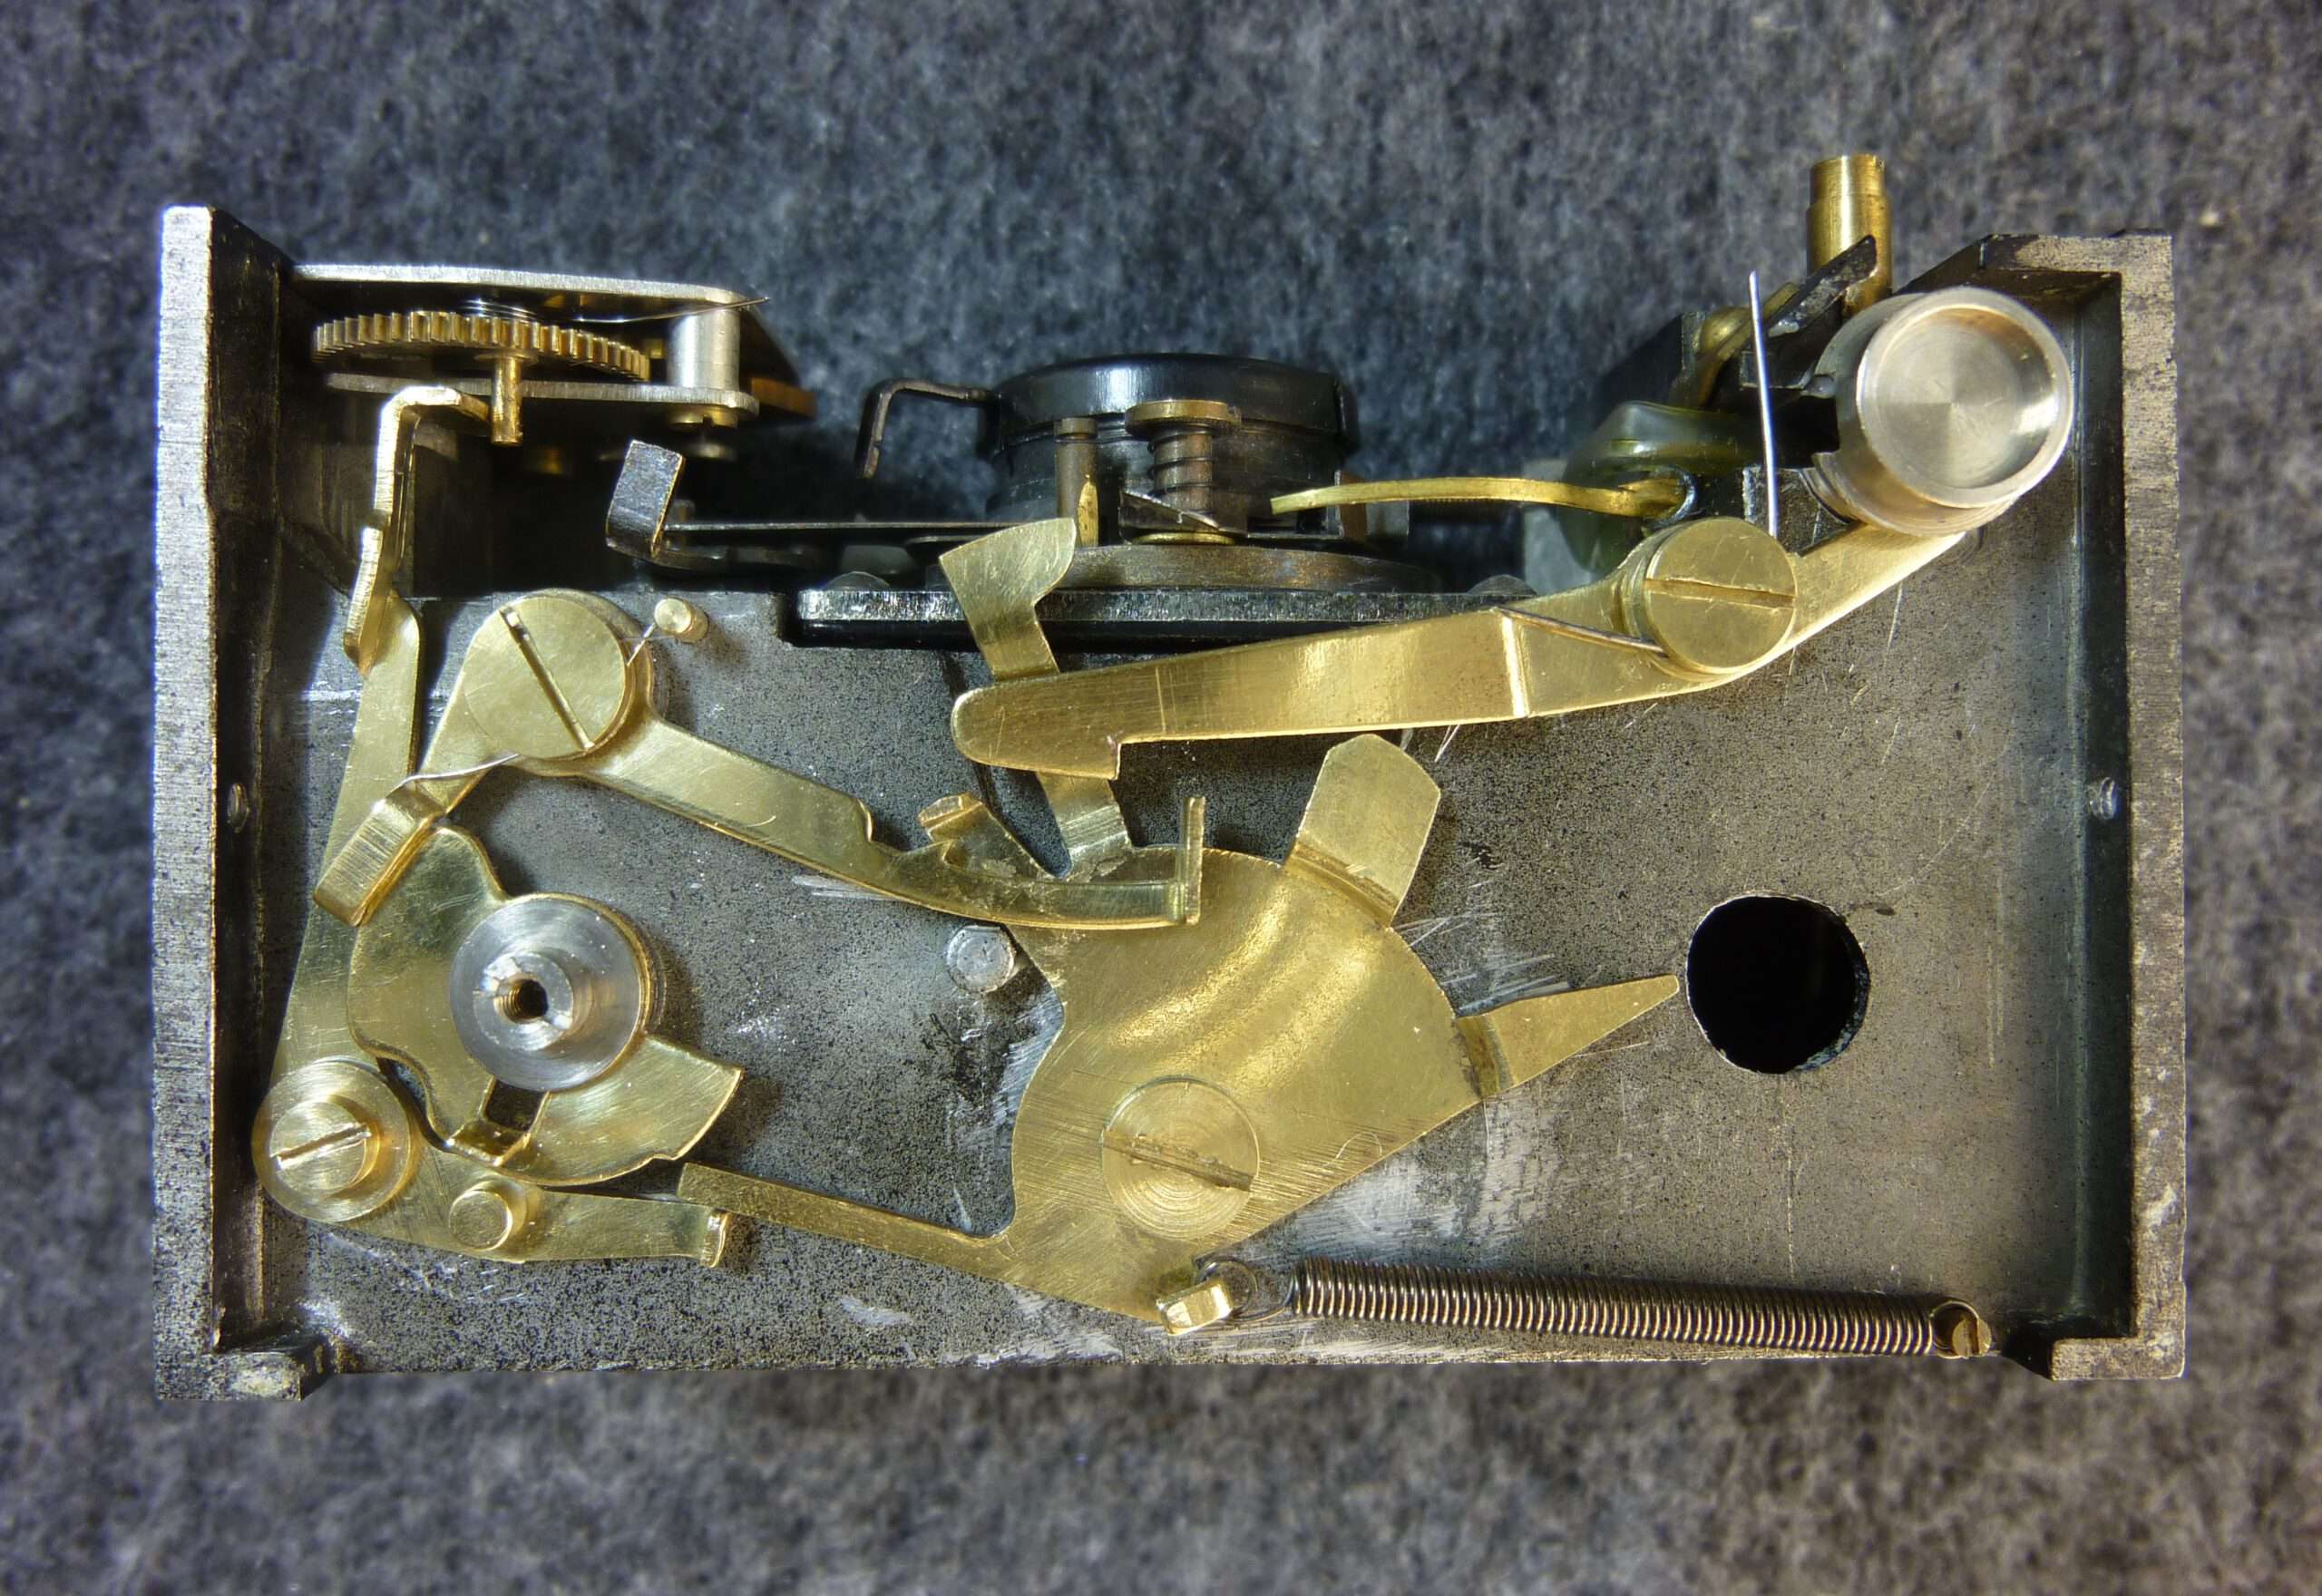
Awakening of the mechanics
The assembly is complete. What was once a gummed-up, grimy relic is now a shimmering masterpiece of golden brass and polished steel. It sits on my mat, revitalized and more beautiful than the day it was born. I have cleared the path so that movement may once again flow unhindered through this mechanical heart.
The final synchrony: Qualitative verification
The restoration is complete, but the work is not yet finished. Now comes the moment of truth – the verification. In this phase, I move beyond the individual parts and look at the machine as a whole. It is a process of listening and observing, ensuring that every mechanical intention is realized.
The Alignment of function
I begin the check with a quiet focus, testing each capability in turn. I press the shutter release, feeling the precise point where the tension gives way to action. I cycle through the speeds: the crisp, instantaneous snap of the short exposures, followed by the steady, rhythmic gear-train buzz of the long times. I watch the shutter blades – they must bloom open and vanish again at the exact mathematical moment. There is no room for hesitation; the movement must be absolute.
I engage the long-exposure setting, holding the moment, then watching as the mechanism returns to rest the instant I let go. Each function is a thread in a larger tapestry; if one is out of alignment, the entire instrument is silent.
At last, I turn my attention to the electrical connections. I check the flash synchronization, ensuring the contact closes in perfect unison with the shutter’s peak opening.
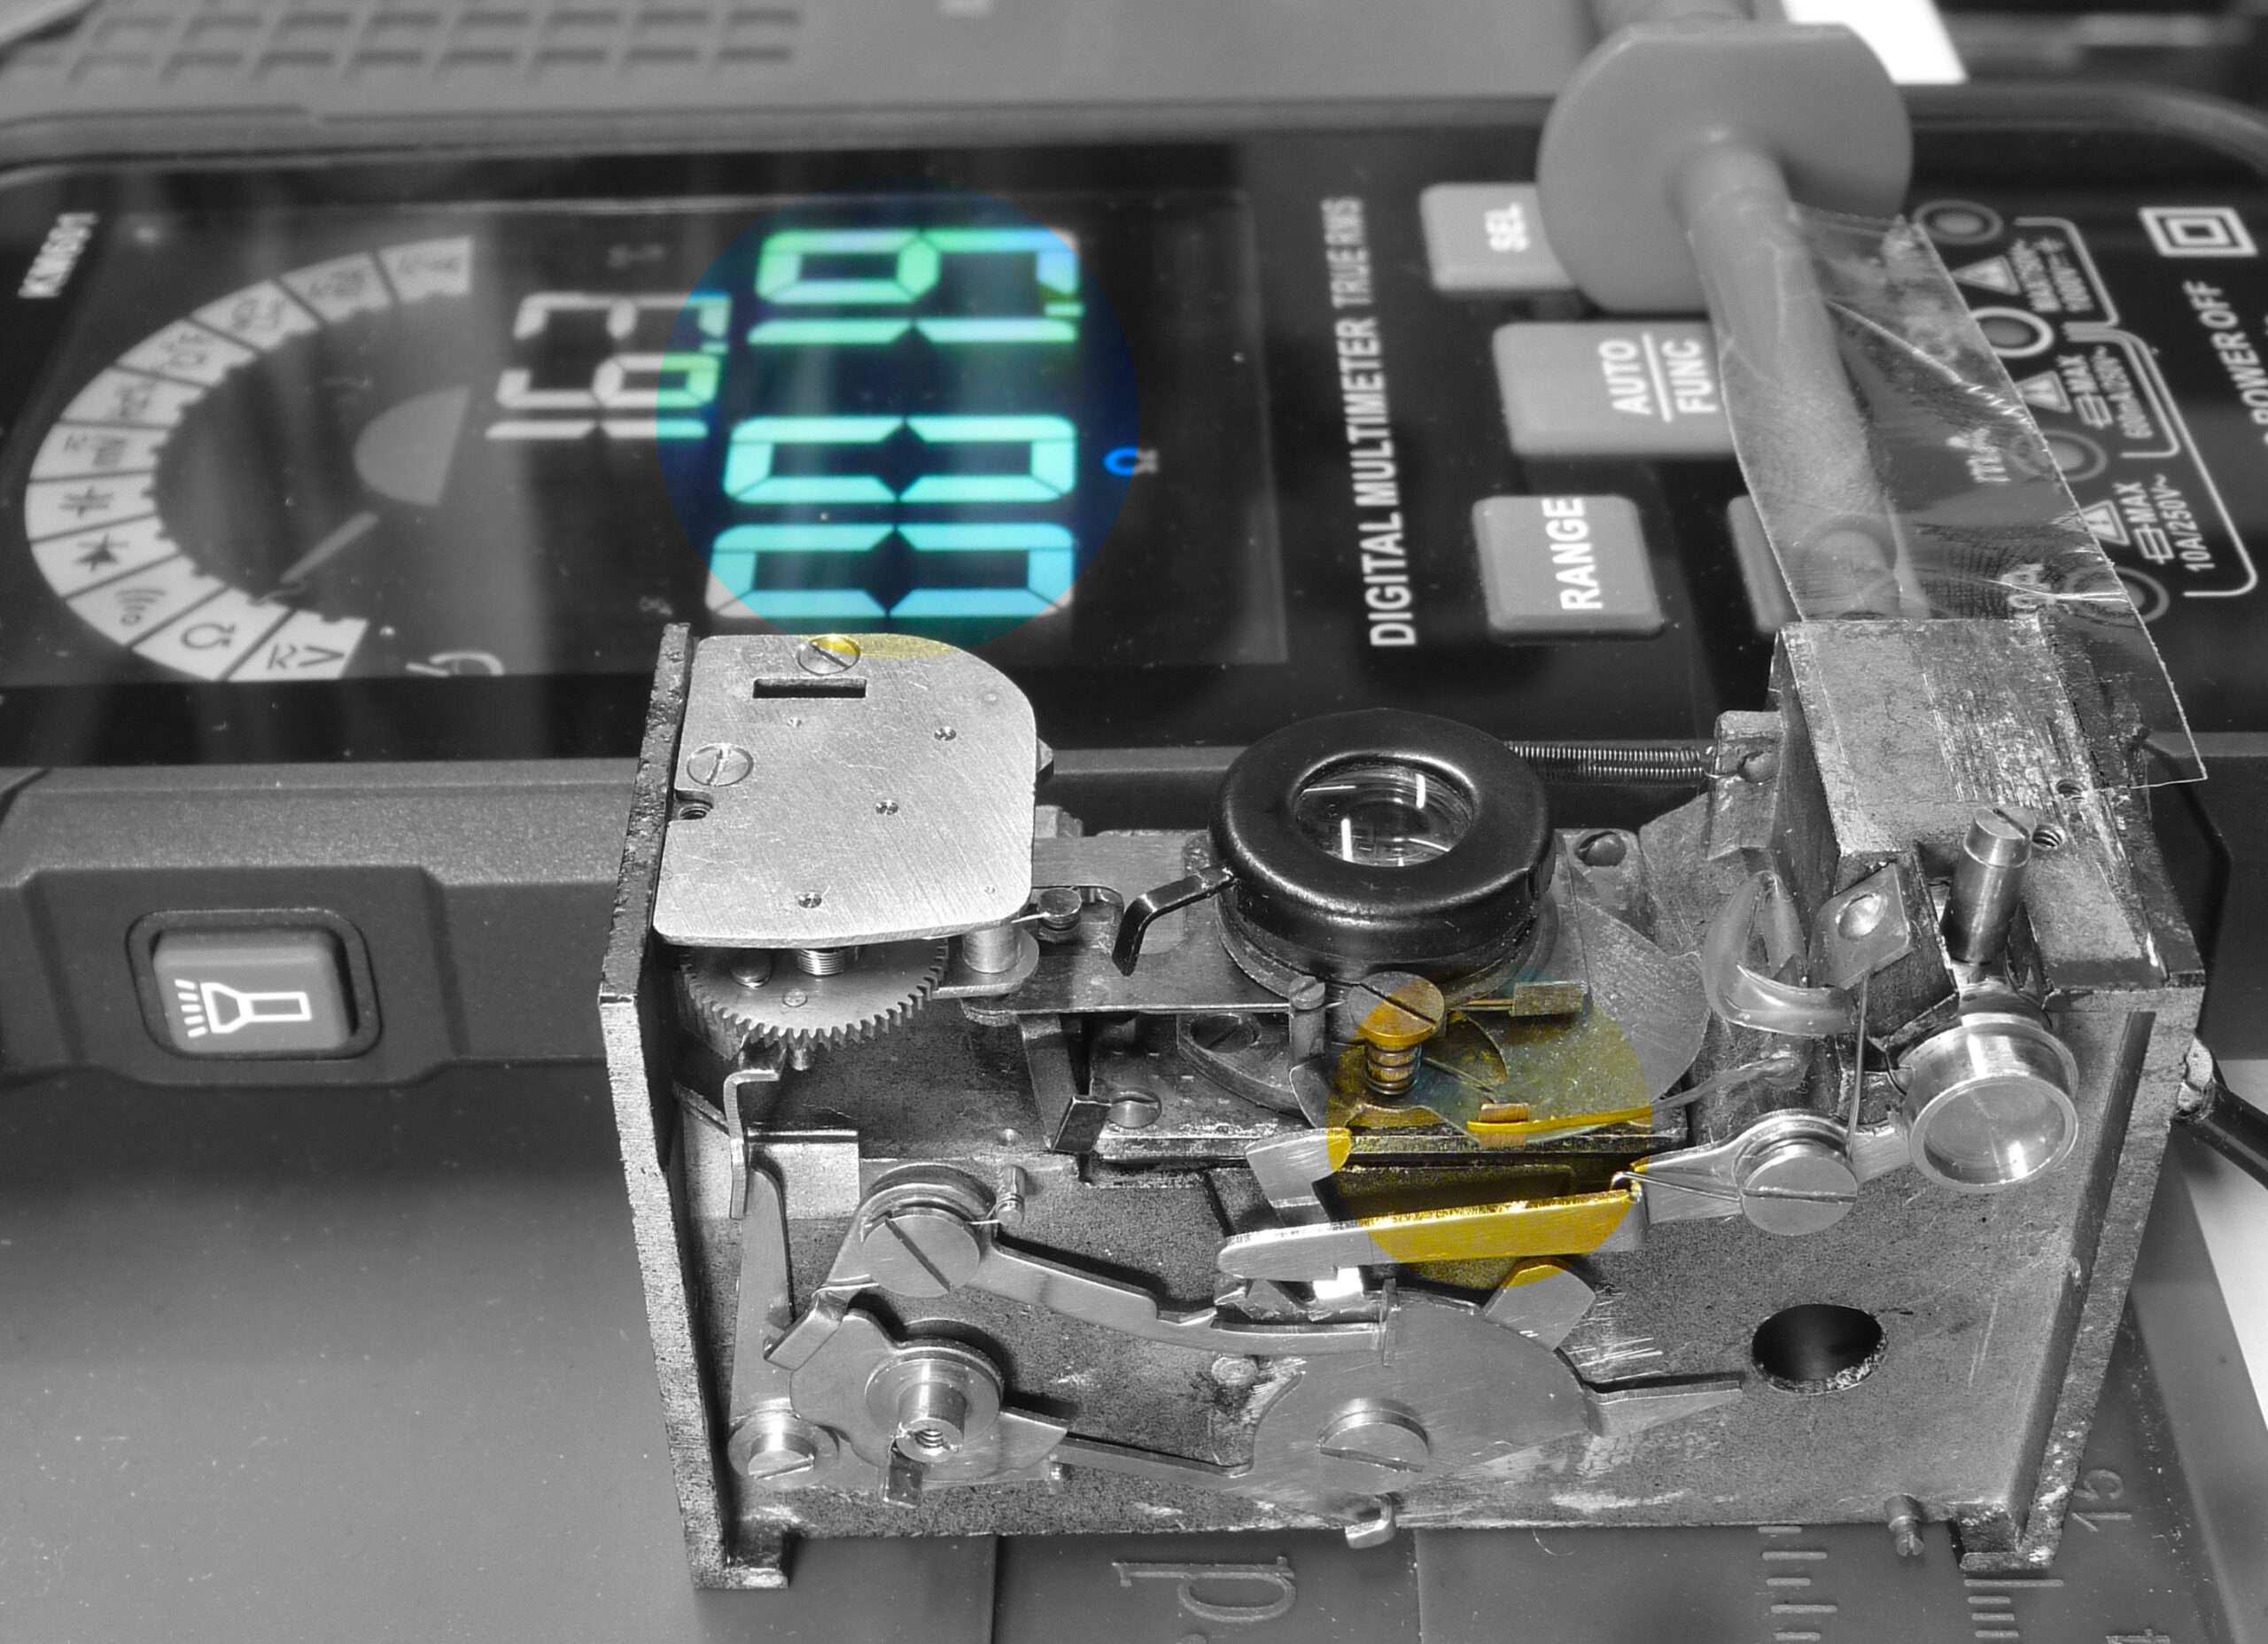
The moment of truth: Data vs. intuition
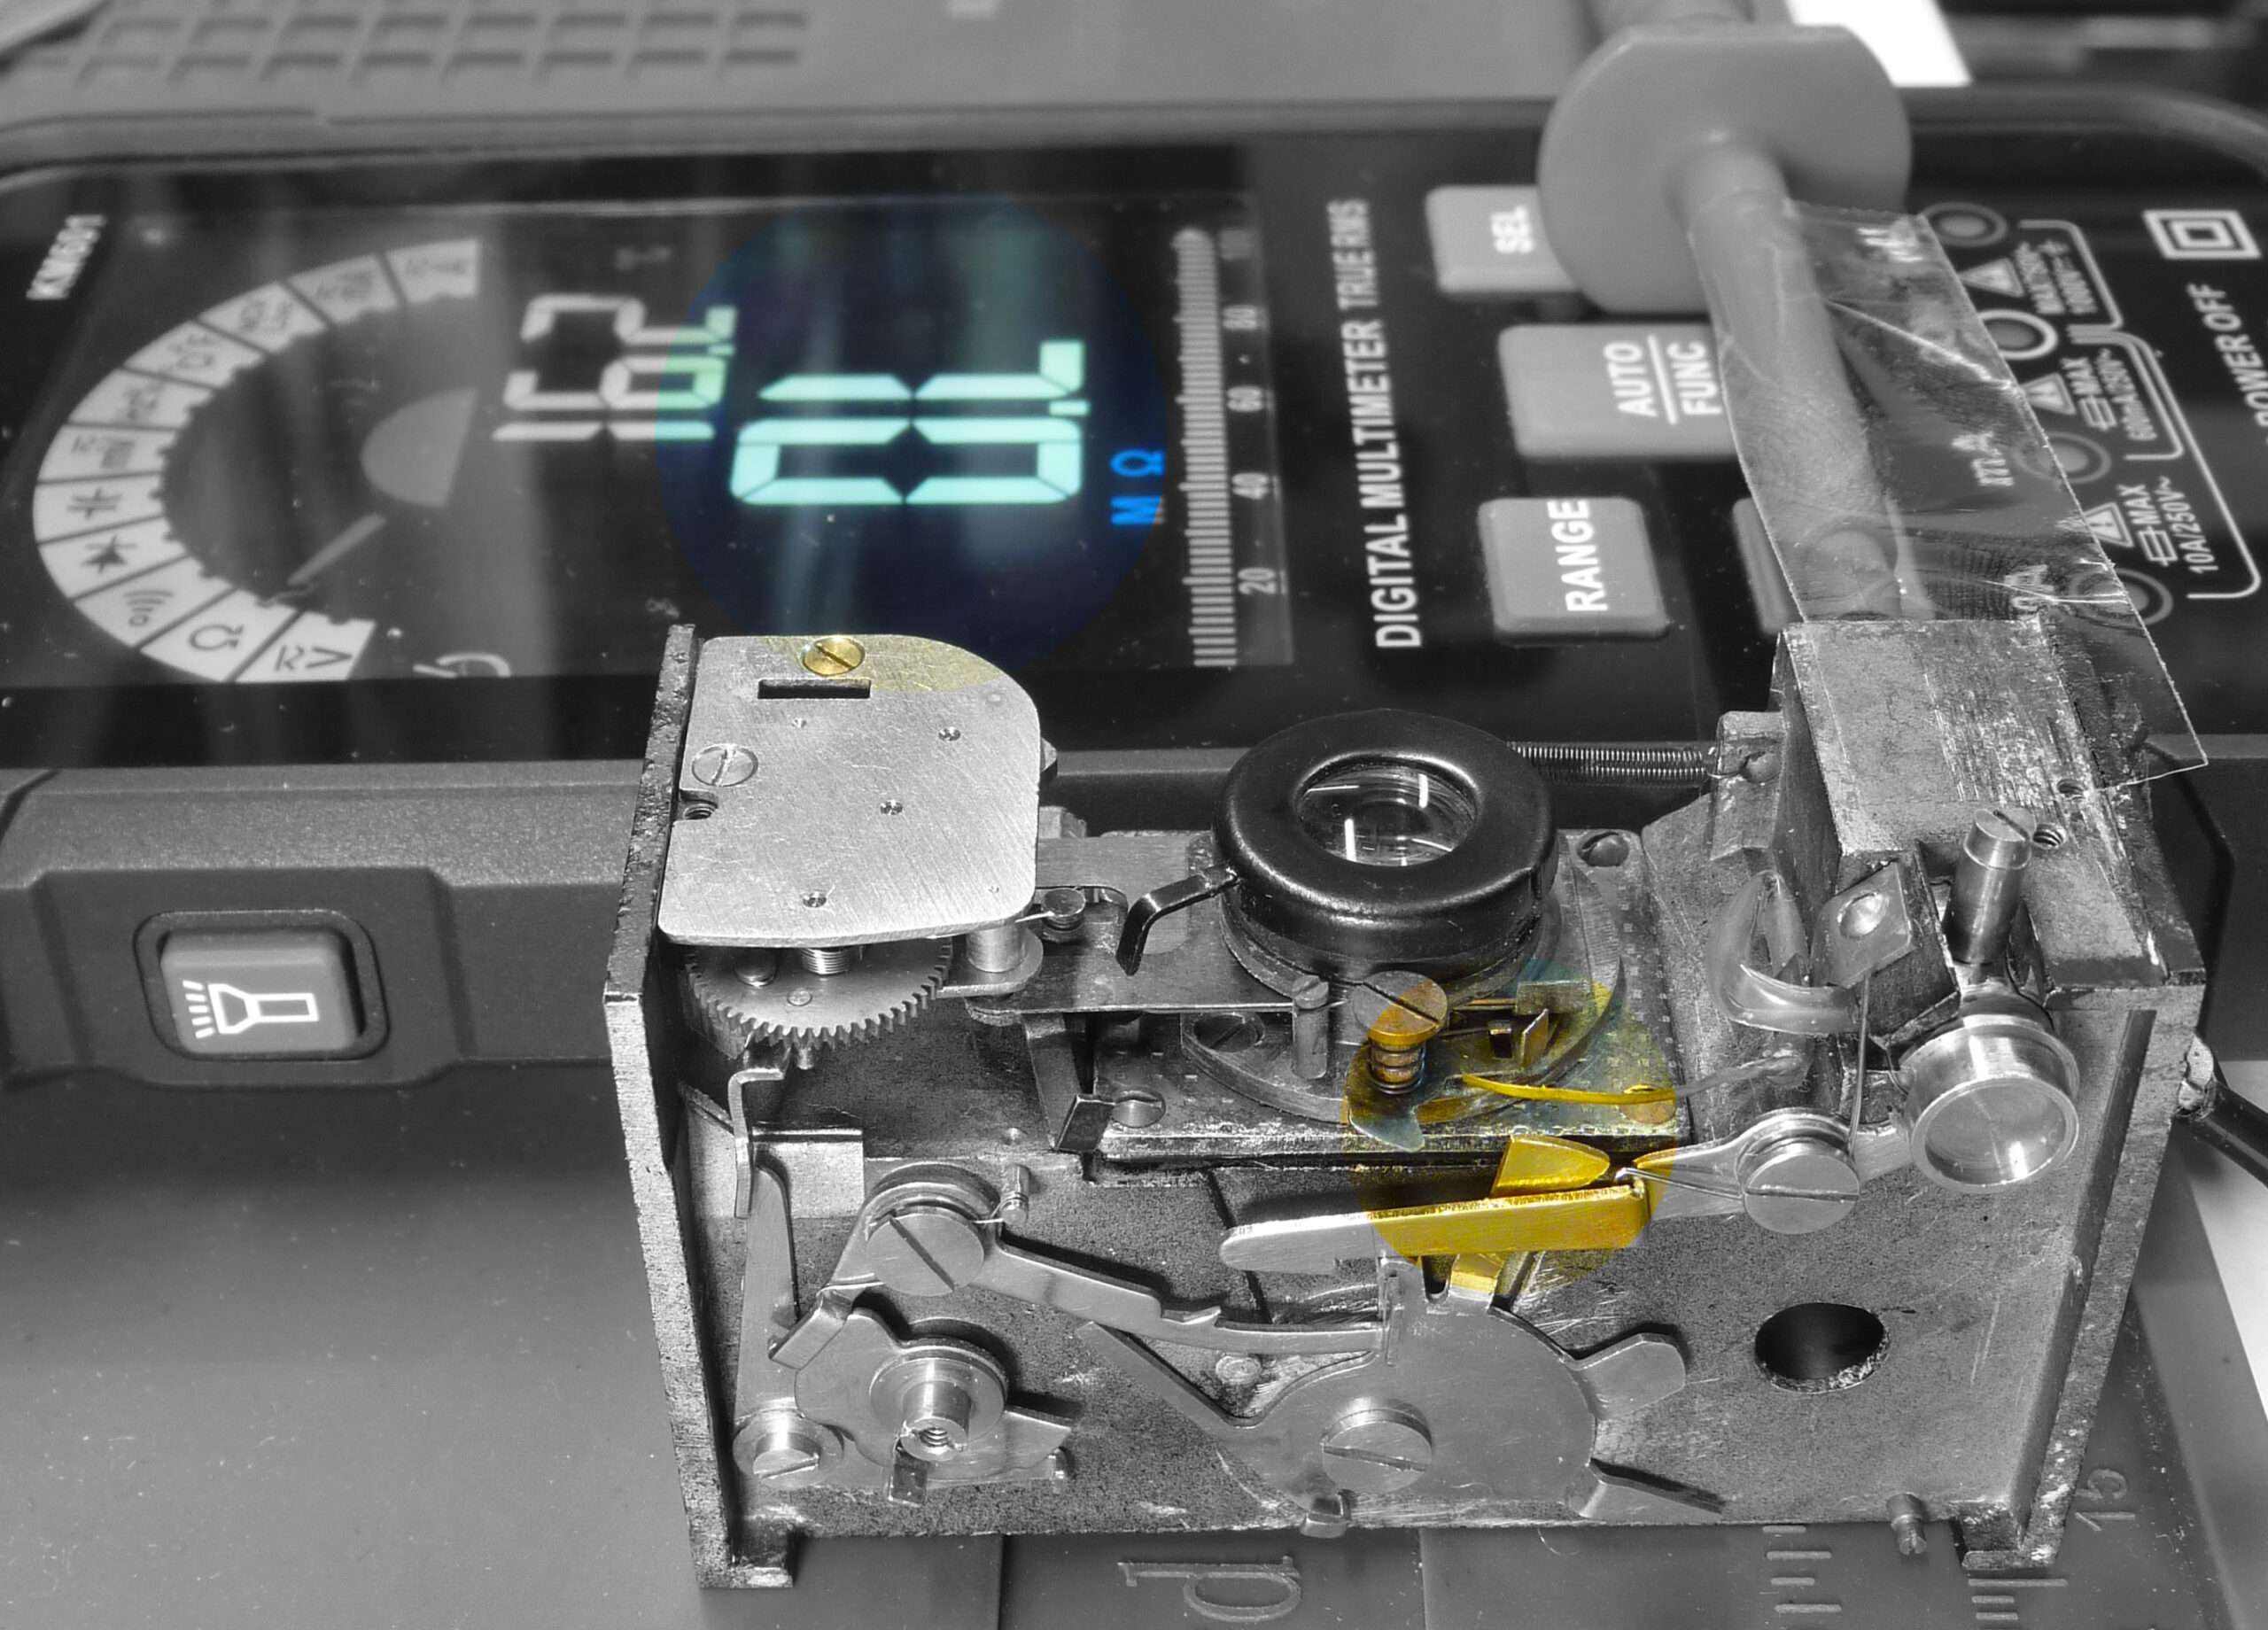
The visual harmony of the polished brass is now a fact, but a camera is defined by its accuracy. To move beyond guesswork, I turn to my custom-built electronic shutter tester. This is the stage where the mechanical soul is weighed against the cold reality of milliseconds.
The results are revealing. The slow speeds are consistent – slightly fast, with 1/2 second clocking in closer to 1/3, but well within acceptable margins. The high speeds, however, are a different story. Instead of 1/200s, I see 1/80s; instead of 1/100s, I get 1/50s. The shutter is sluggish.
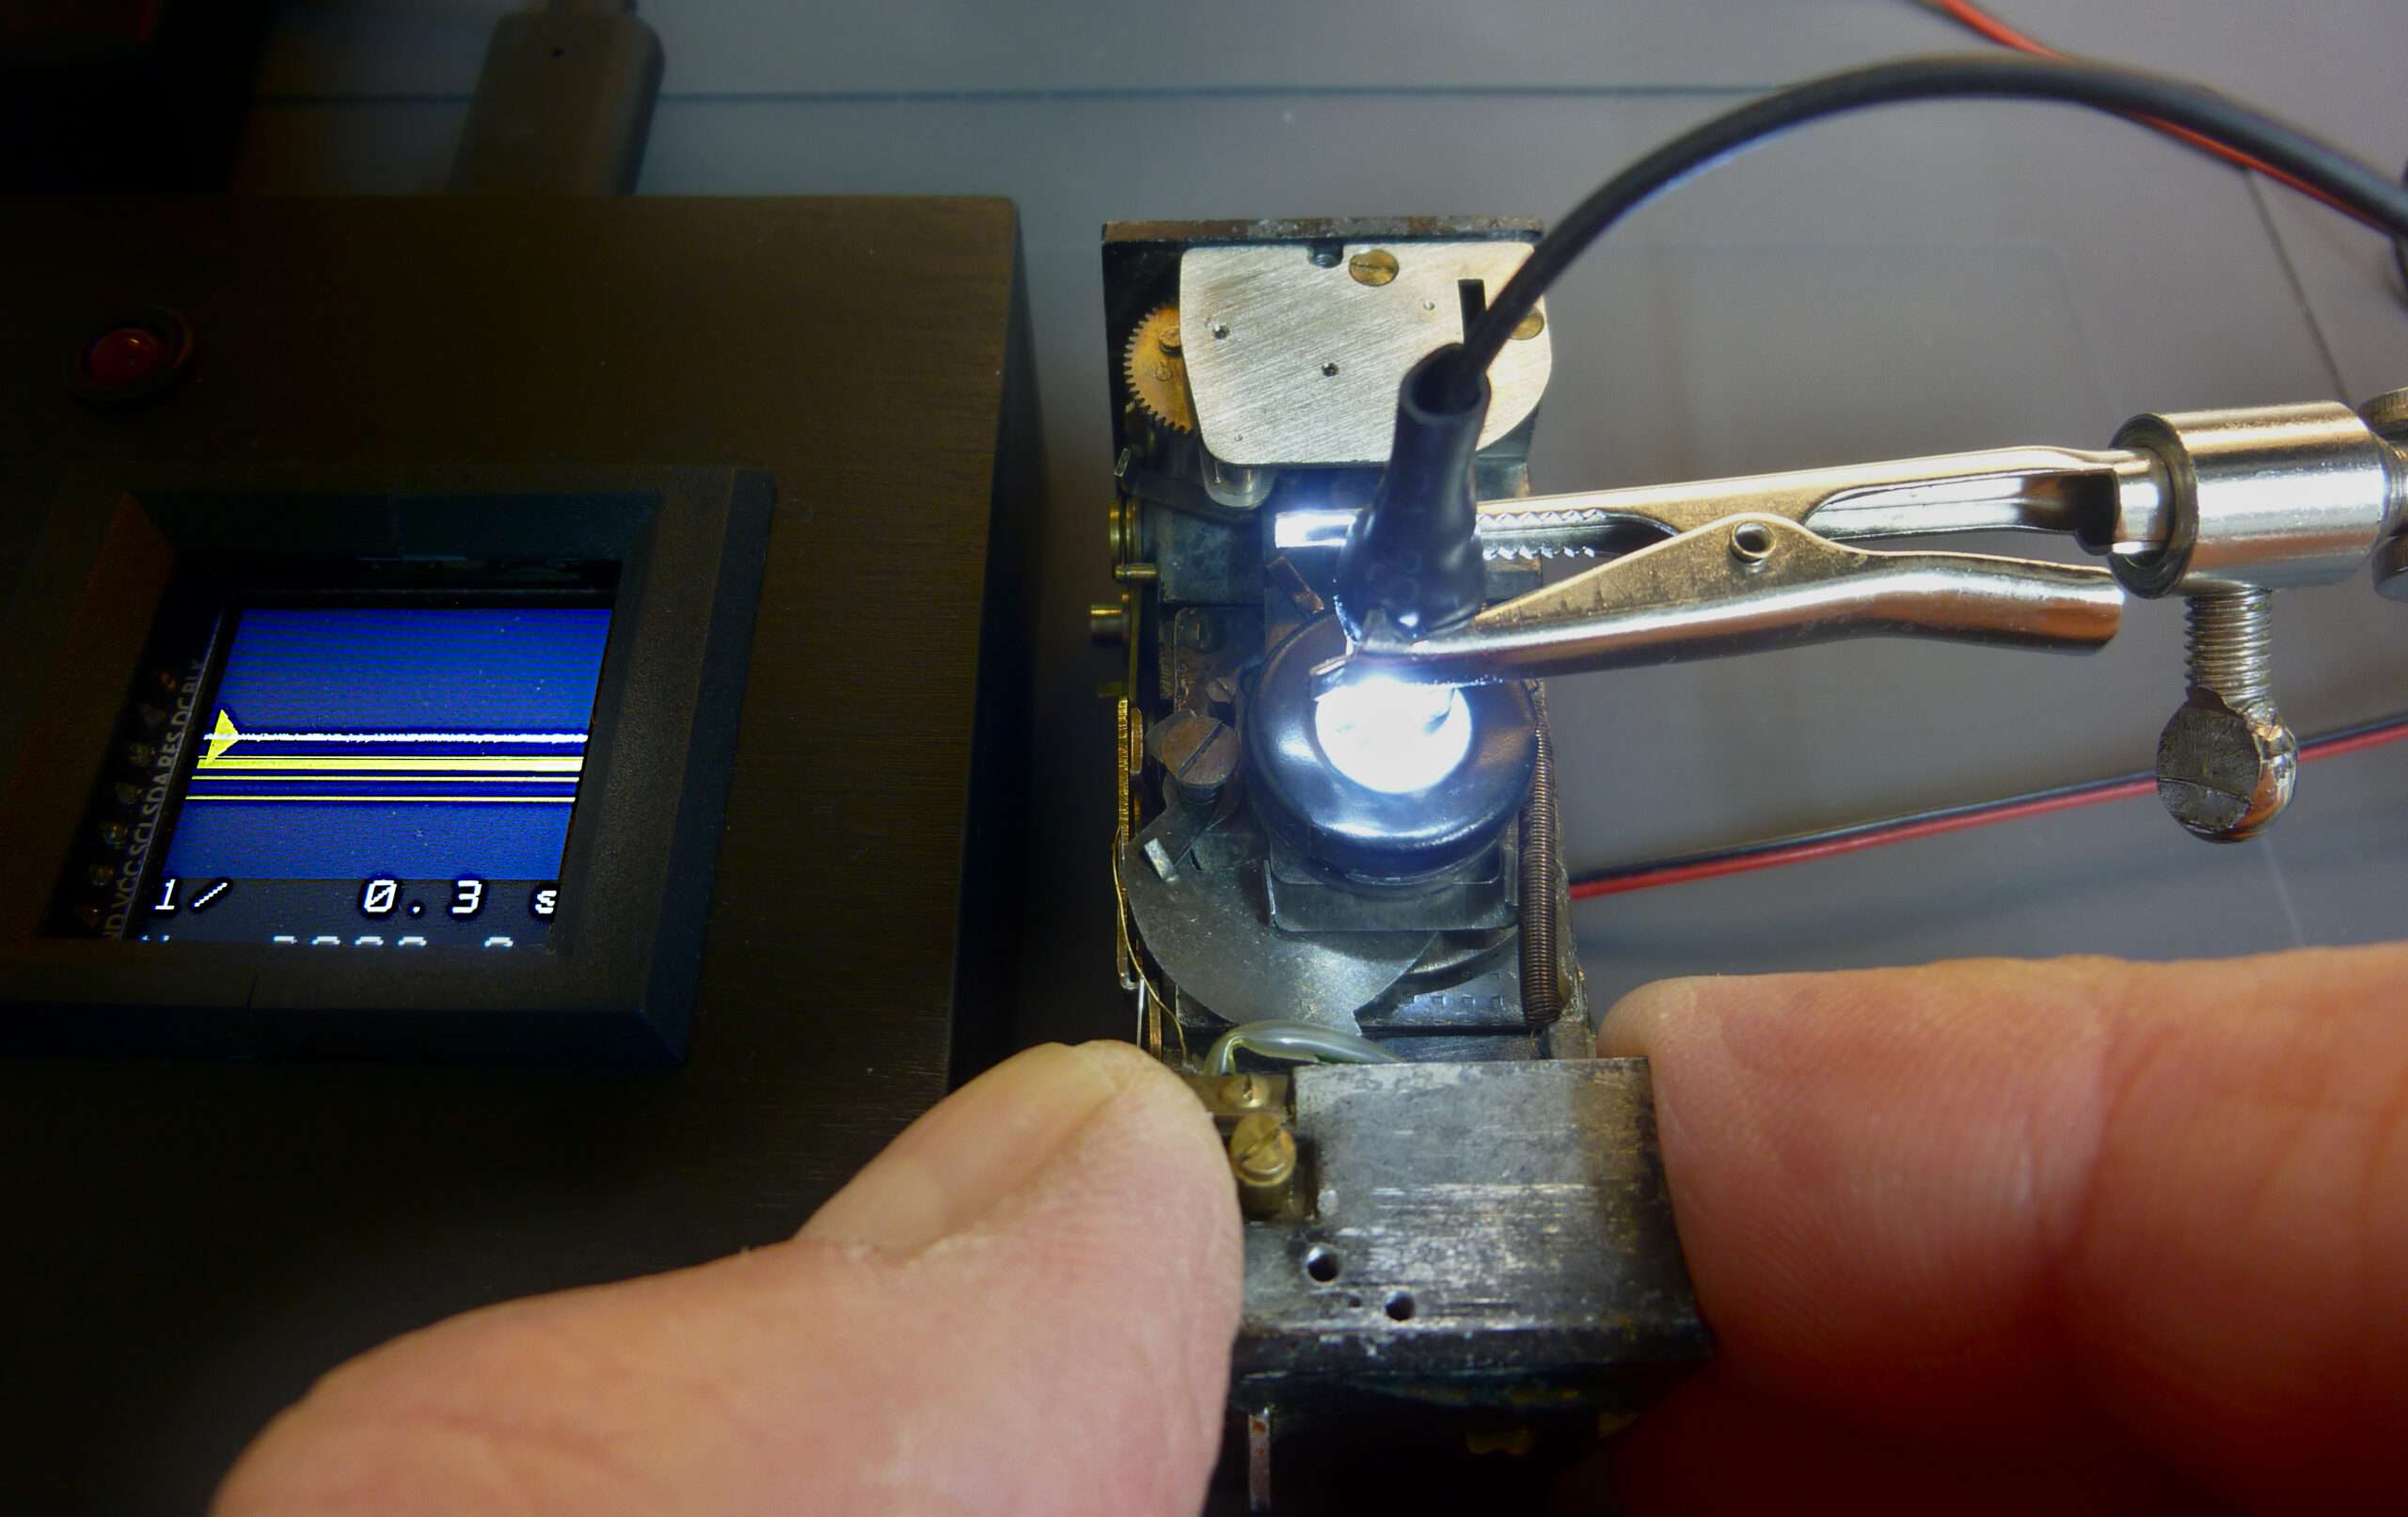
Trigger pressed – light falls on the sensor.
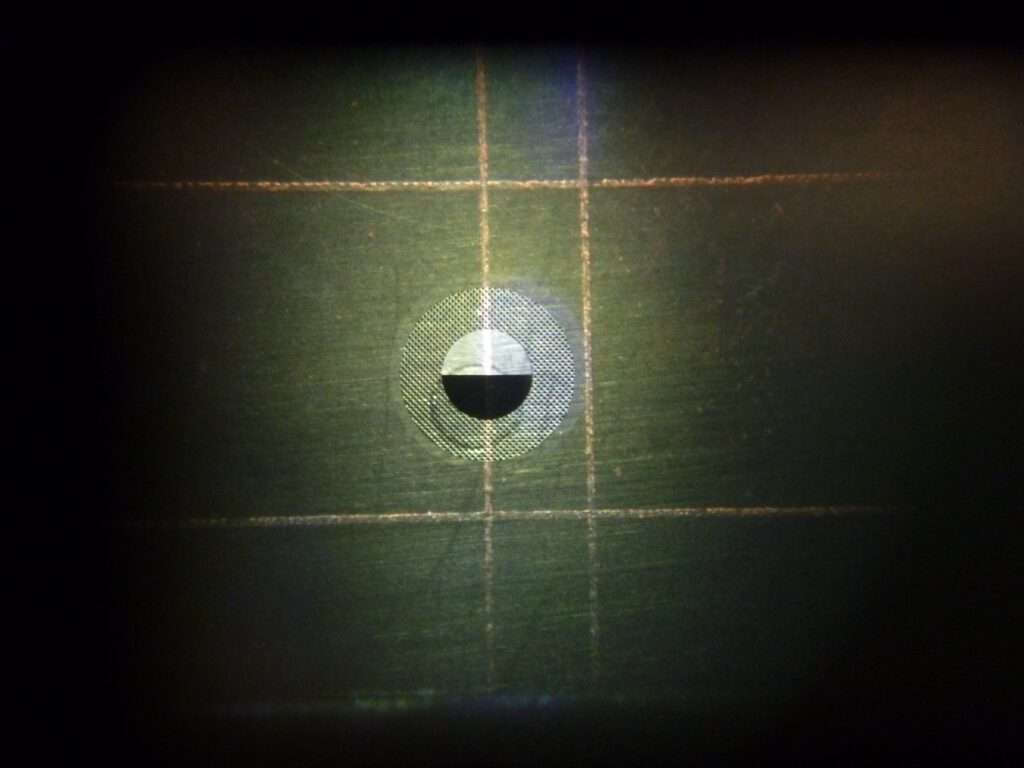
The image on the right shows the measuring setup for shutter speeds. A super-bright LED is positioned in the camera body behind the lens.
A phototransistor is mounted in front of the lens. When the shutter opens, light from inside the camera falls on the sensor. The measuring device determines the time during which light was measured, i.e., the shutter was open.
Since the escapement is running beautifully and the lubrication is fresh and precise, the bottleneck isn’t friction—it’s power. My focus shifts to the two primary energy sources: the large tension spring driving the main lever and the torsion spring responsible for snapping the shutter blade shut. Contrary to popular myth, springs do not weaken simply with age or by being left tensioned; they fatigue through the repeated cycle of stretching and relaxing. In this case, I suspect these speeds were never truly reached, even when the camera left the factory.
The Search for Equilibrium
I decide to replace both springs. The challenge now is sourcing stronger springs that fit the microscopic spatial constraints of the Mamiya.
I turn to my personal collection – a vast archive of springs – and begin a long, iterative process of trial and error.
I measure the pull of the tension springs and the torque of the torsion springs, searching for that perfect “plus” in power.
Each swap requires a full re-test on the electronic timer. It is a delicate balancing act: if I install a main spring strong enough to hit a true 1/200s, the momentum overwhelms the escapement, making the 1/2s far too fast.
The Final Calibration of the Mamiya super 16 shutter
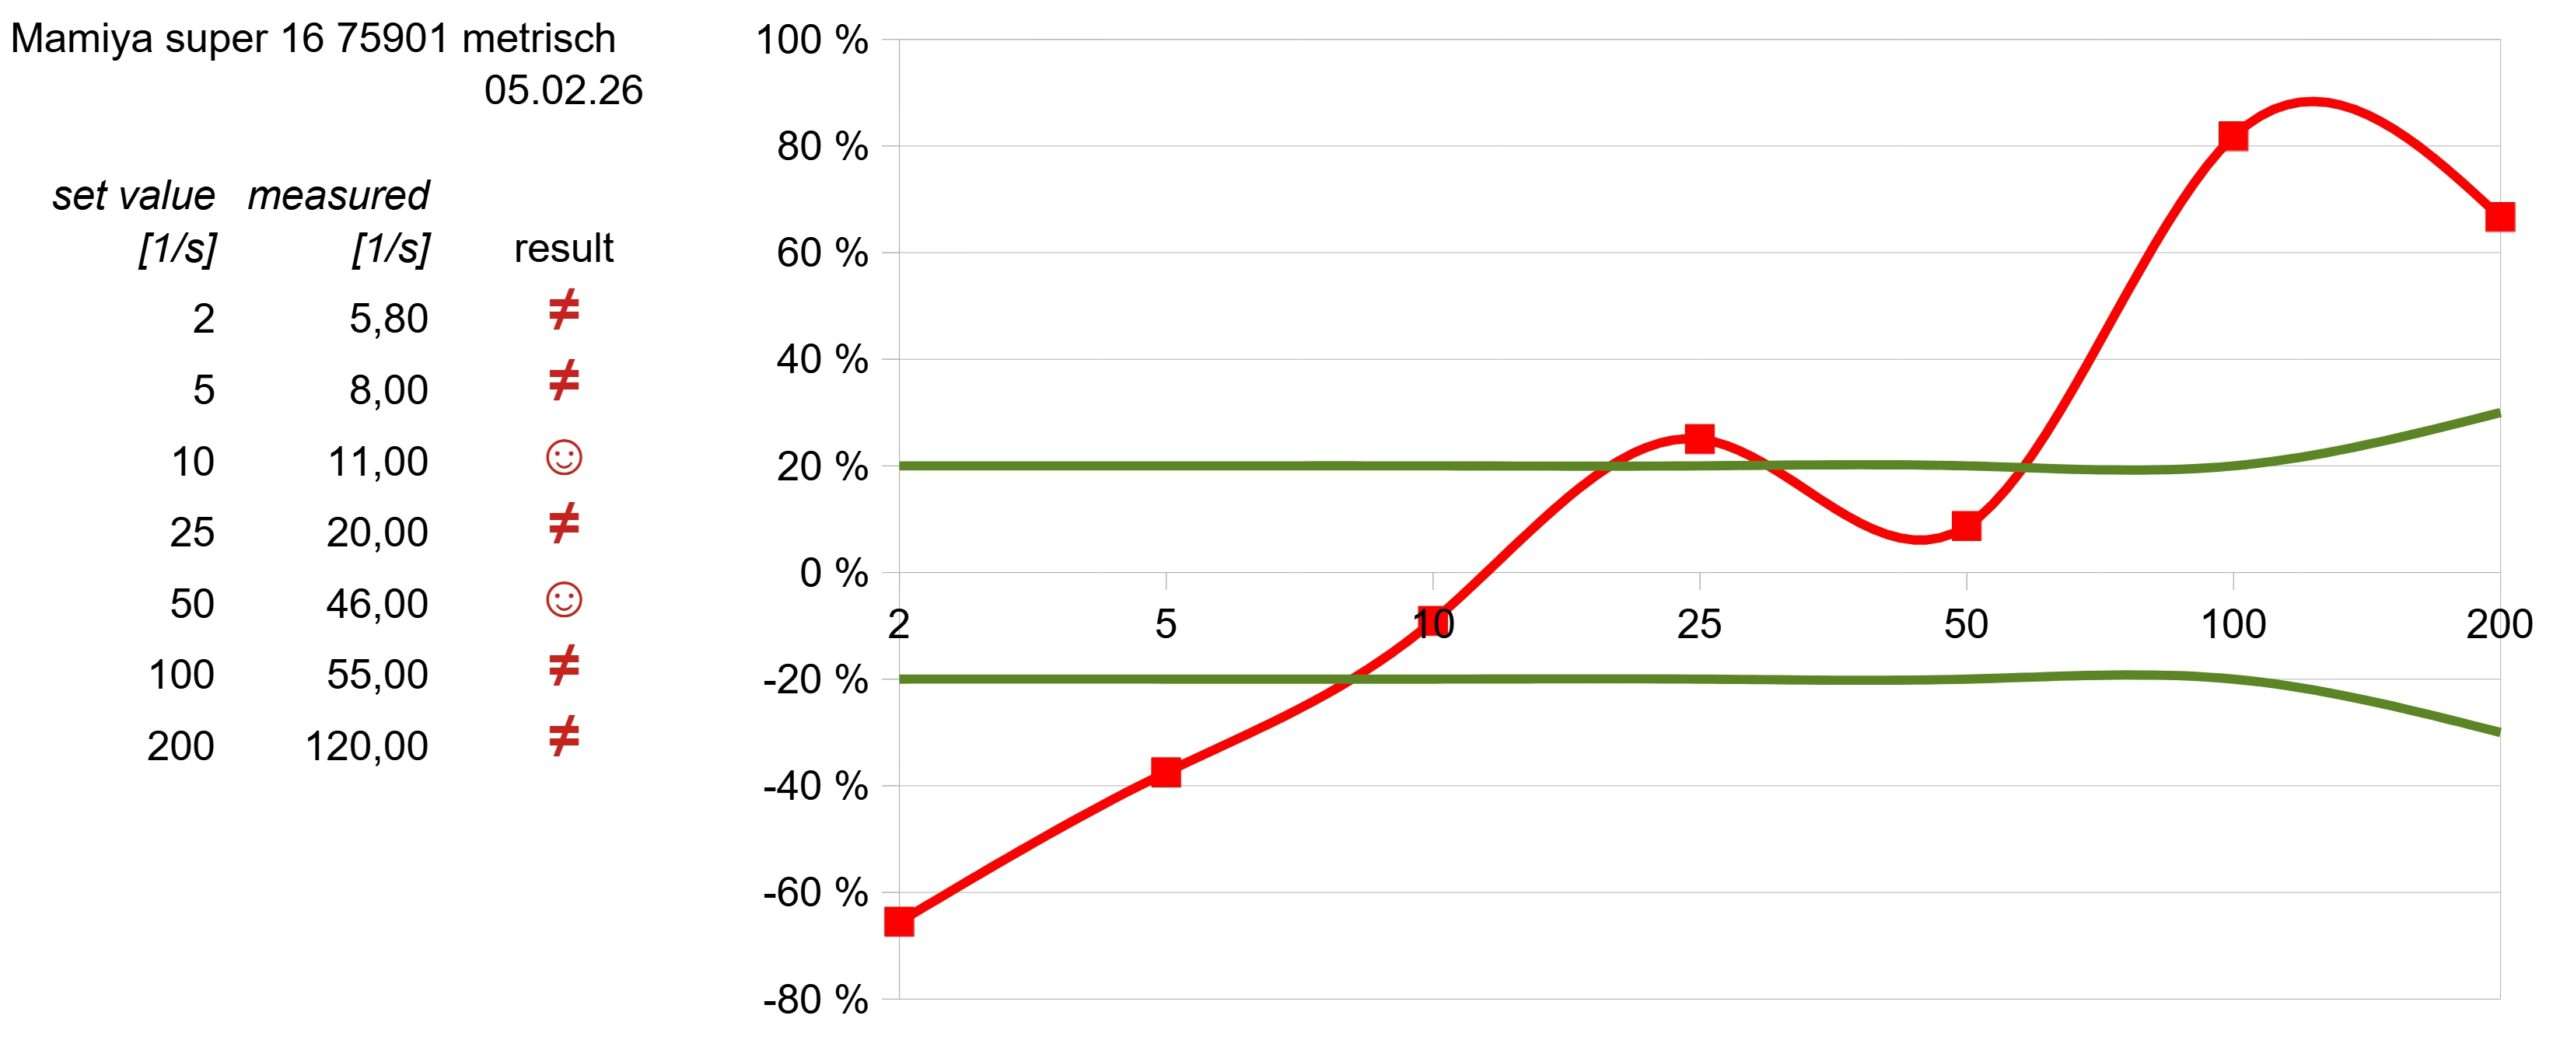
After numerous iterations, I reach a point of mechanical equilibrium. The result is a mean deviation of 42% across the entire range. For a subminiature camera of this era, this is a victory I can live with. To complement this, I’ve charted a specific shutter speed table – a vital reference for my future self when precision exposure is required in the field.
The flash sync verification
To close the chapter, I test the flash synchronization. Using a multimeter to monitor resistance during a long-exposure “B” setting, I watch the display. The contact closes with perfect timing and zero hesitation.
Conclusion
The mechanism is no longer just beautiful to the eye; it is understood, measured, and mastered.
Lens check and a message from the past
The glass
The lens is held in place by a brass ring with an external thread, which secures it in the camera body:
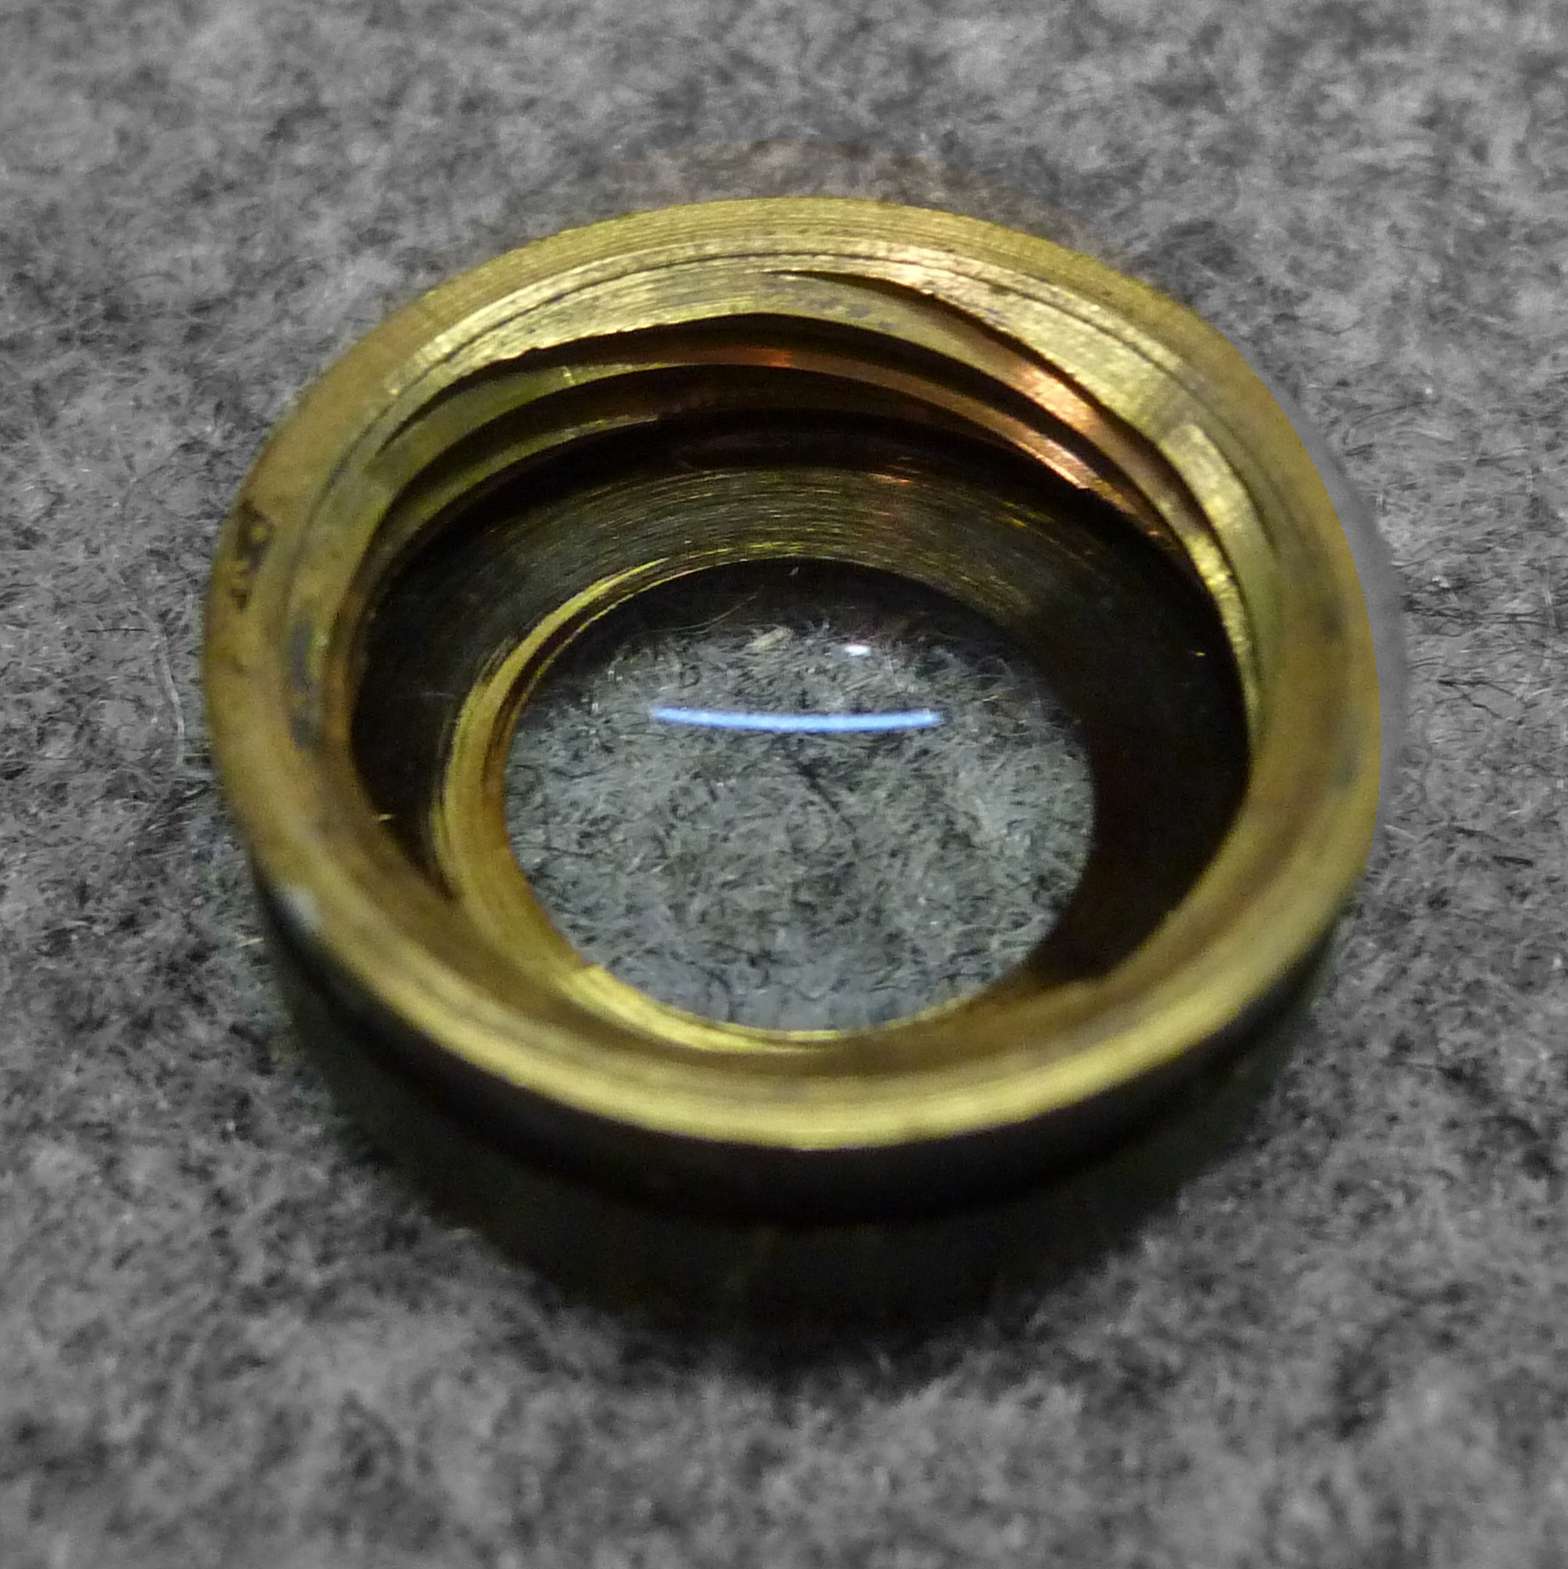
(taken from a different camera)
I can see at first glance that the lens is clean. So I don’t need to do anything here.
The adjustment
Turning the ring adjusts the distance between the lens and the film, and thus the focus. In addition, a sheet metal cap is pressed onto the front of the ring. This cap has a bar that connects it to the adjustment slider on the outside of the housing. A tension spring ensures that there is no play in the movement:
The following video provides a clearer illustration of how it works:
If the black cap is not pressed onto the lens in the correct position, the distance setting may be incorrect. This would result in blurry photos.
When I look at the lens mount from all sides, I notice two scratched lines on the underside. The two lines are directly opposite each other when I set the distance to infinity. Is this a message from long ago? I suspect that the person who assembled the camera back then made the markings to document the correct distance setting. If that’s true, then everything is fine here too.
I won’t know for sure until I’ve taken some test photos with the camera. But I want to be certain now. So I improvise a collimator. With a collimator, I can check the infinity setting. To do this, I use my old SLR camera and position it directly opposite the Mamiya.
Instead of film, I insert a transparent plastic test plate with engraved markings. Then I set both cameras to infinity and look through the viewfinder of the large camera.
The markings appear perfectly sharp. This confirms that the lens is correctly adjusted.
Conclusion: The integrity of the optics
In a restoration of this depth, there is a rare satisfaction in finding a component that requires no intervention. The lens remains exactly as it was intended to be: clean and perfectly aligned. I have decided to leave the optical assembly untouched, preserving the original factory seating. It is a testament to the build quality of this Mamiya that, after all these years, the glass is ready to resolve light just as brilliantly as it did on day one. However, definitive proof must be provided by a later test with film.
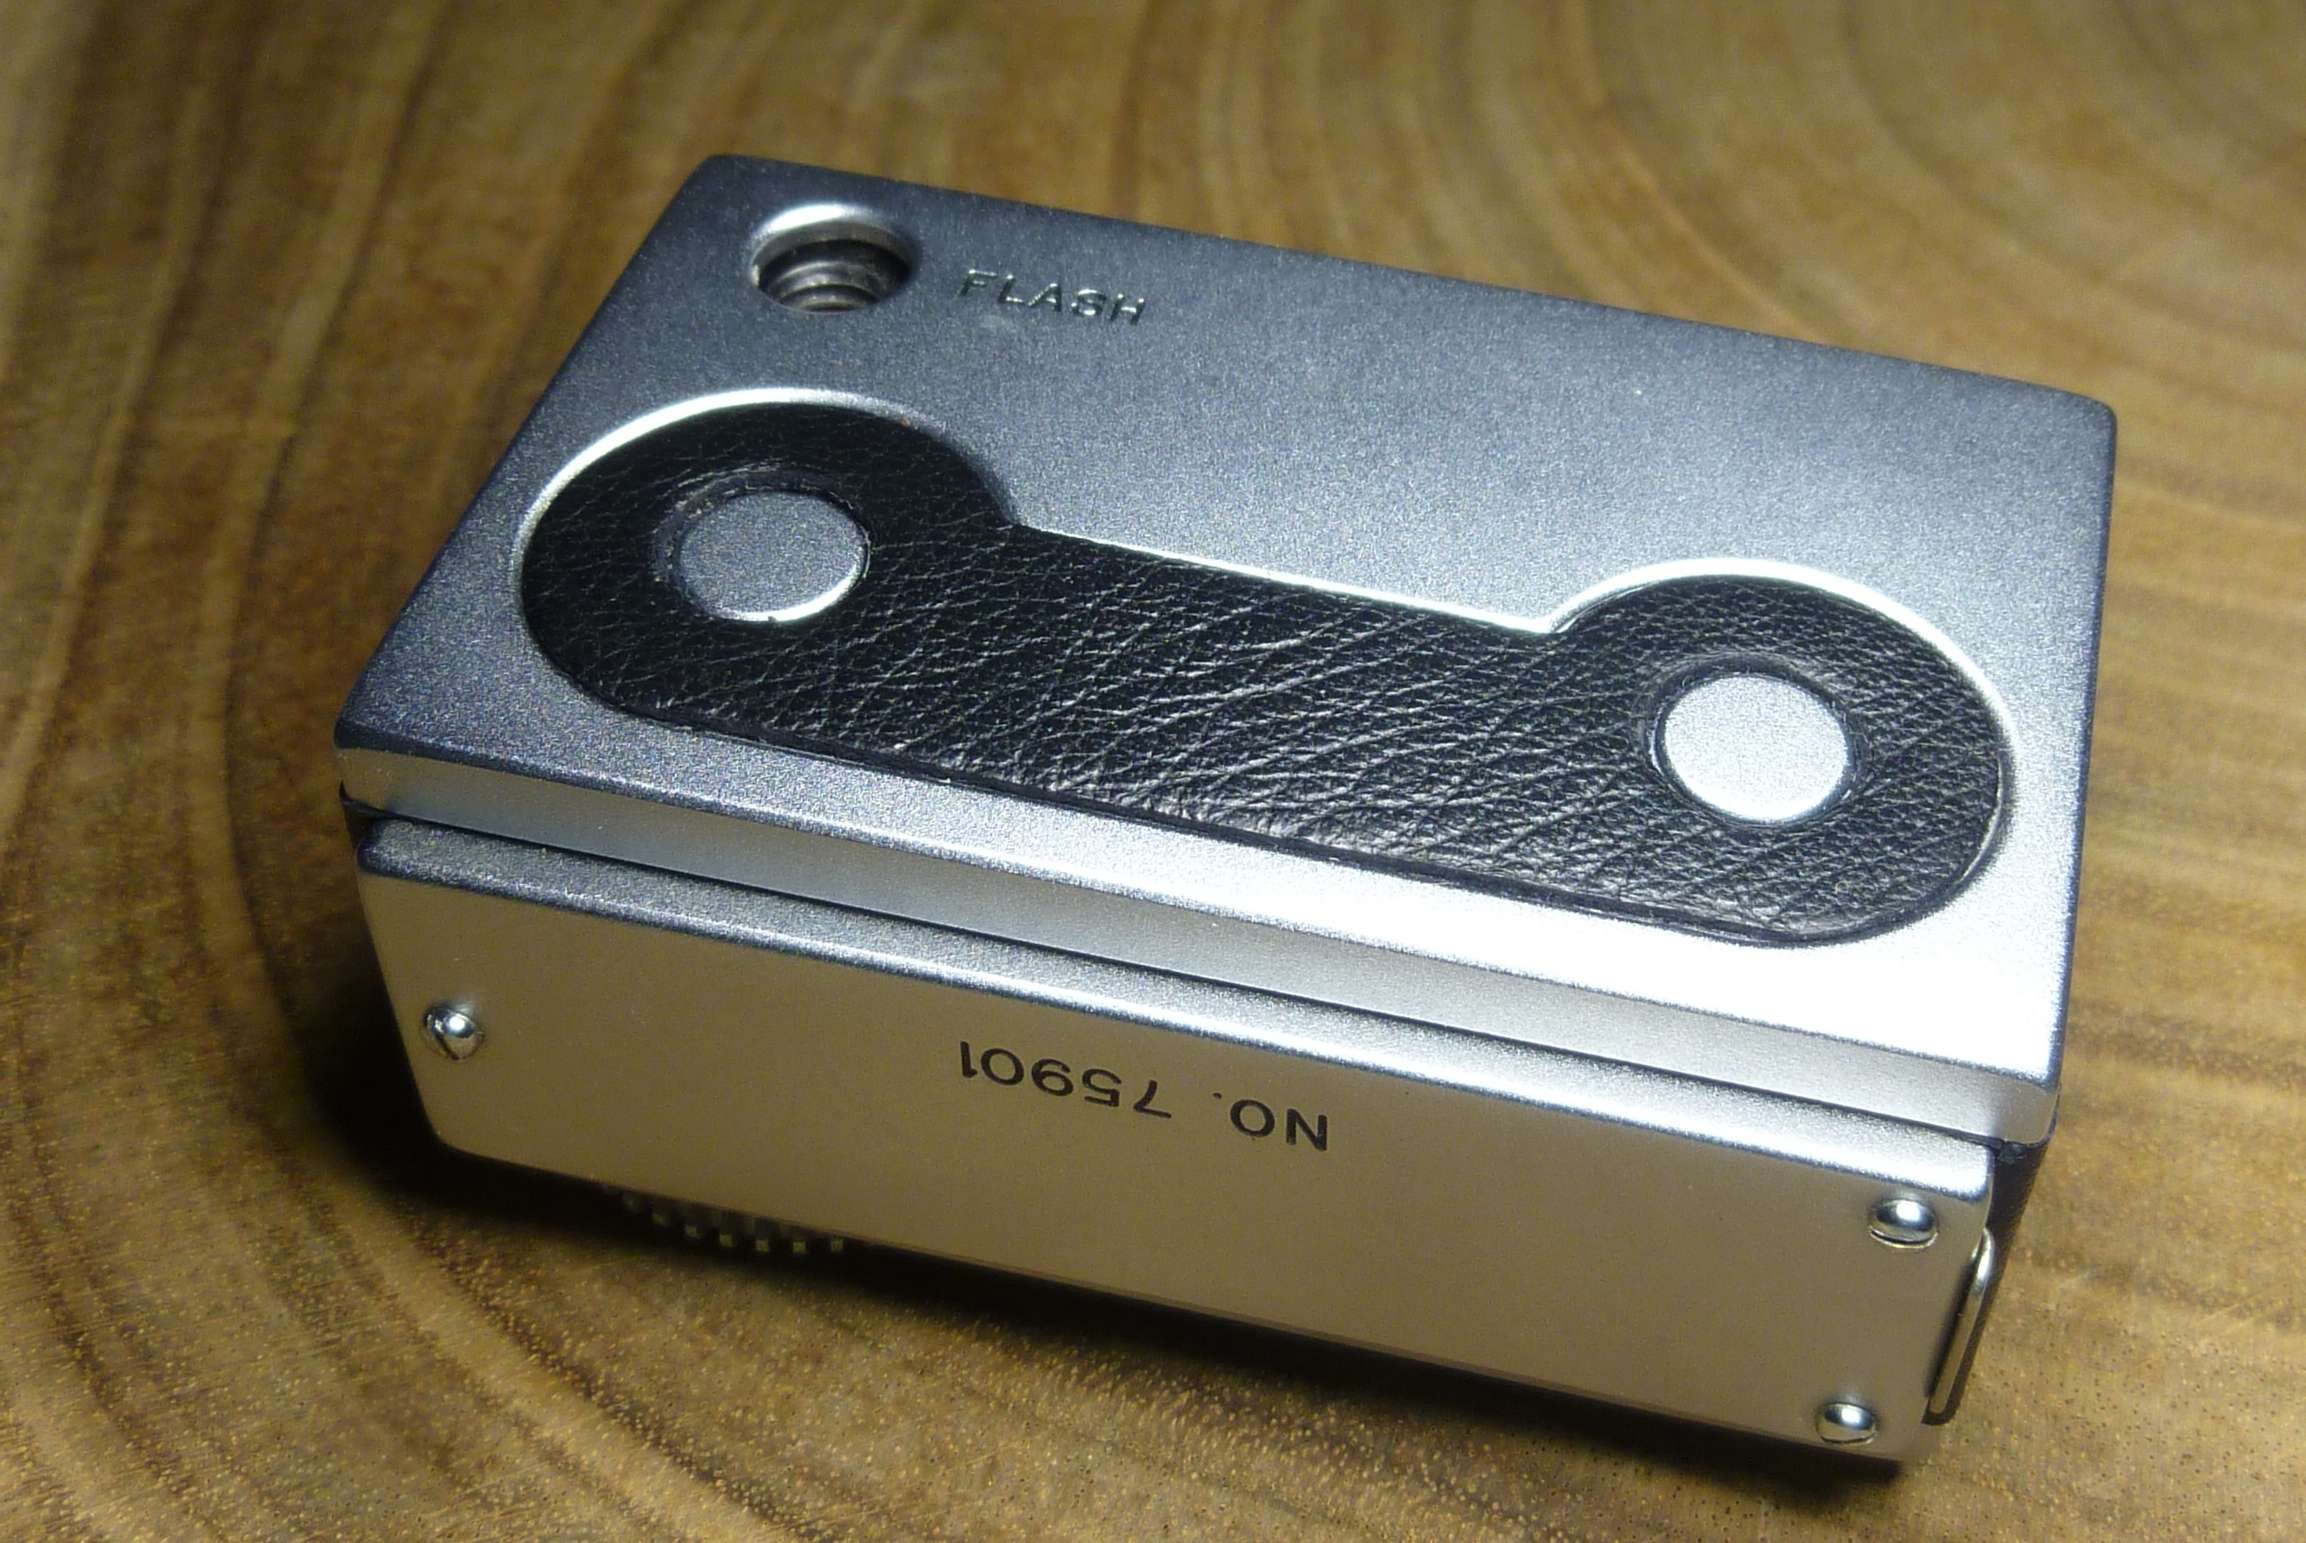
Second skin: elevating the Mamiya super 16 with genuine calfskin
With the mechanical restoration complete, I turned my attention to the camera’s weary exterior. The original synthetic covering had become a brittle relic of the past, failing to match the precision of the clockwork it protected.
The Clean Break
Fortunately, the first step – stripping the past – was surprisingly straightforward. The old, brittle plastic covering lacked the stubborn grip of modern adhesives; it peeled away easily without the need for solvents or heat, leaving the bare metal frame ready for its transformation.
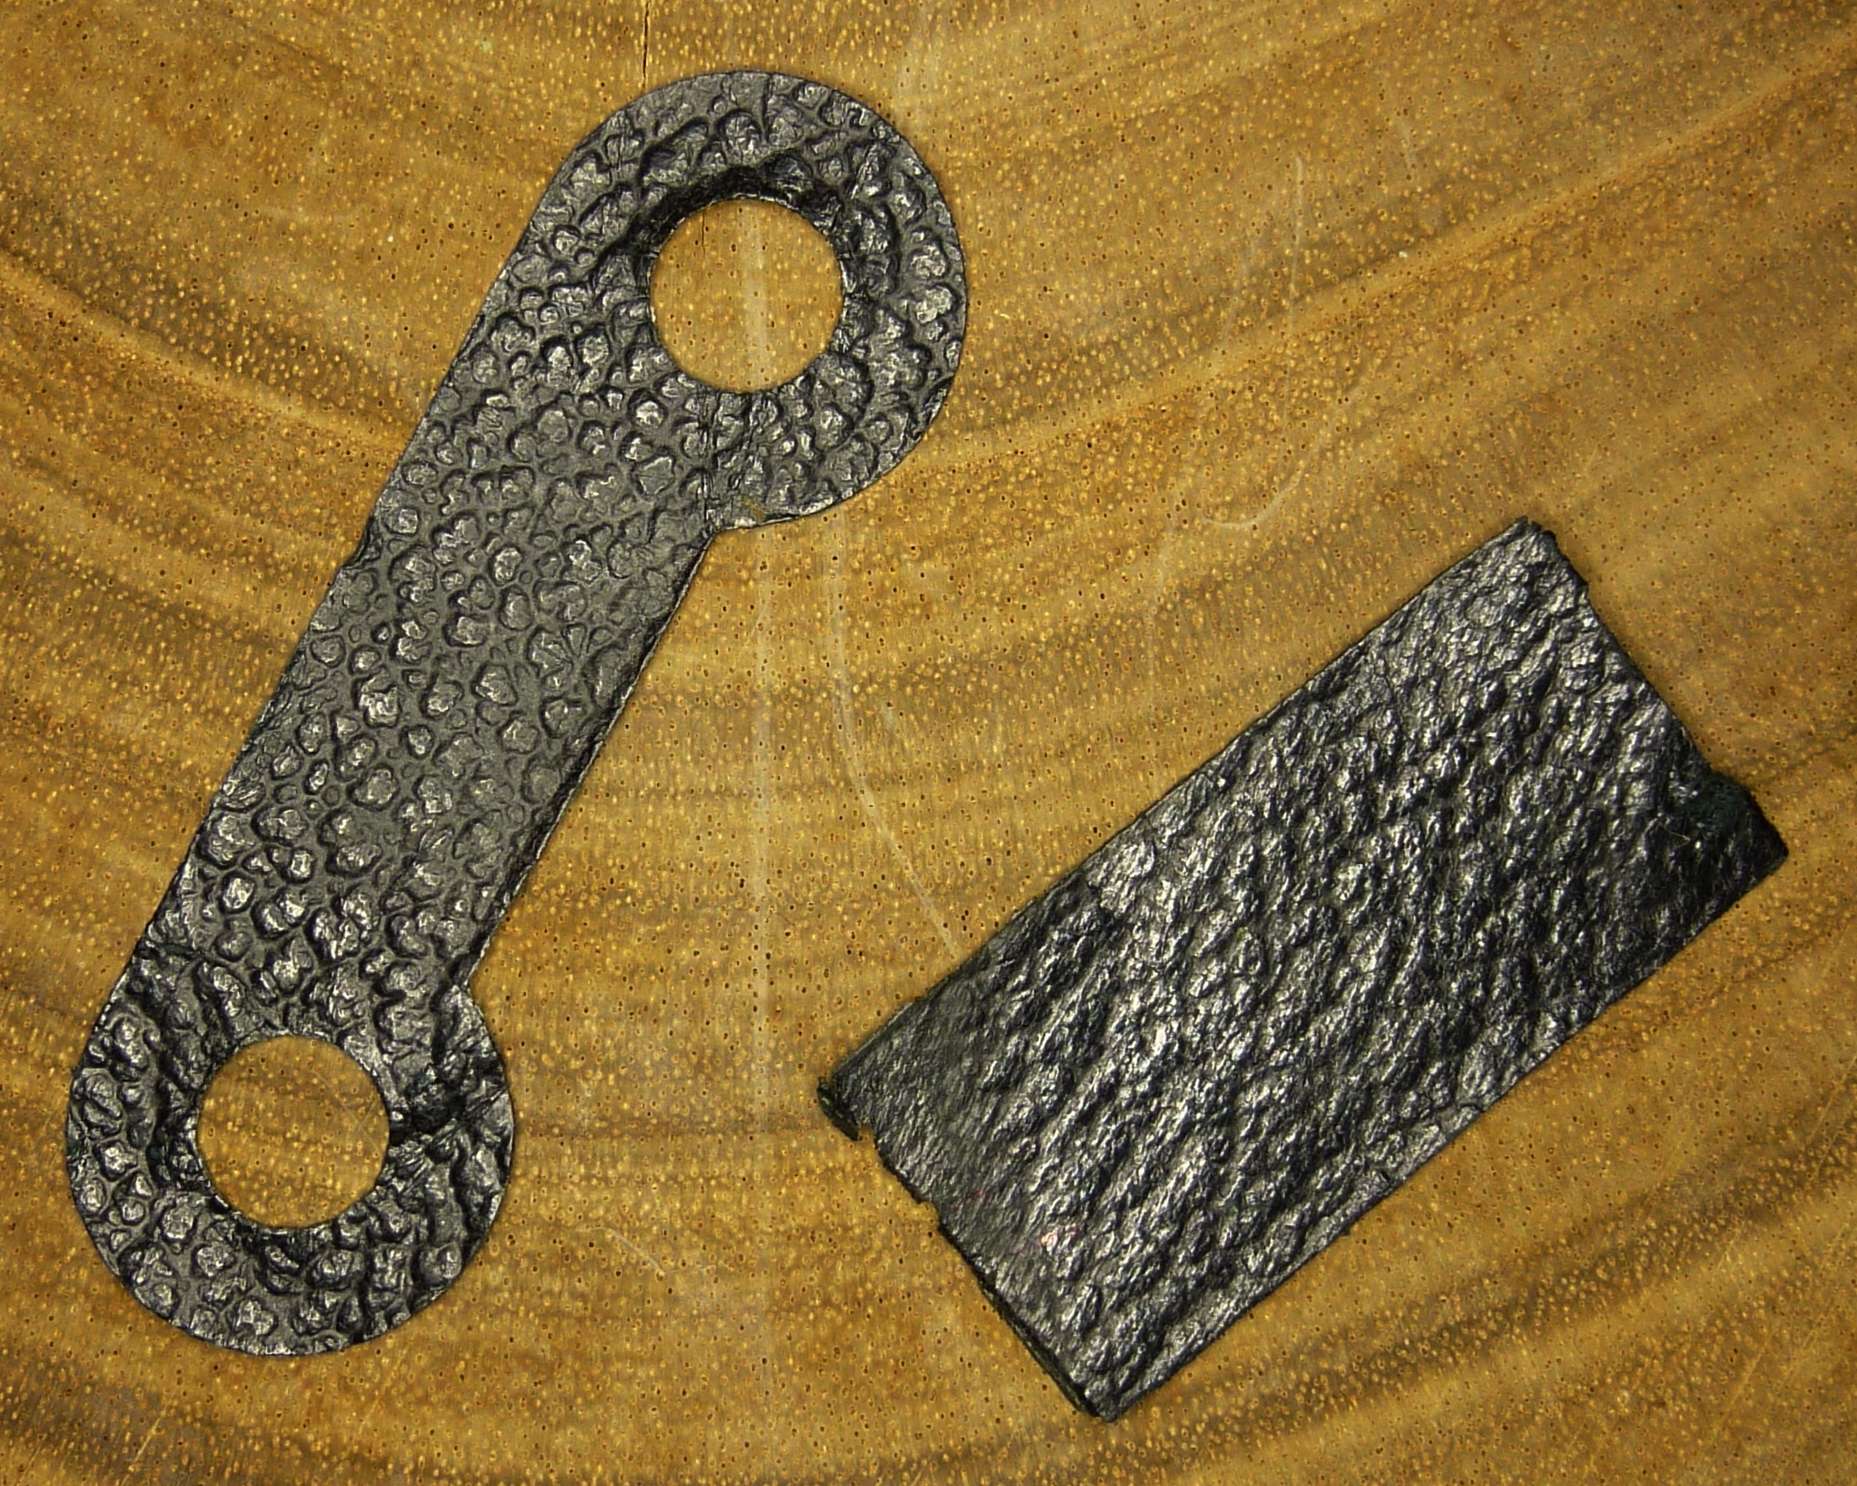
The picture on the right shows the old plastic covers that have been removed.
The Choice of Material: Genuine Calfskin
I chose to replace the original “leatherette” with authentic black calfskin. Calfskin is the ideal choice for a subminiature camera like this; its grain is fine enough to look proportional to the small body, yet it offers a tactile warmth and grip that plastic simply cannot replicate. My goal was to respect the original aesthetic while significantly upgrading the material quality.
Material Spotlight: Leatherette vs. Genuine Calfskin
Most vintage cameras from the 1950s and 60s, including the Mamiya 16 series, were covered in a material often referred to as “Leatherette” or “Vulcanite”.
The Original (Vulcanite/Leatherette): While “Vulcanite” is technically a hard rubber heated onto the body, many subminiature cameras used a synthetic “Leatherette” – a plastic-coated fabric designed to look like leather. Over the decades, these materials lose their plasticizers. They become brittle, develop cracks, and eventually crumble away like dry crackers.
The Upgrade (Genuine Calfskin): For this restoration, I replaced the failing plastic with authentic calf leather. Calfskin is far superior for subminiature photography:
Tactile Grip: Unlike the slippery or brittle original, genuine leather offers a warm, organic grip that feels secure in the hand.
Fine Grain: The naturally tight grain of calfskin is perfectly in scale with the small body of the Mamiya, preserving its sleek proportions.
Durability: While plastic eventually disintegrates, real leather remains supple and develops a beautiful patina over time.
The Precision of the Punch
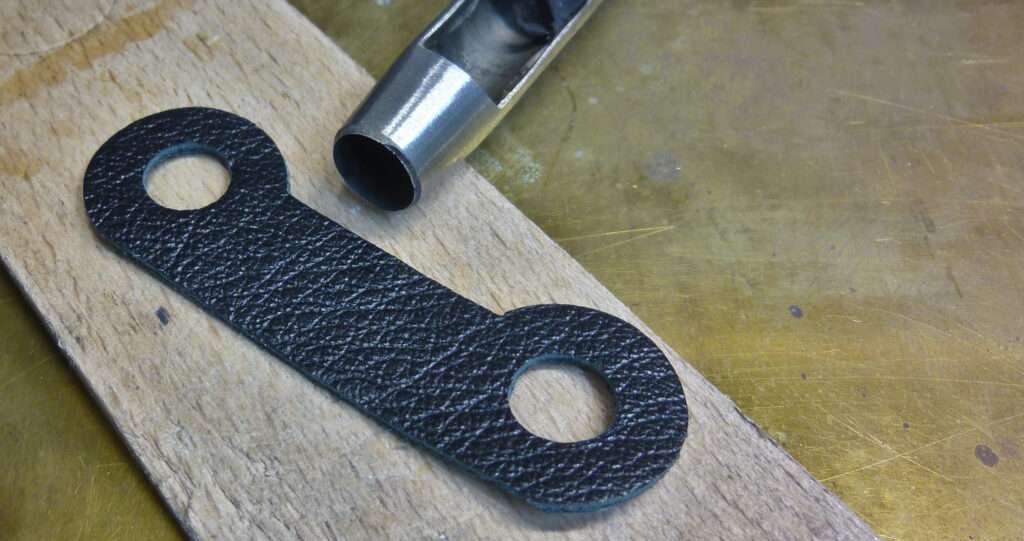
The most demanding part was the bottom plate. The design requires a complex, inlaid circular shape that leaves zero room for error. To achieve the outer curve, I had to use a hollow punch with extreme caution, positioning it so that it only engaged with a partial section of the leather surface. One slip would have ruined the entire panel. It was a slow process of “tailoring” that required more focus than the mechanical disassembly itself.
The Final Result
The effort was worth the tension. The new leather wraps the Mamiya in a rich, deep black that makes the polished chrome accents pop. It no longer feels like an antique toy; it feels like a professional instrument. By upgrading the “skin” to genuine calfskin, I haven’t just repaired the camera – I’ve given it a level of finish that honors the craftsmanship originally poured into it decades ago.
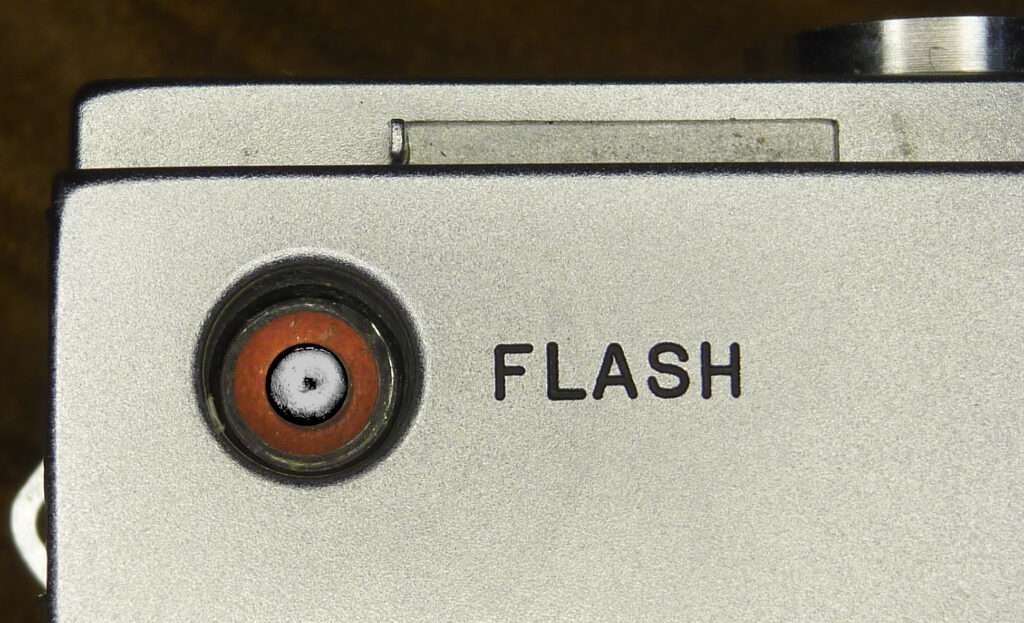
The missing link: building a custom flash sync cable
My primary motivation for this part of the project was pure precision: I wanted to perform test shots to evaluate the true optical quality of the lens. To do this properly, I needed to eliminate any risk of camera shake that comes with handheld shooting or longer exposures. The only solution was to trigger an electronic flash, which provides a burst of light fast enough to “freeze” the frame and ensure total sharpness.
The Challenge of Proprietary Connections
The Mamiya Super 16 features a proprietary flash contact cleverly hidden beneath the tripod socket – a design choice that is as elegant as it is frustrating today. Original flash cables for the Mamiya 16 series have long since vanished from the market. They are impossible to find new, and even the used market has run dry. To make this camera truly functional for my film tests, I had to build my own bridge between 1950s tech and modern standards.
Engineering the Adapter for the Mamiya super 16
My solution began with a standard, off-the-shelf tripod screw. Since the flash contact sits directly inside the tripod mount, I decided to turn the mounting screw itself into the connector. The process required careful proceeding:
- The Bore: I drilled a hole straight through the center of the tripod screw.
- The Core: I inserted a small metal pin into this bore to act as the central contact point.
- The Insulation: To prevent a short circuit against the screw body, I insulated the pin using heat-shrink tubing (Schrumpfschlauch).
- The Circuit: This created a two-pole system – the tripod thread itself serves as one pole (ground), while the isolated central pin serves as the second.
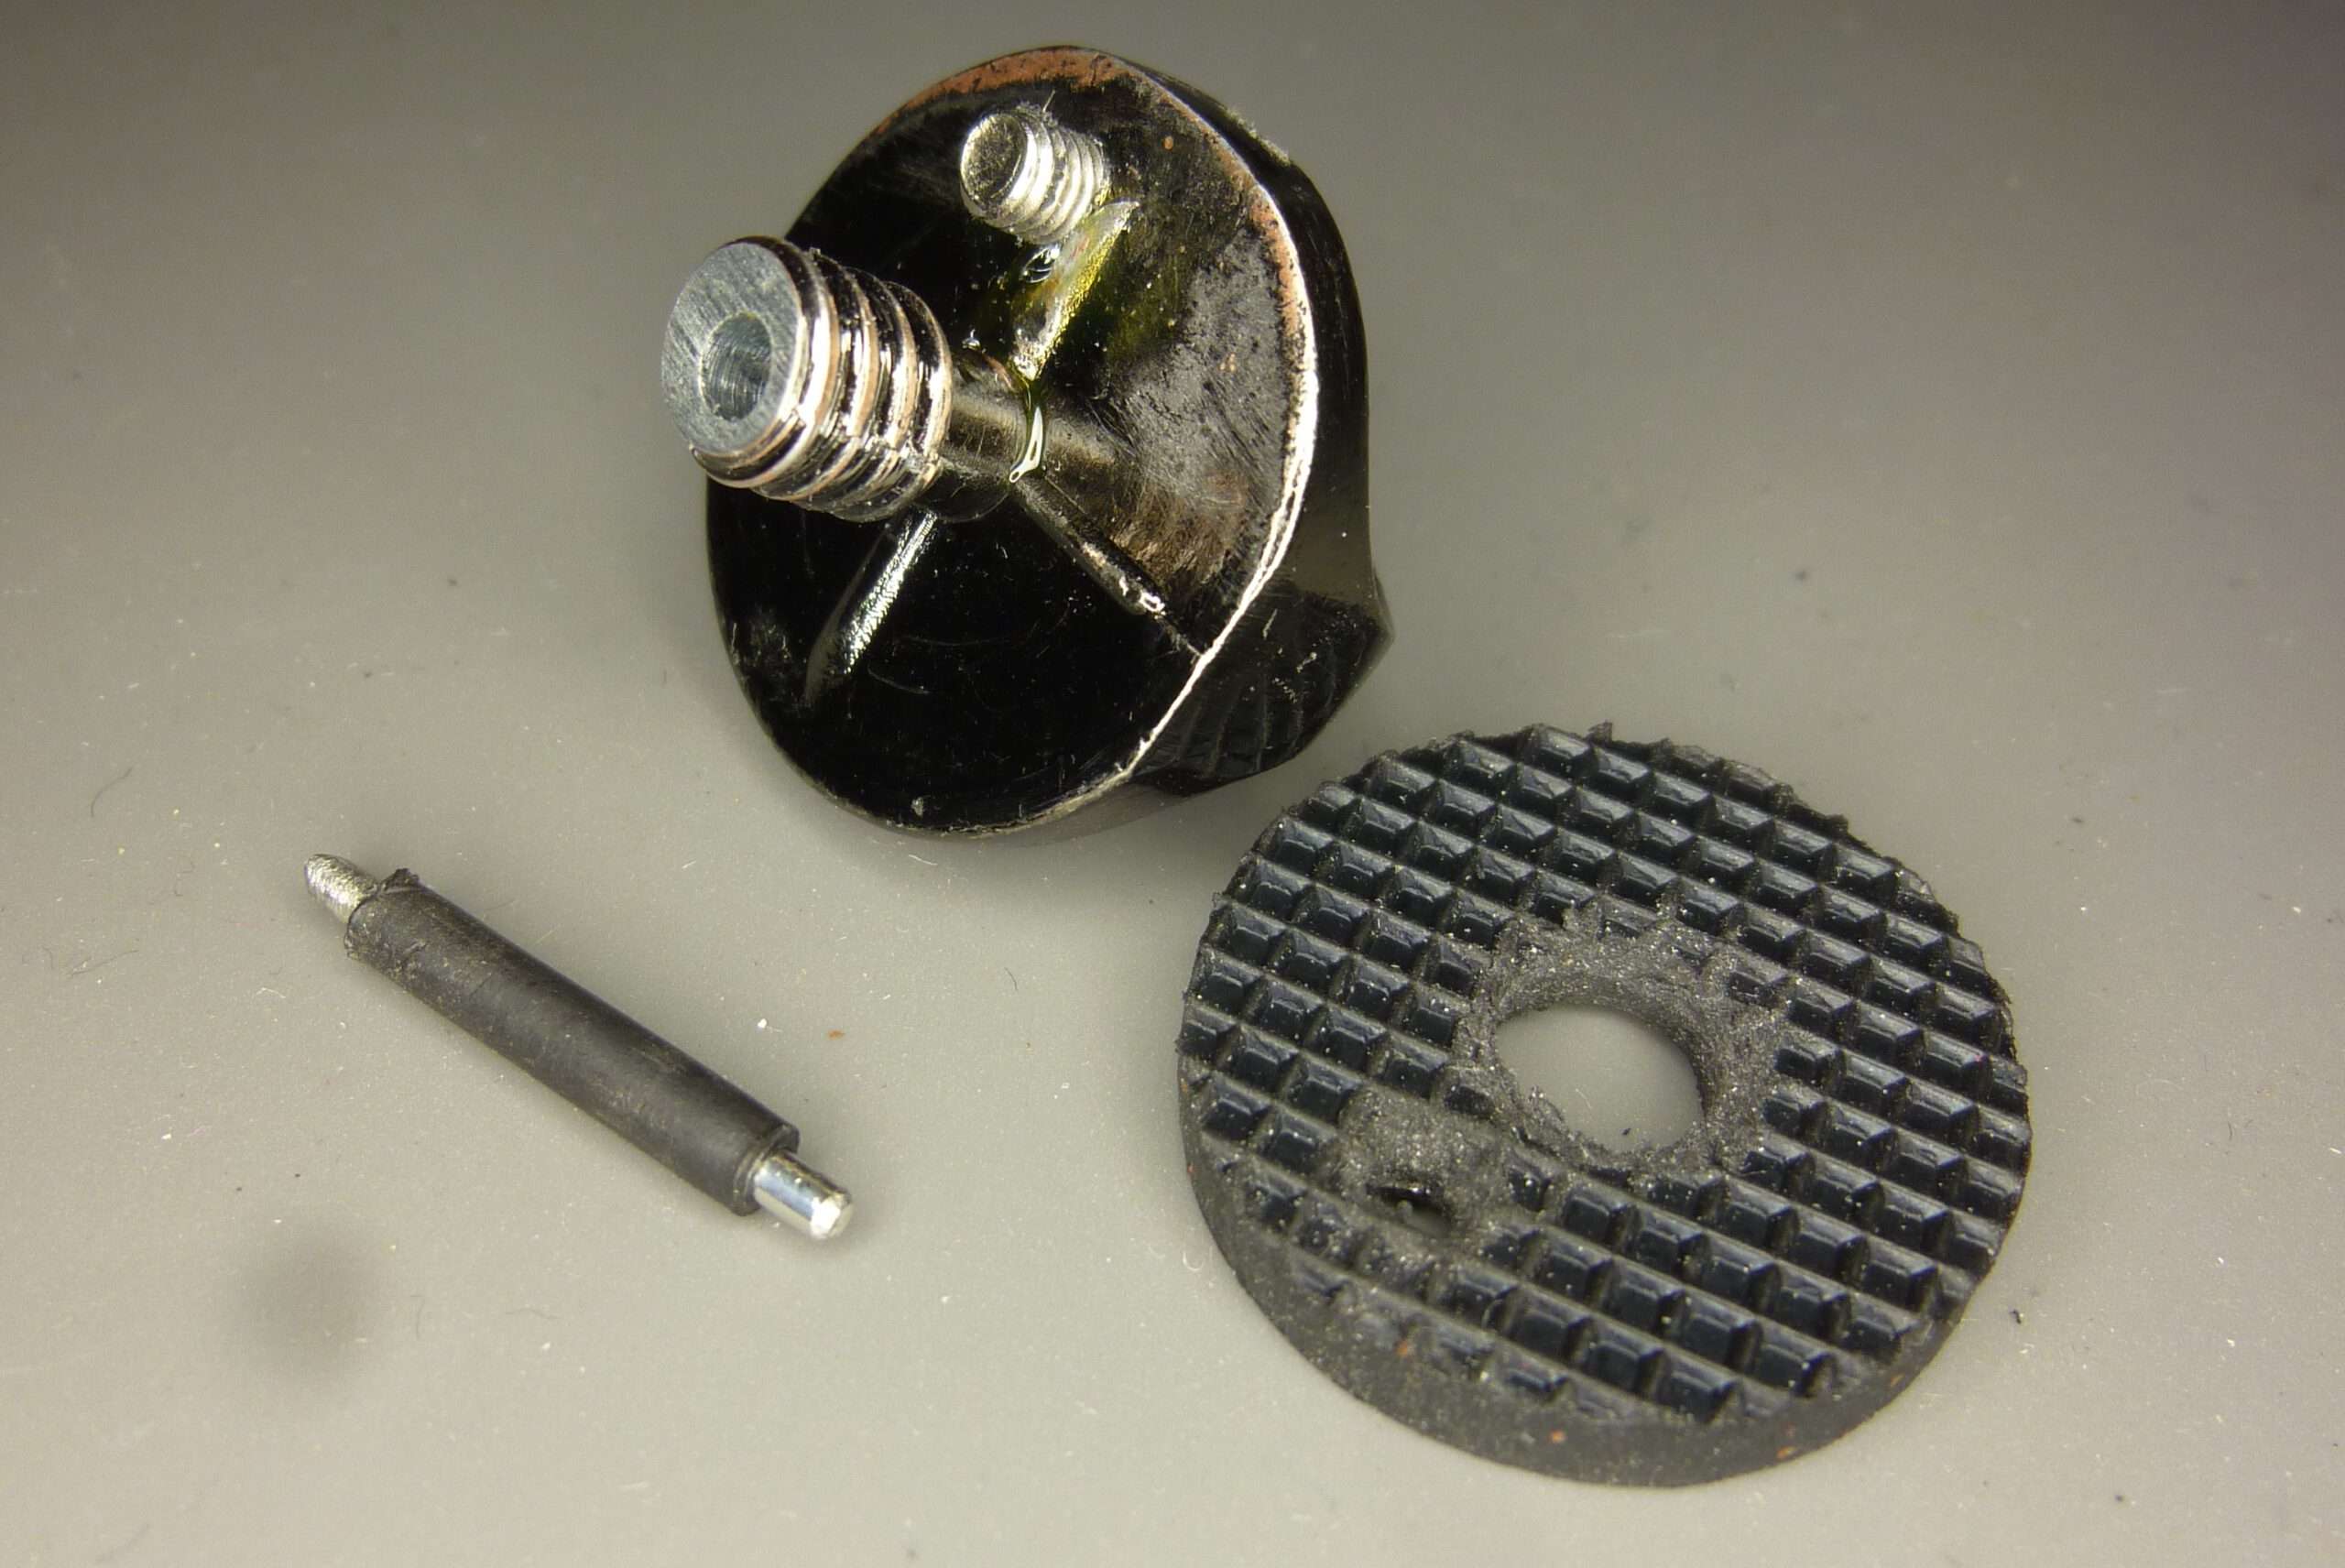
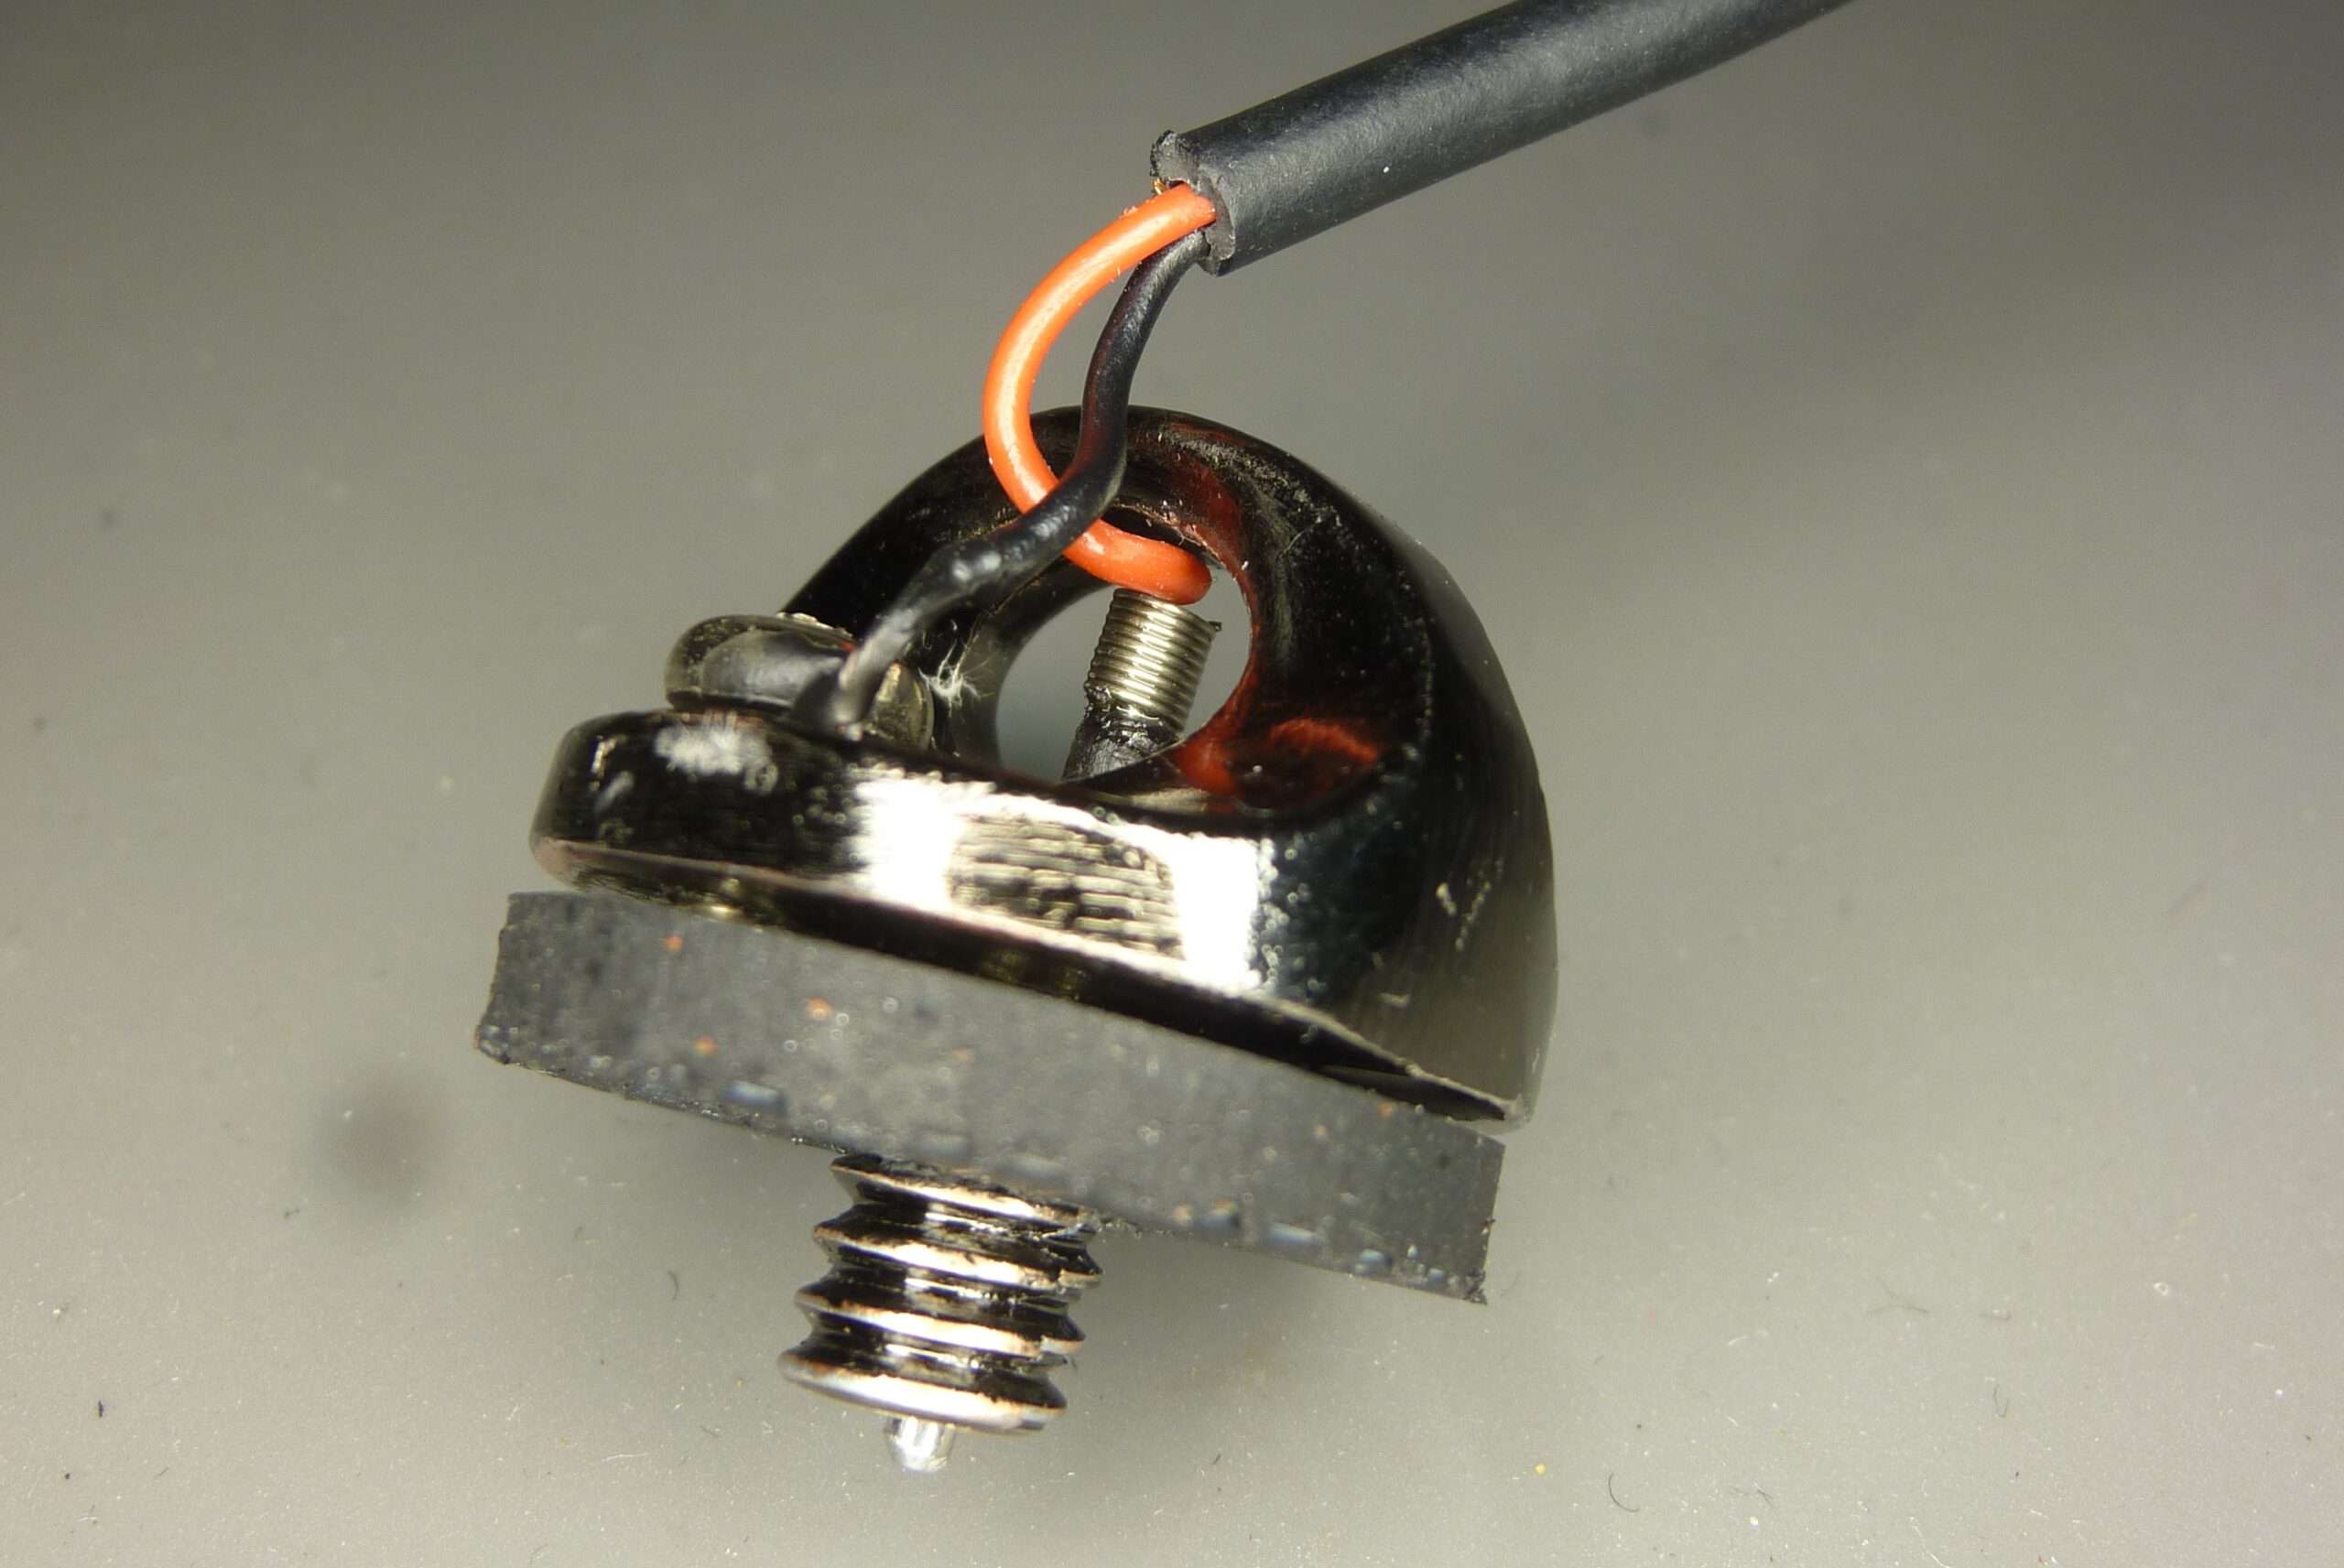
The Connection
I soldered a cable directly to these two points, terminating the other end in a standard PC-sync plug. This allows the Mamiya to trigger any traditional external flash unit or radio trigger.
The result is a small, rugged adapter that screws into the base of the camera. It works perfectly on the first try: when the shutter fires, the signal passes through my homemade pin-and-screw assembly, triggering the flash in perfect sync. Now, with the danger of blur removed, I can finally see what this lens is truly capable of.
The results from the first tests with the custom cable are definitive: the Mamiya Super 16 synchronizes perfectly with an electronic flash across its entire shutter speed range, including the top speed of 1/200s.
This is a significant advantage of the Mamiya’s leaf shutter design. Unlike focal-plane shutters found in many larger cameras – which are often limited to slower sync speeds – this miniature mechanism allows the flash to fire at the exact moment the blades are fully retracted, regardless of the chosen speed.
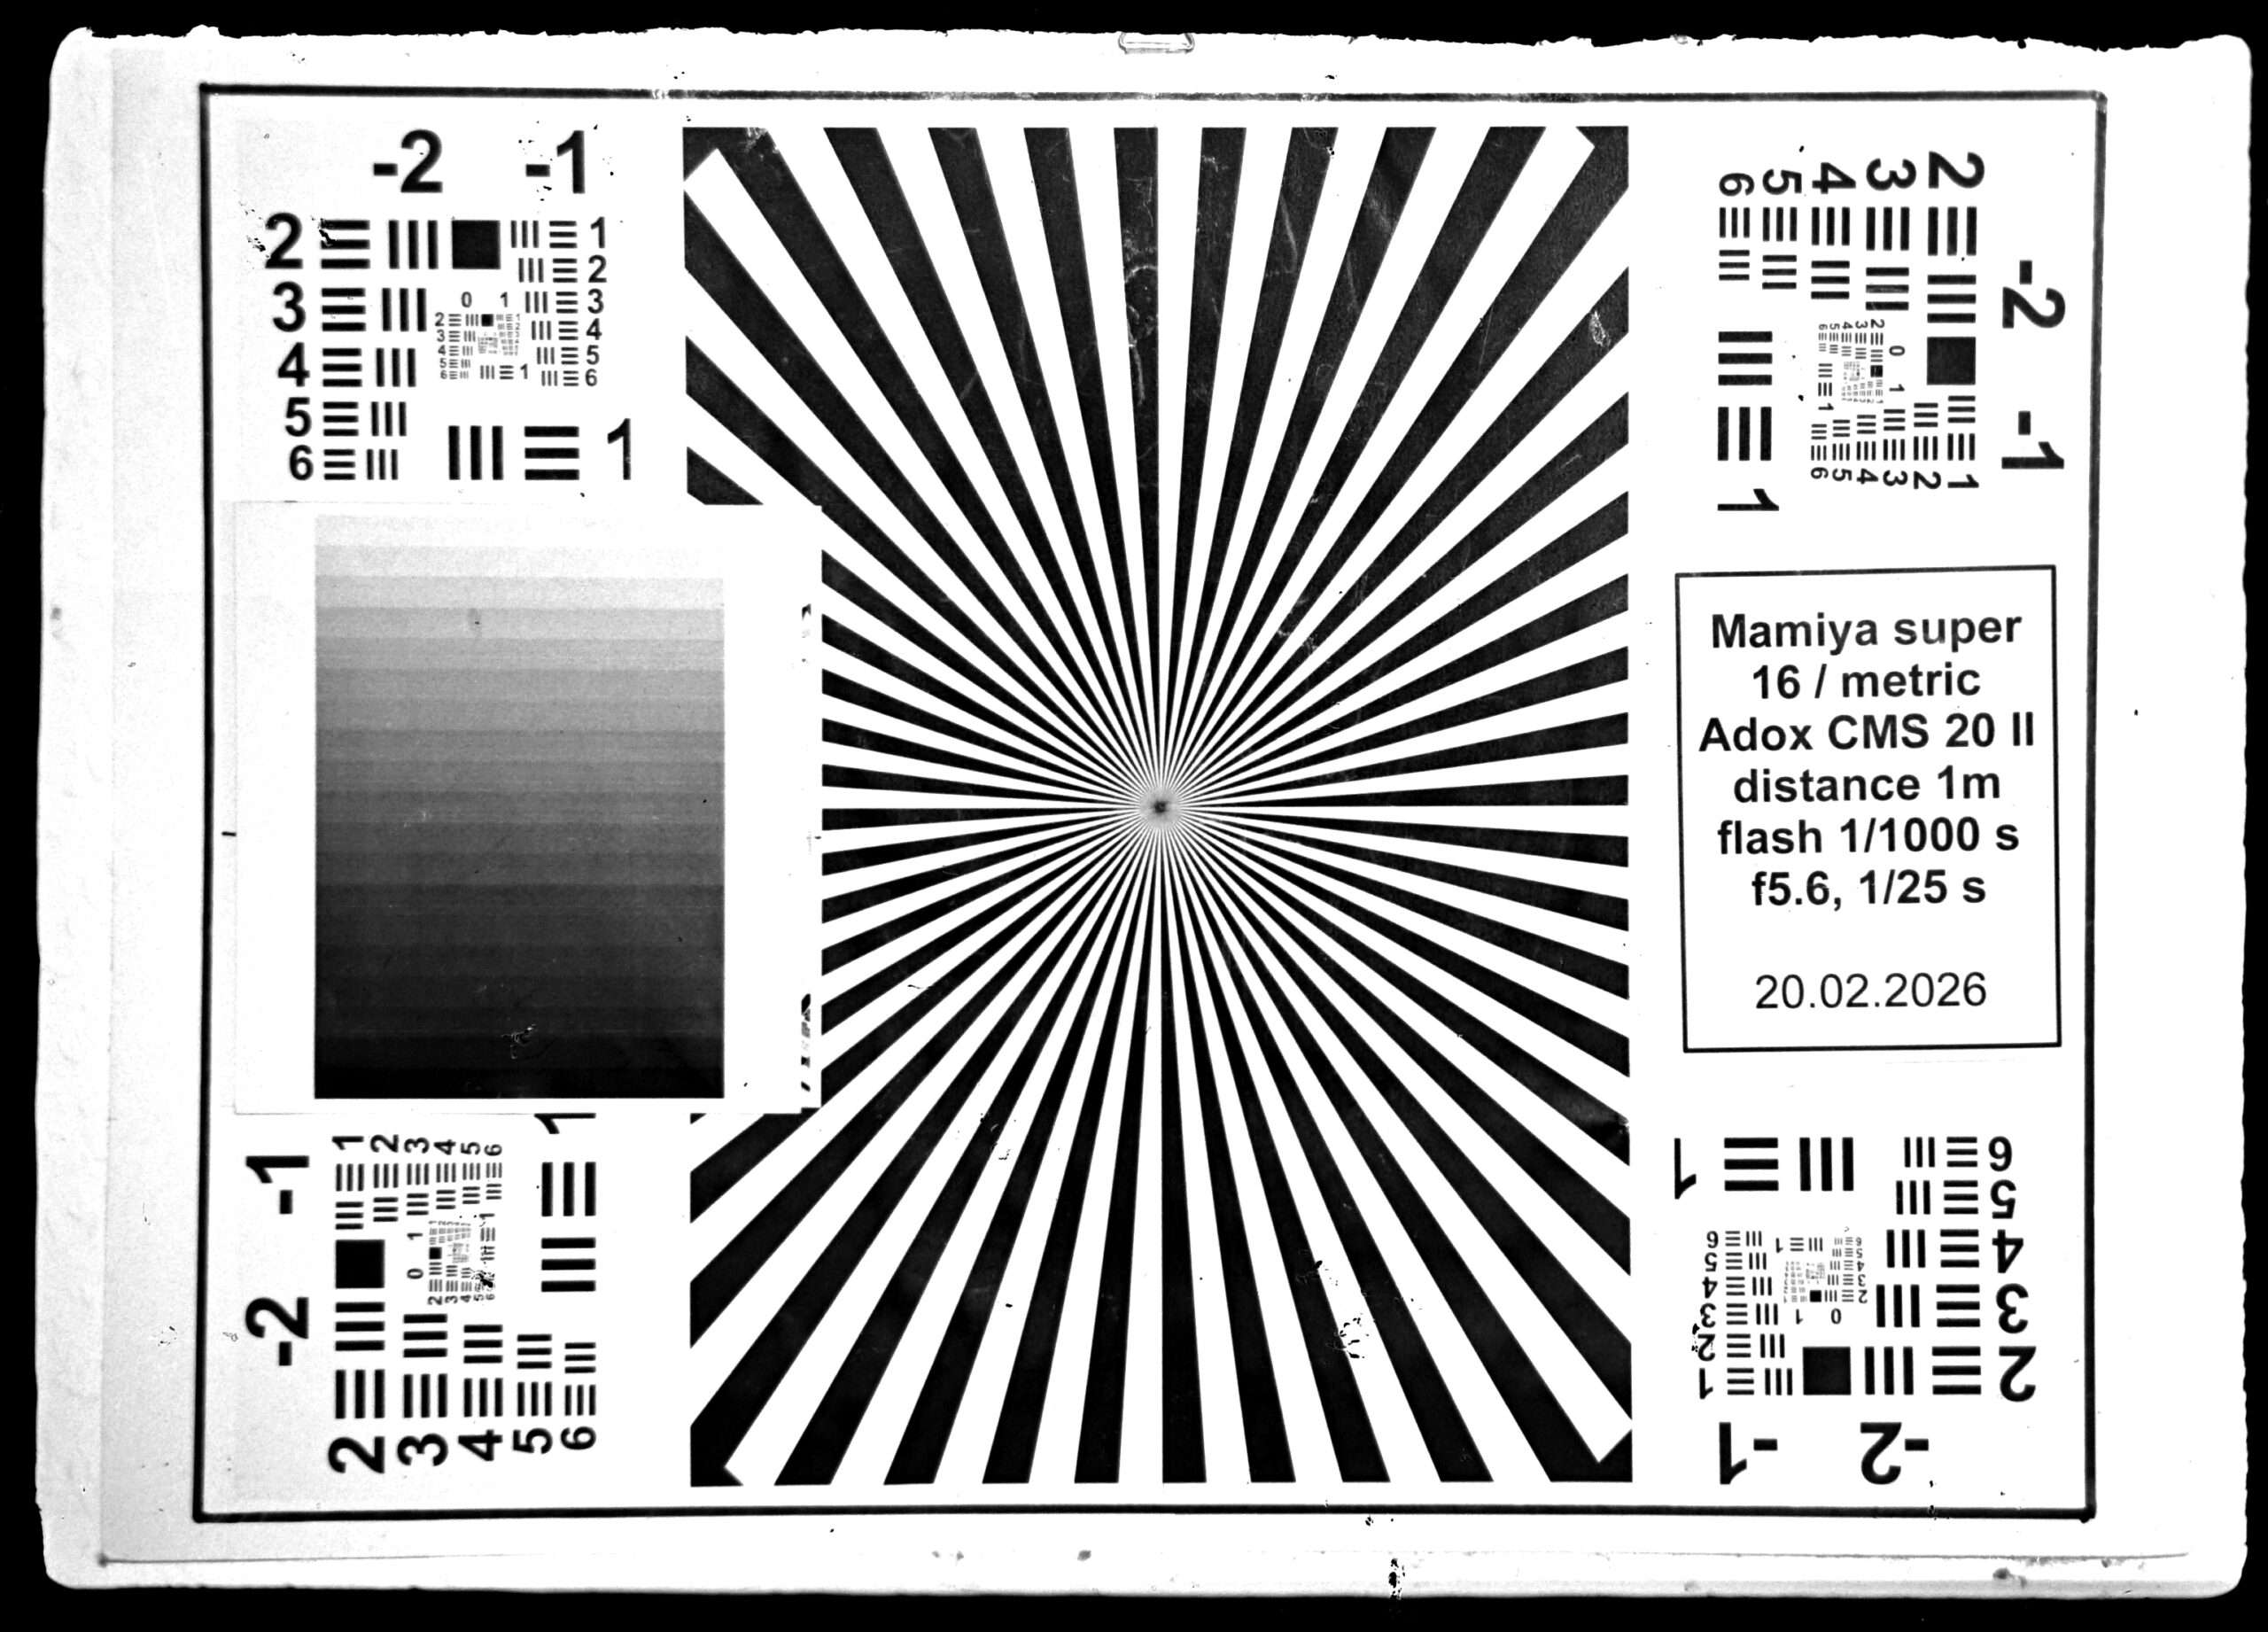
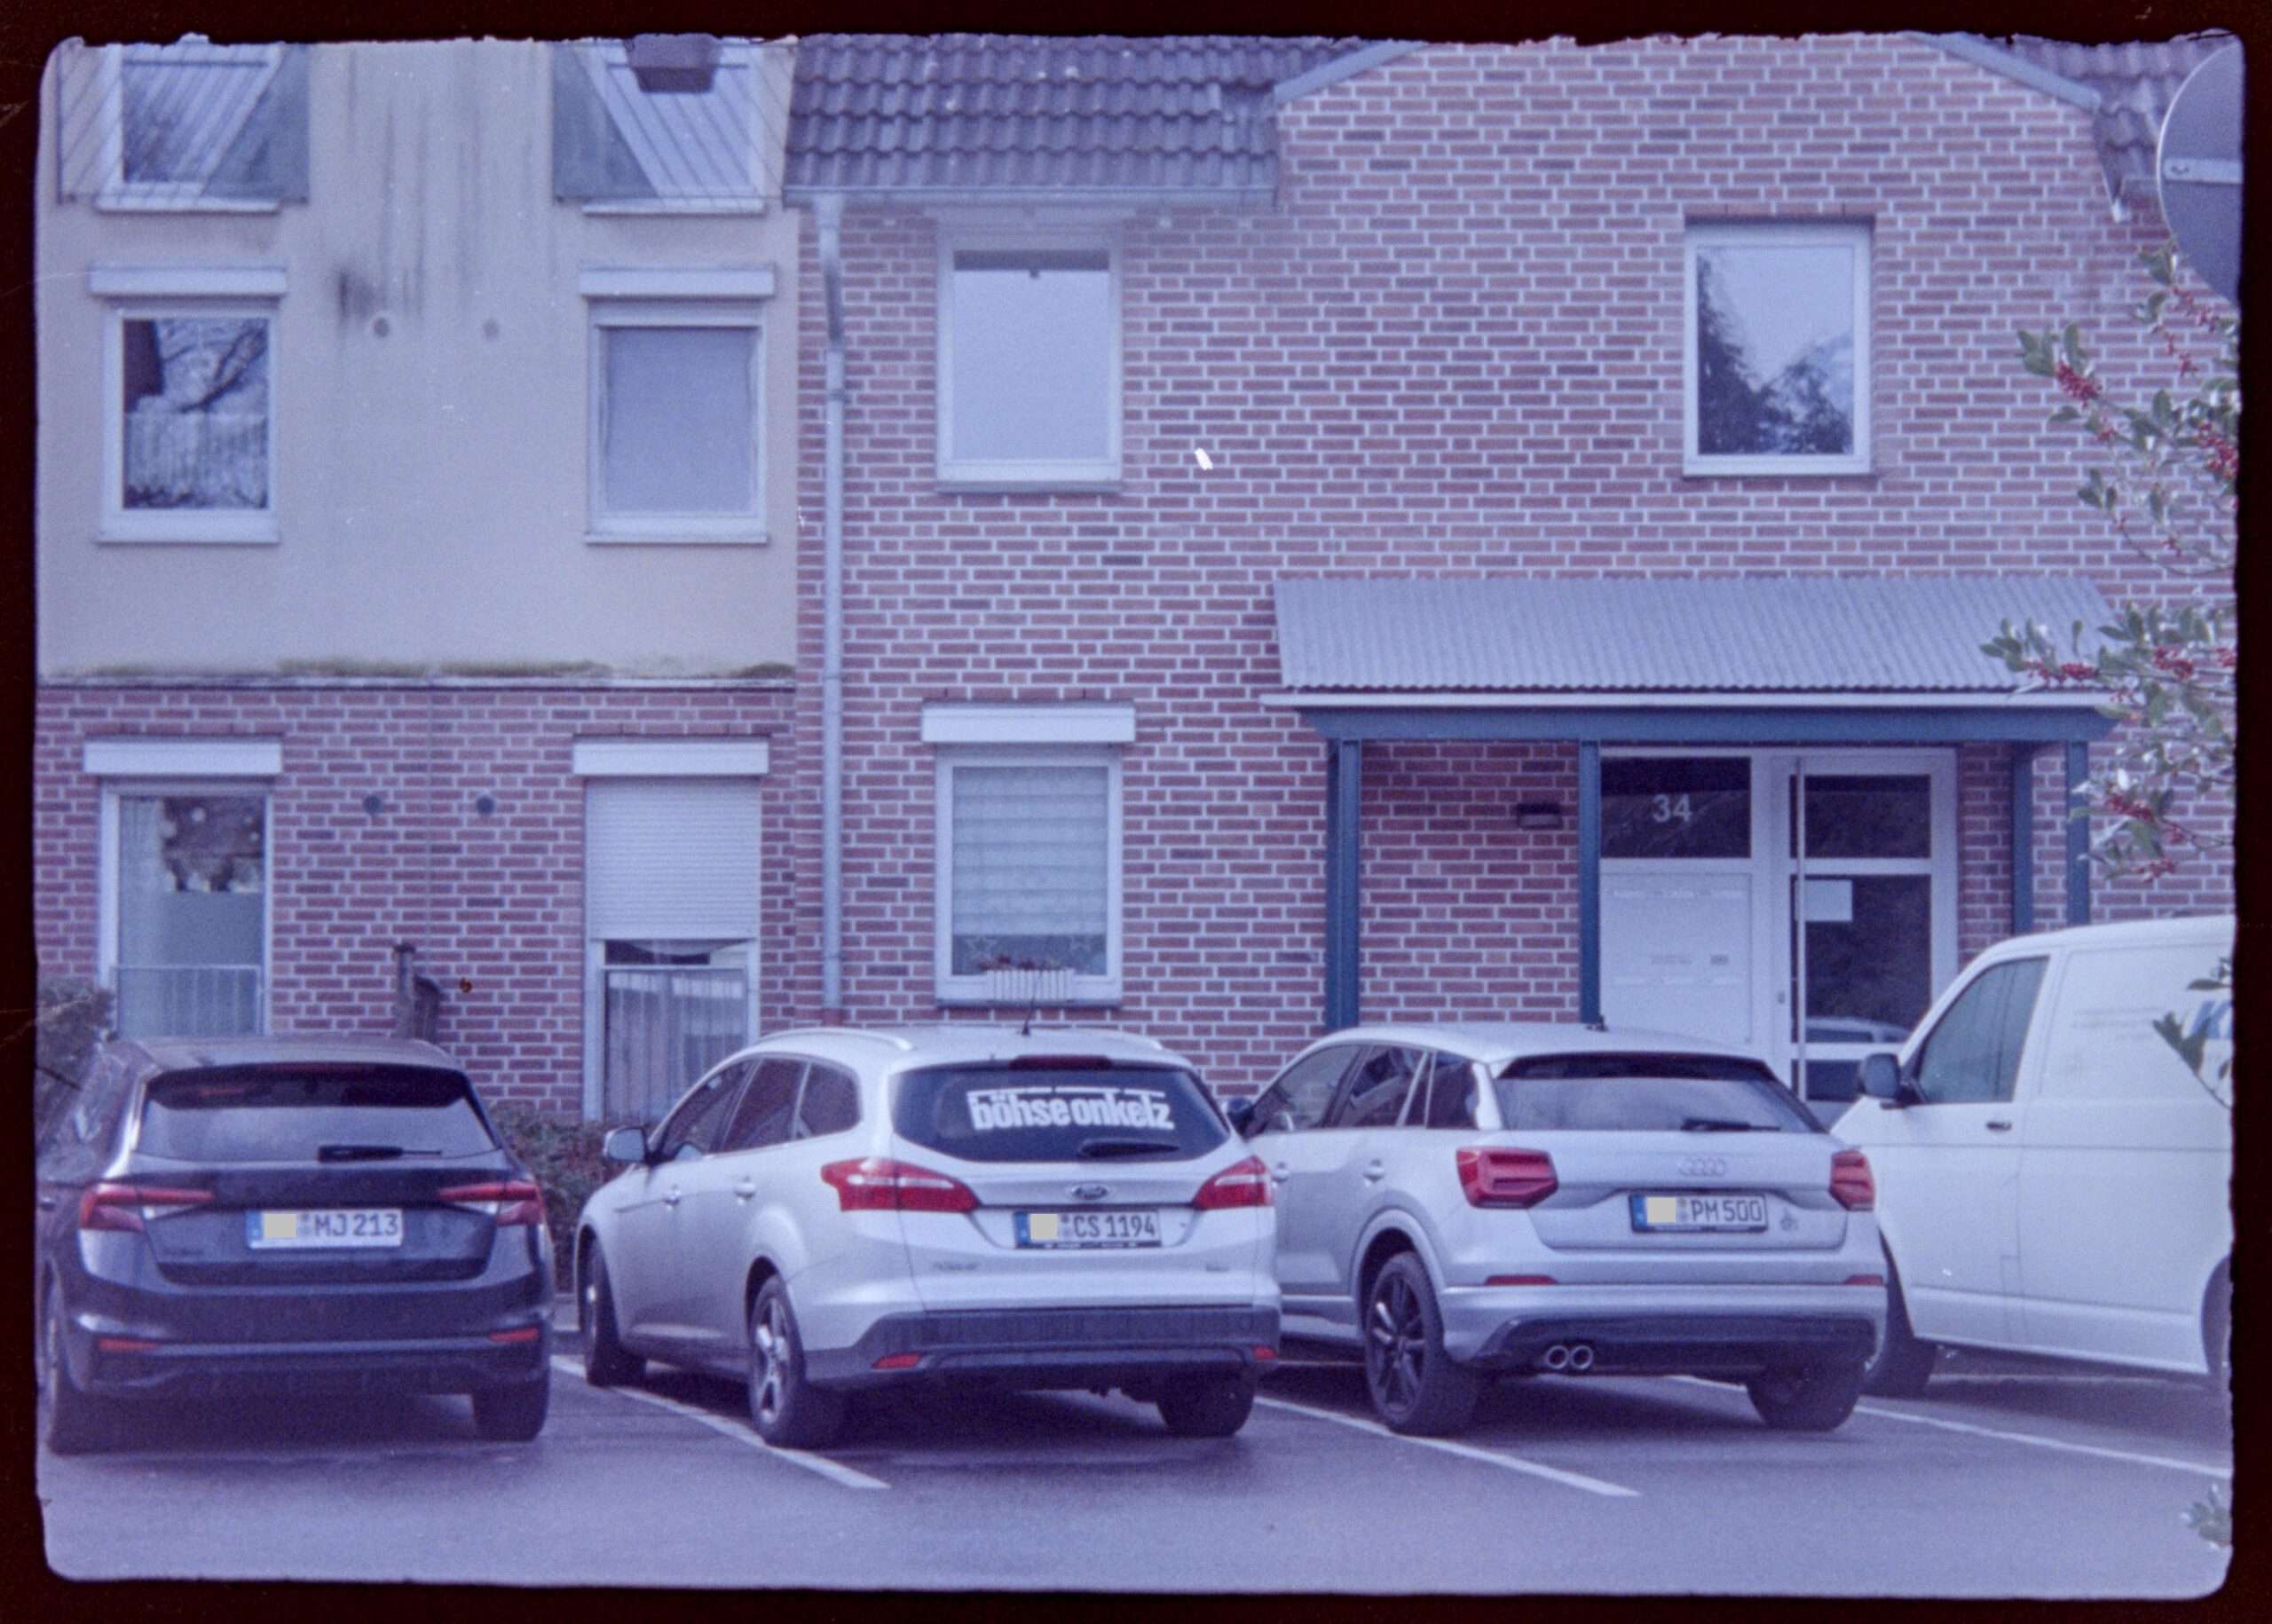
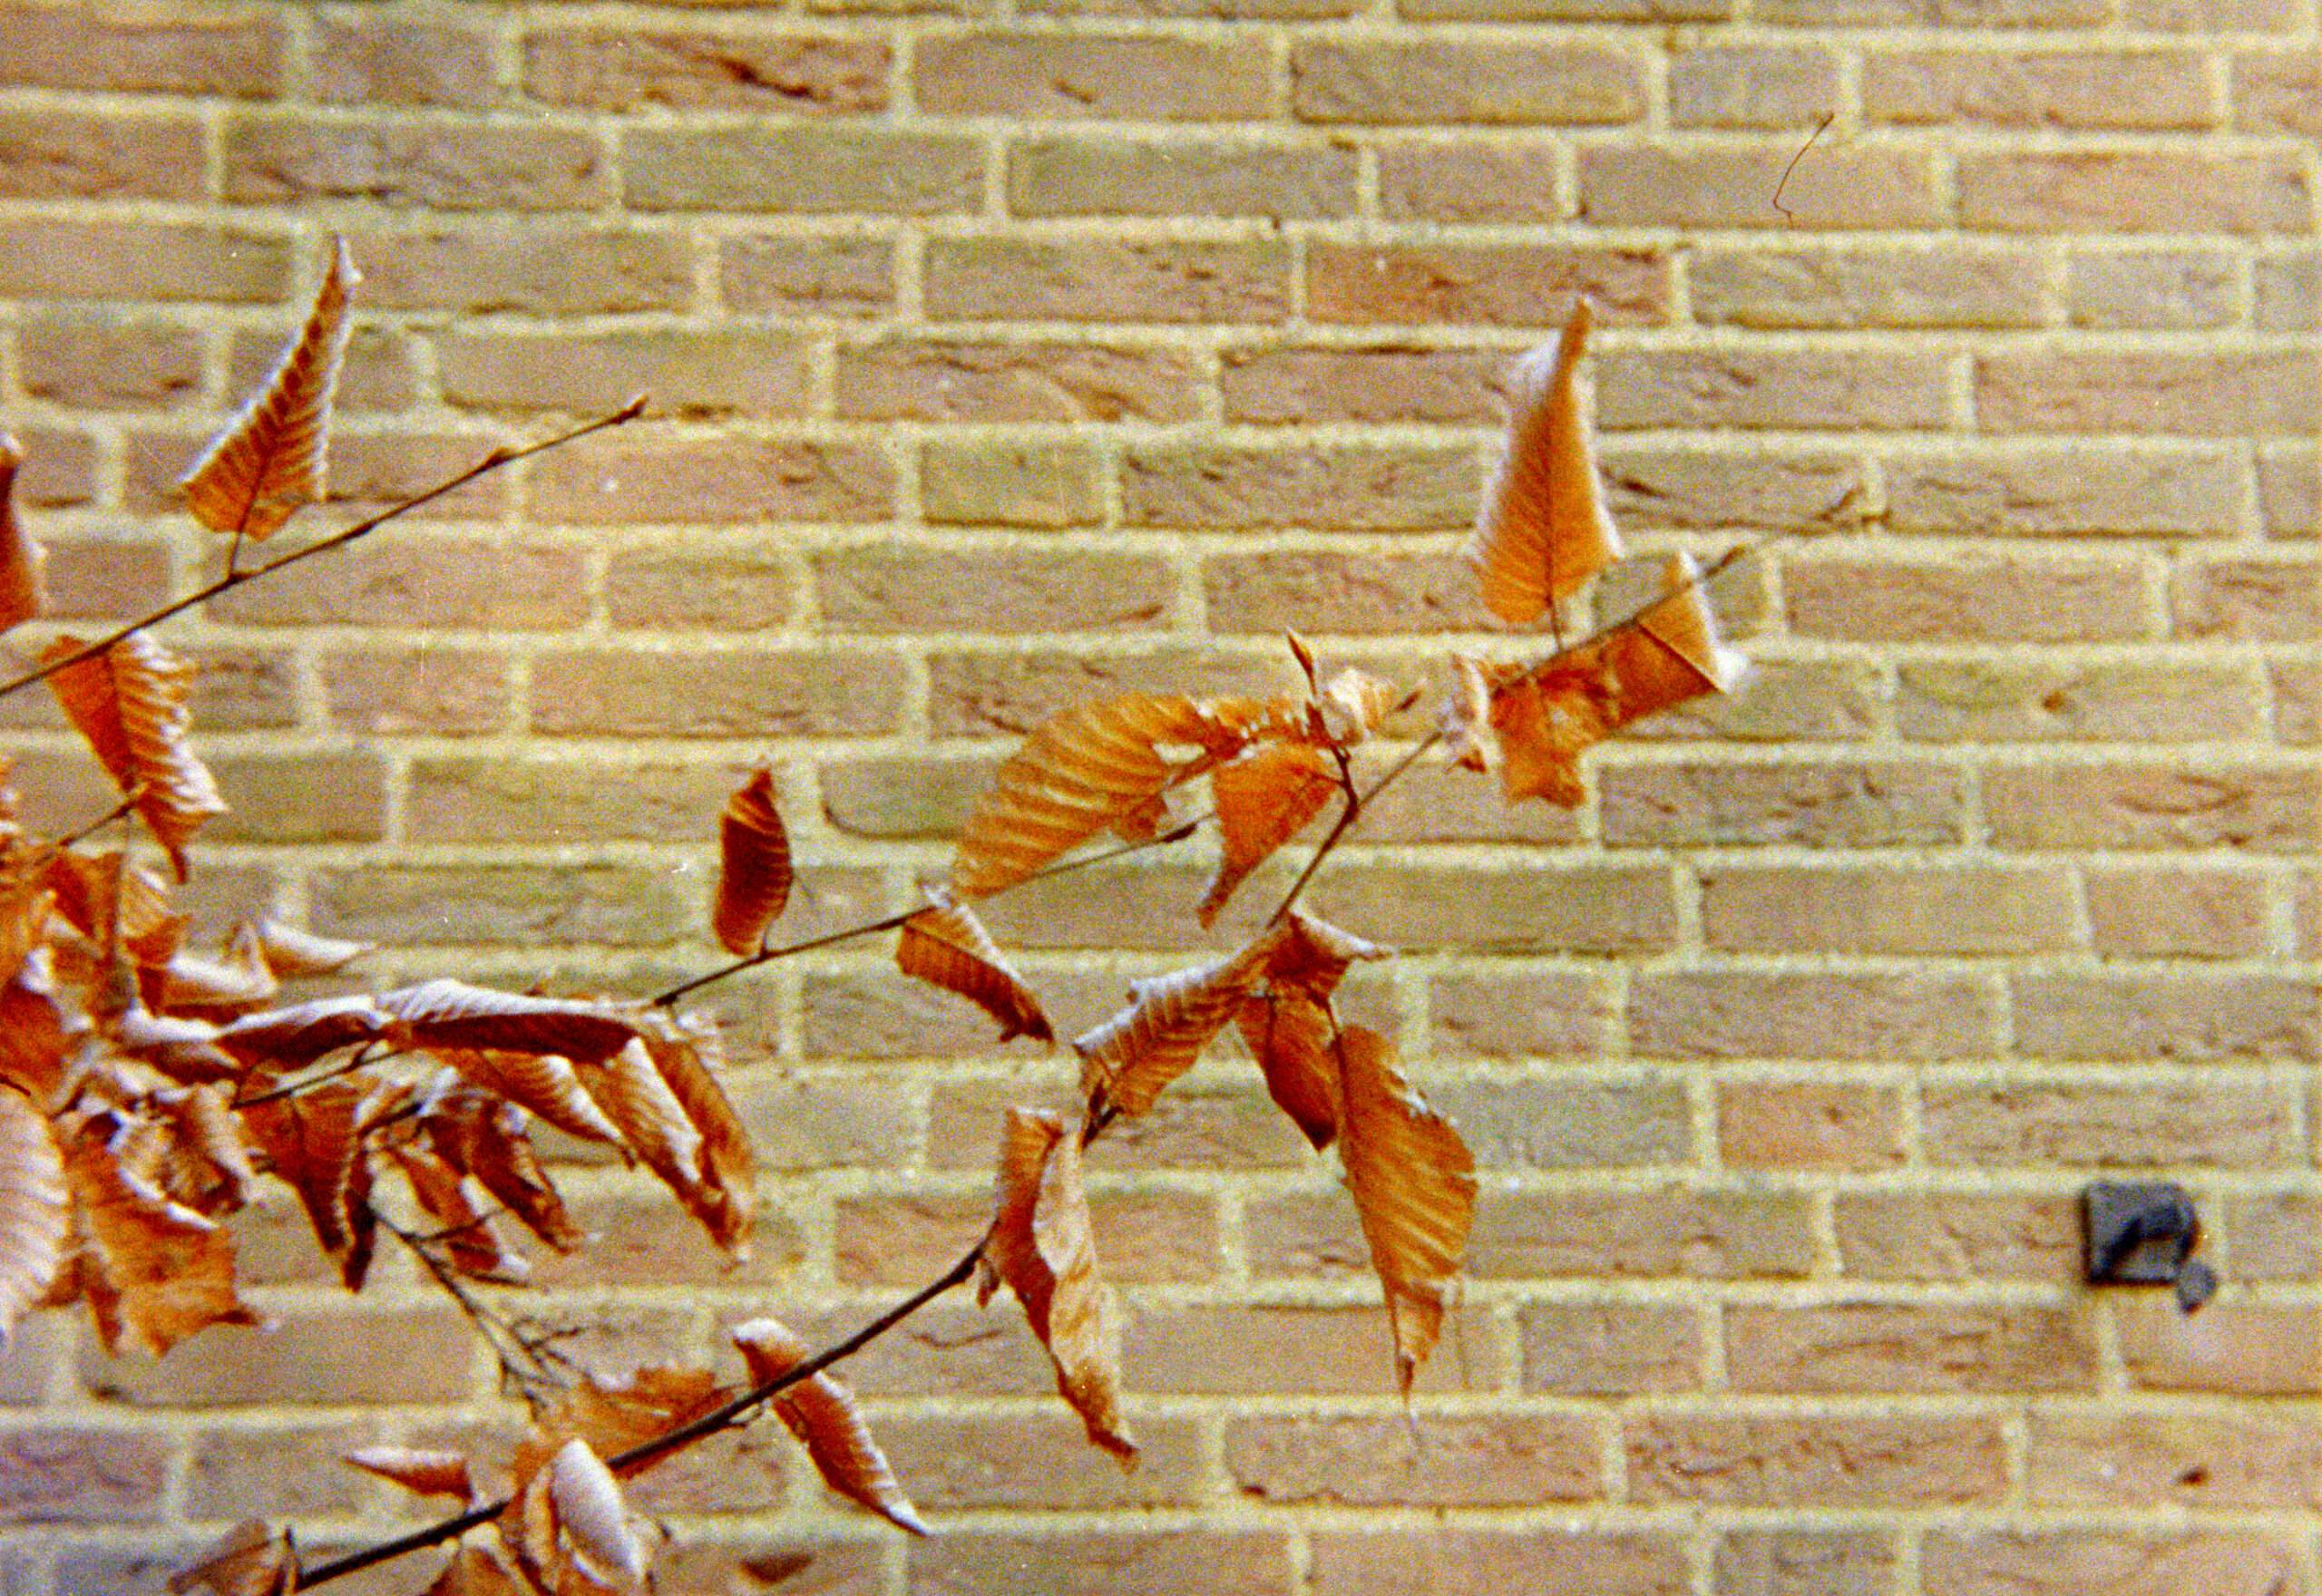
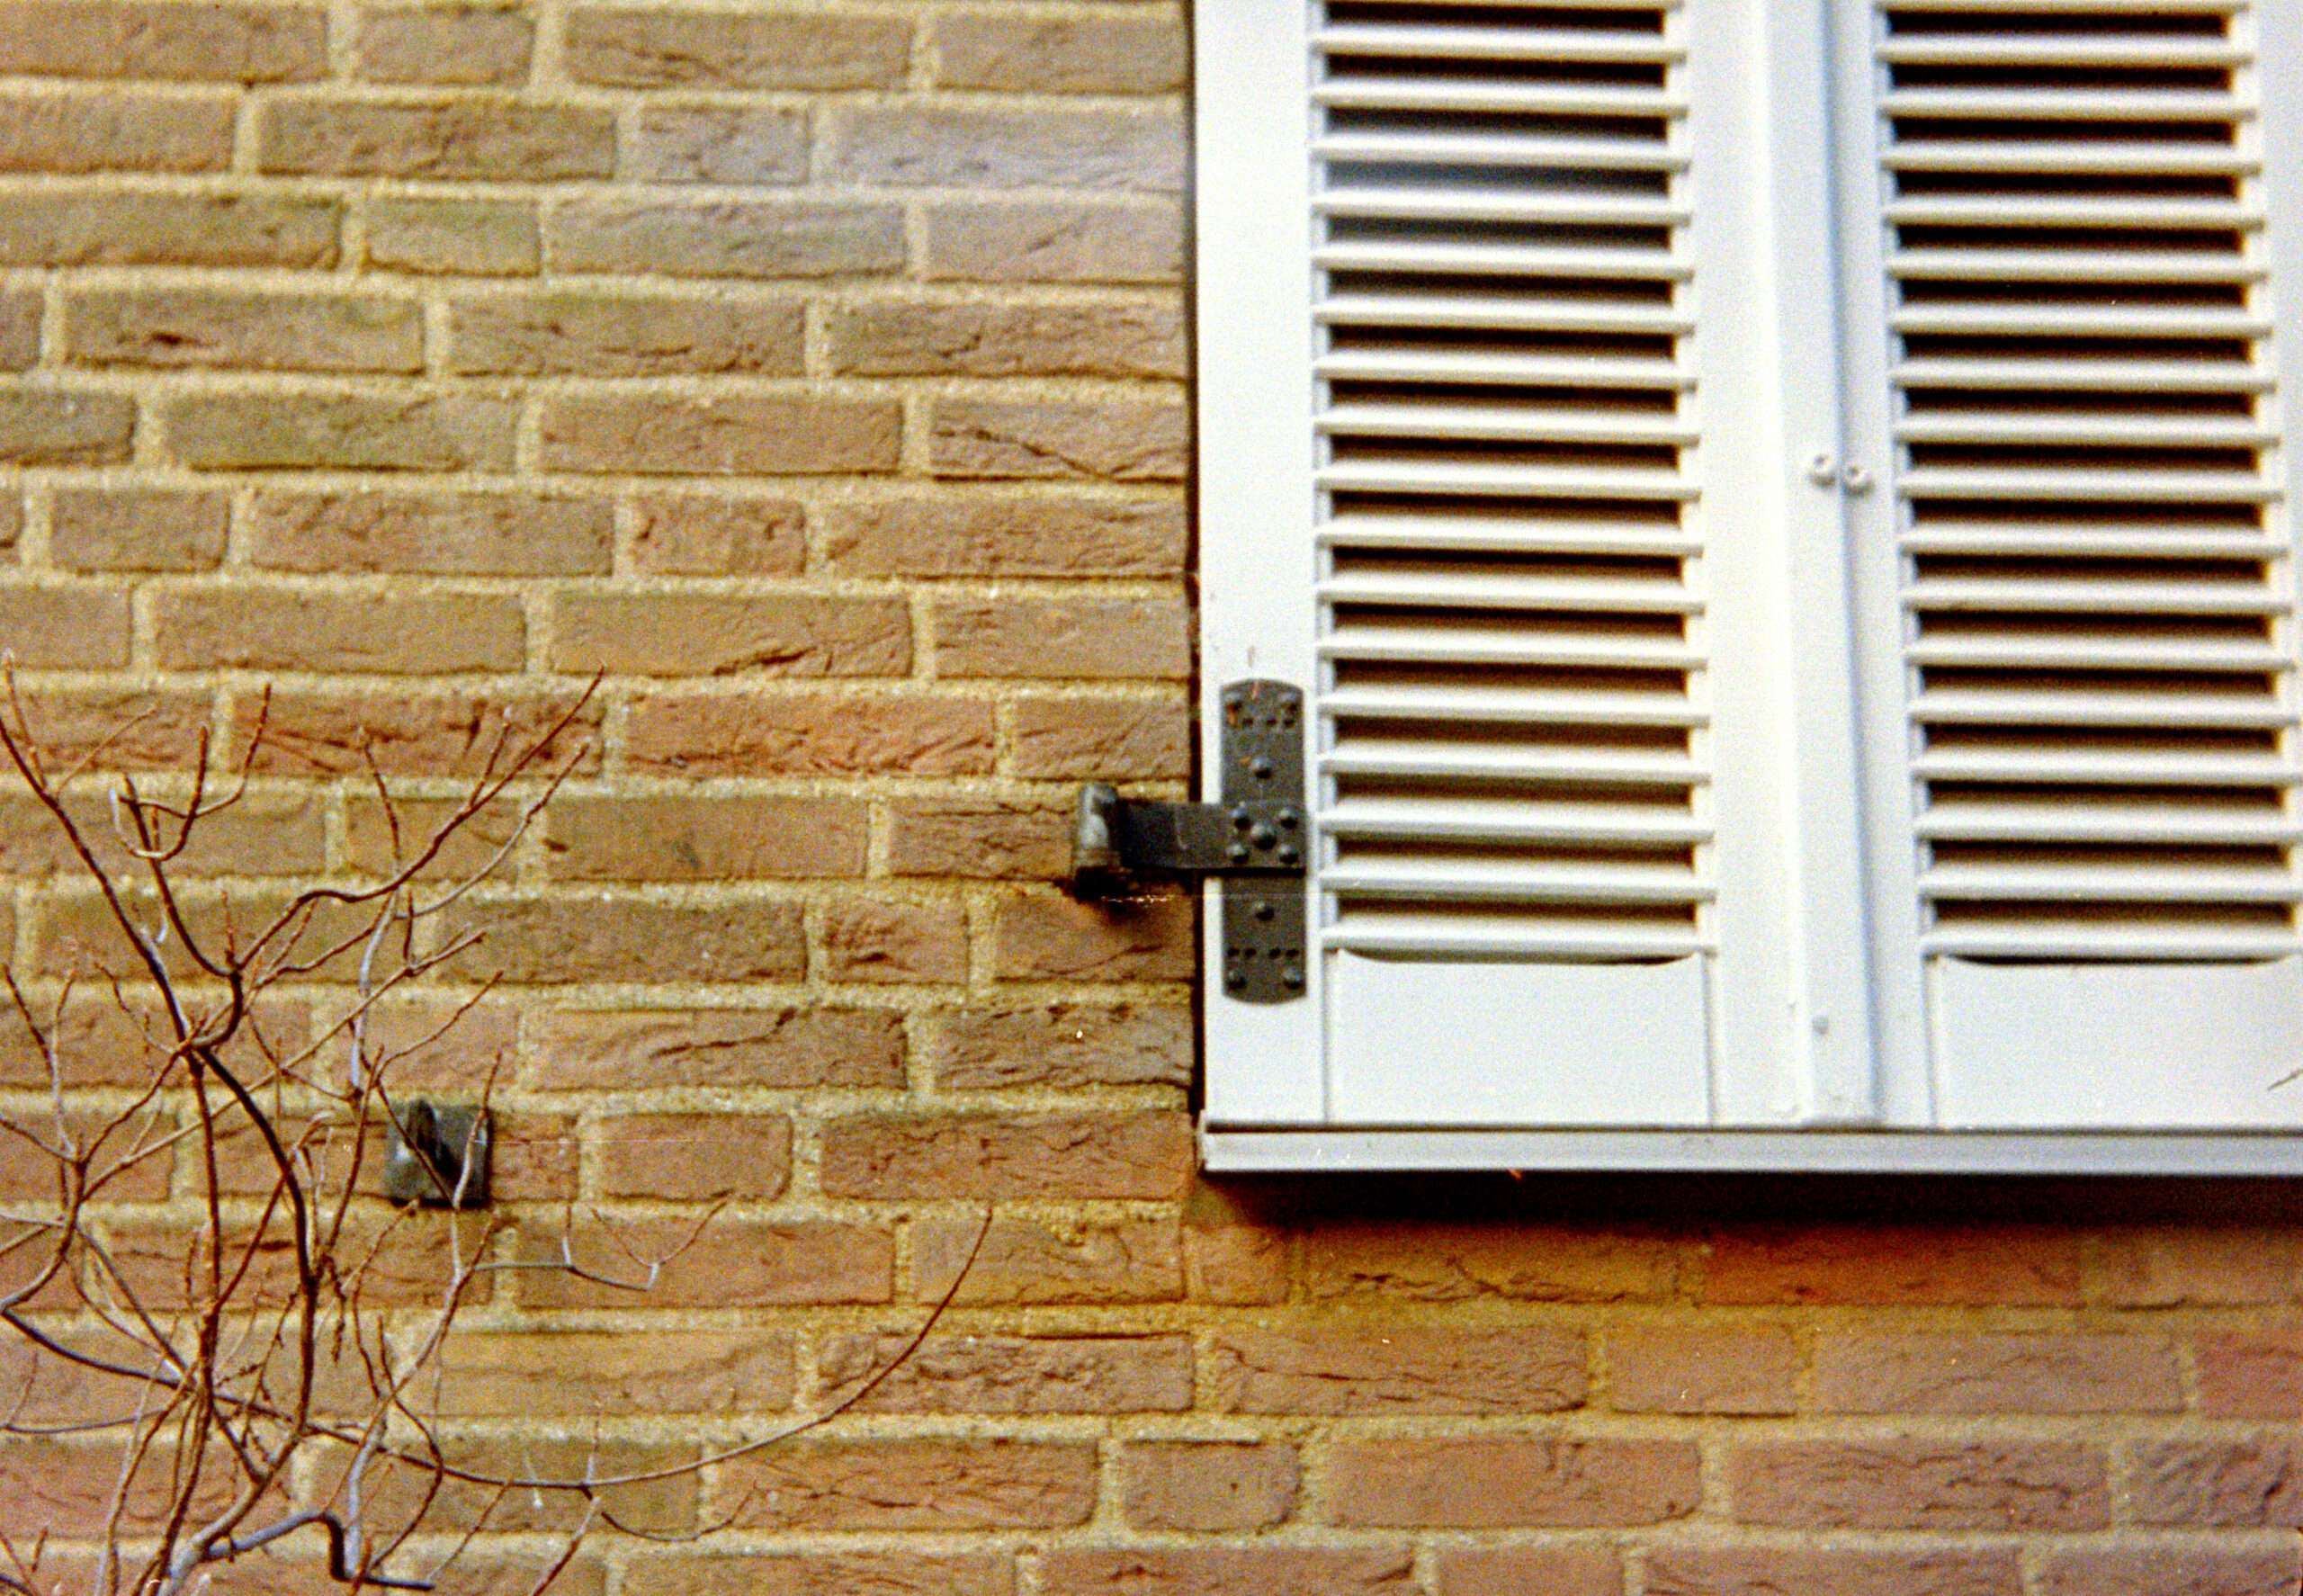
The final proof: Field testing with film
With the mechanics polished, the shutter calibrated, and the flash synchronization secured, I reached the final stage of this restoration: the ultimate test under real-world conditions. To push the Mamiya Super 16 to its absolute limits, I prepared two distinct types of film, hand-cut to size.
The films of the test
To get a complete picture of the camera’s performance, I chose two specialized emulsions:
- Kodak Ektar 100: Known for its ultra-fine grain and vibrant saturation, this color negative film would show how the lens handles color rendition and “normal” real-world scenes.
- ADOX CMS 20 II: This is a high-resolution black-and-white film capable of resolving detail far beyond what most lenses can provide. It was the perfect choice for a technical “stress test” of the optics.
Three objectives, one result
I approached this final test with three clear goals in mind:
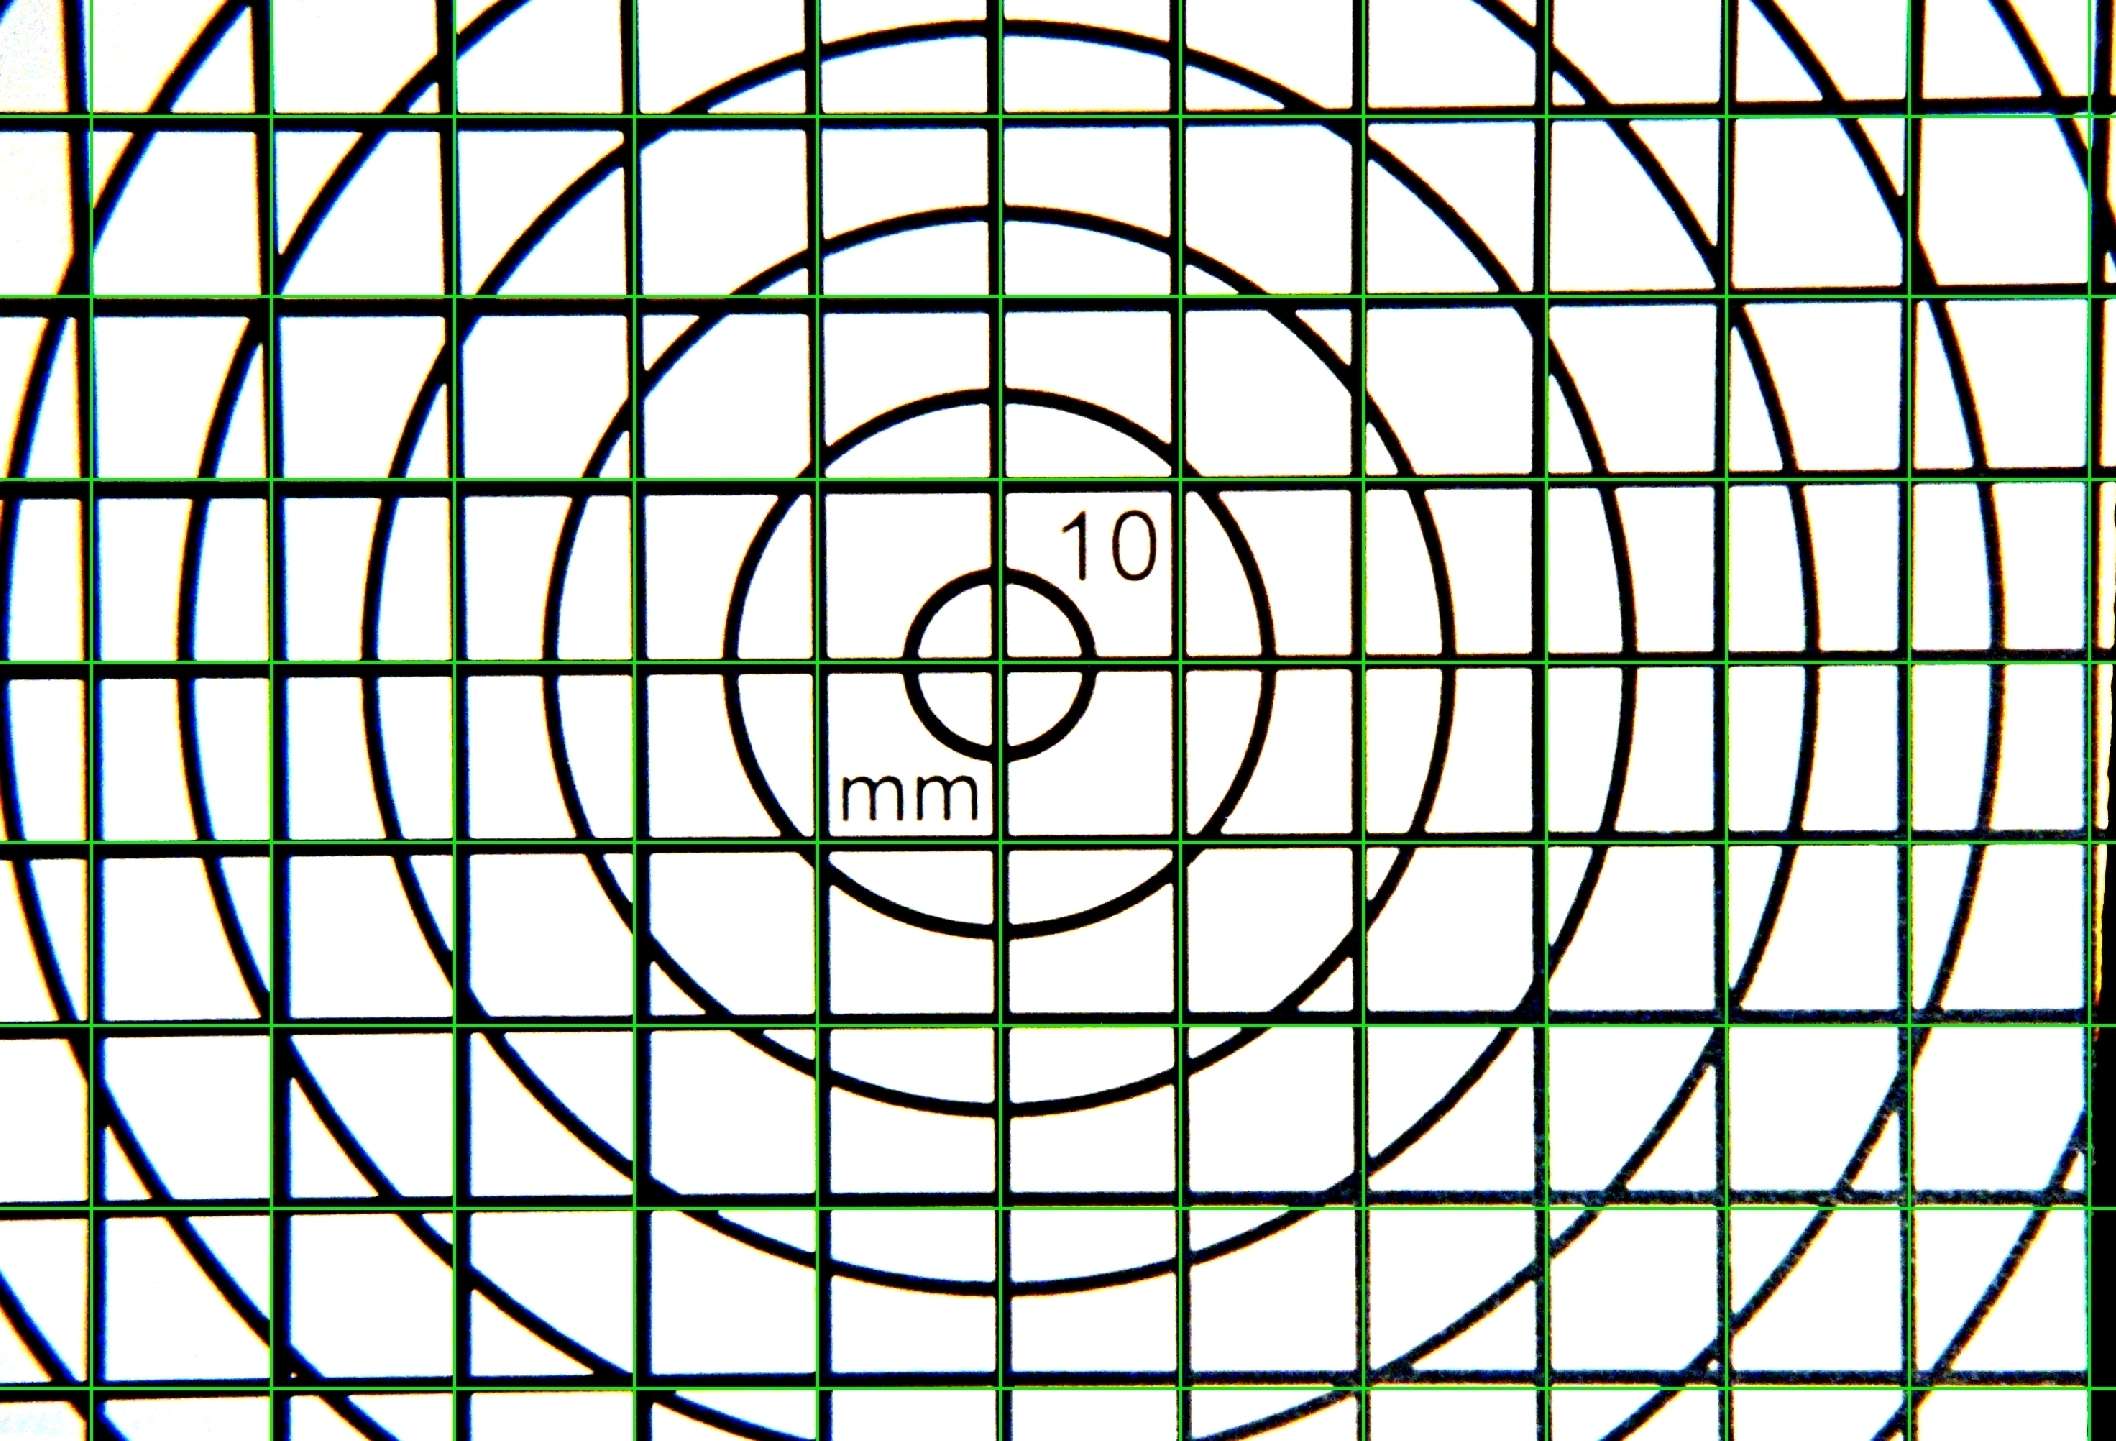
- Focus Verification: I needed to ensure that the distance scale on the lens translated accurately to the film plane. Whether at the closest focus distance or at infinity, the results were sharp and consistent. My earlier manual calibration was confirmed.
- Distortion: Another positive surprise is that there is practically no distortion.
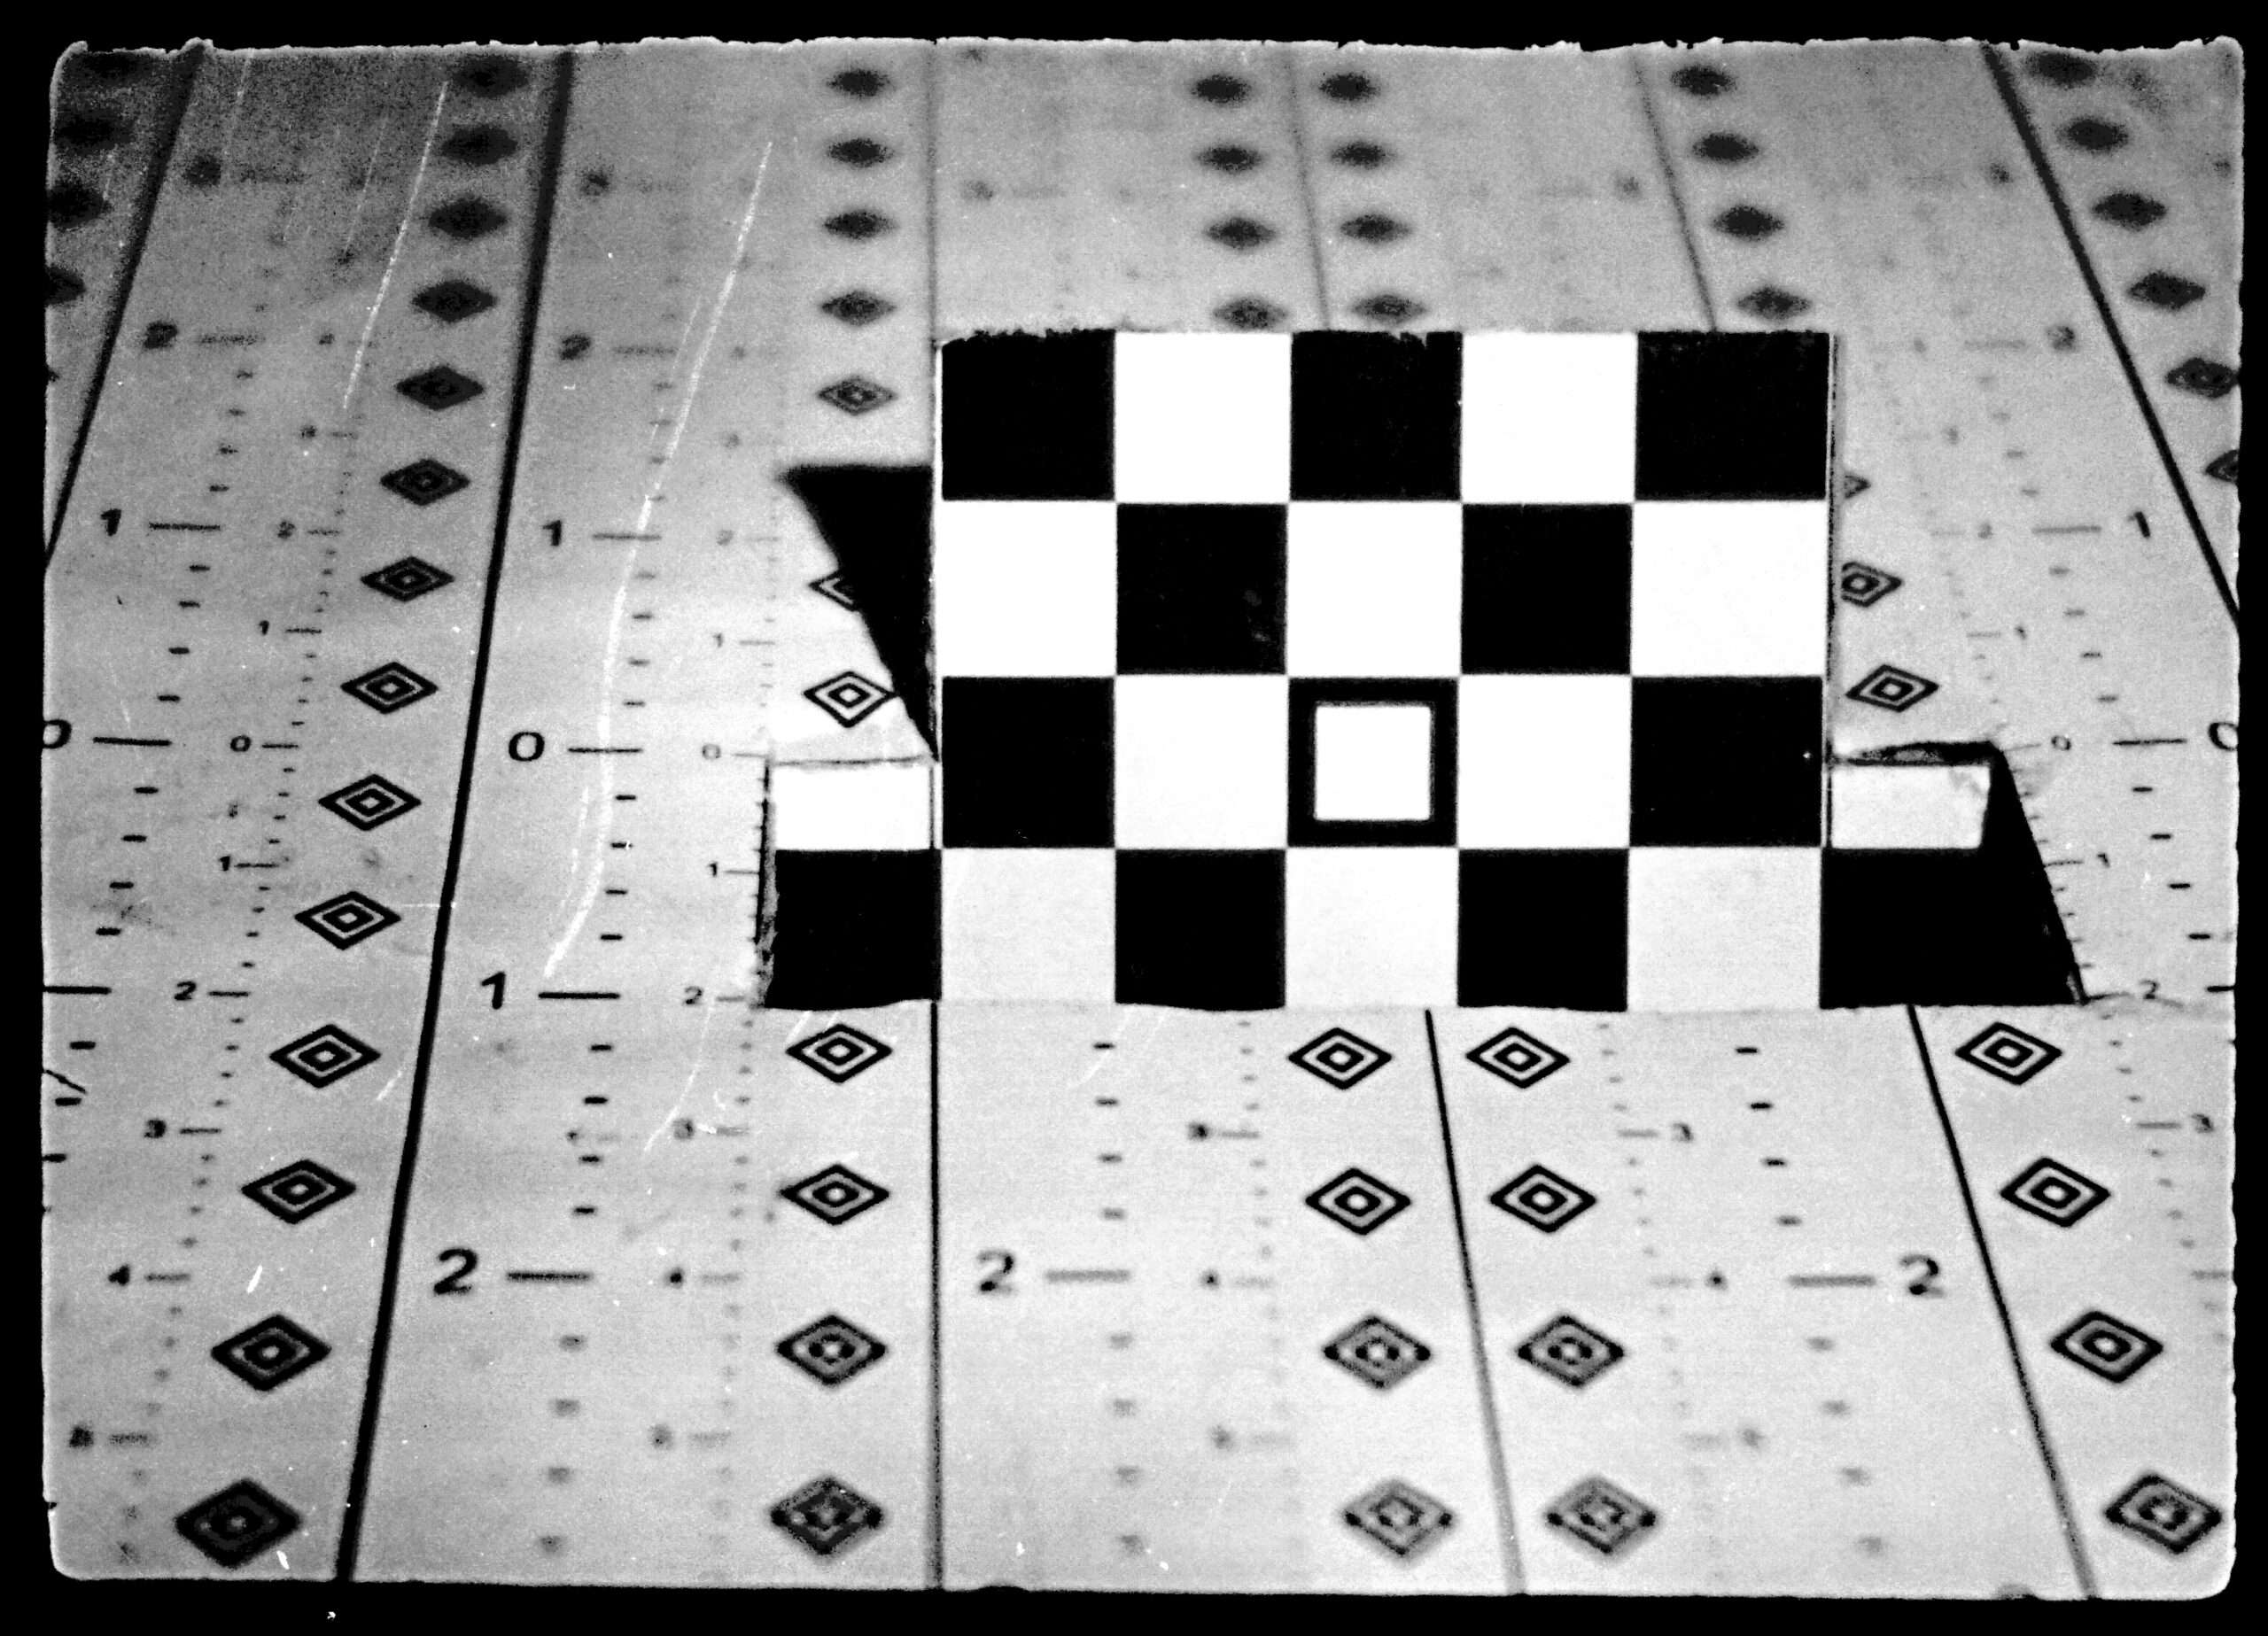
- Resolving Power: Using the ADOX film, I aimed to find the true limit of the lens. The results are impressive: 133 LP/mm (center 140, corners 126), proving that Mamiya’s glass was designed for serious work. You can find my detailed review here.
- Overall Image Quality: Beyond technical charts, I wanted to see the “soul” of the images. The Kodak Ektar frames produced beautiful, rich exposures with that classic analog depth. The “normal” shots showed no signs of light leaks or irregular spacing – the transport and shutter worked in perfect harmony.
My journey into the Mamiya super 16 ends
Ultimately, I achieved my goals. What’s more, it was a wonderful and satisfying journey. The Mamiya super 16 has been transformed into a useful and aesthetic photographic tool.
The effort to understand its inner workings, clean and oil it, polish every lever, and optimize the spring tensions has ultimately resulted in a camera that works just as well as it did the day it left the factory.
If you’re interested in how exceptionally well the Mamiya super 16 compares to the Minox A, you can find a direct comparison I made here.
Sample photos
Below are sample photos from the test rolls, which serve as final confirmation of this restoration:
Practical tips for the Mamiya super 16
- Where can I get film?
Film slitter for making your own 16 mm films from any 35 mm film - How do I develop the film?
I develop black-and-white films myself using this developing reel in a Jobo developing tank. I rewind color films onto a 35mm cartridge and have them developed using the C41 process in a professional lab. - How do I digitize the film?
I have described here how I do this with my Minox negatives. For 16 mm film, I do it the same way, only with a different negative holder. - Which type of adapter do I need to build my own flash cable?
Tripod adapter for making your own flash cable - Which other Mamiya 16 mm models exist?
Further information on the Mamiya Super 16 and subsequent models here, here and here.
Ein interessantes Projekt, auch diese Kamera mit ihrem Innenleben darzustellen. Besonders hat mir auch die Konstruktion des Blitzadapters gefallen, da muß man erst mal drauf kommen.
Thomas,
Your “revitalizations” are always enlightening and clearly reveal the pleasure you derive from them.
I appreciate them very much, both as guides if I want to follow in your footsteps and to learn a few “tricks.”
They also allow me to better appreciate the (perhaps hidden) features of the machines in my small collection.
Congratulations
Folco
Absolutely fascinating and beautifully written and photographed. Thank you for sharing this.