When you take a picture, the lens is focused at some definite distance. That means, that it’s position relative to the film is adjusted in such a way, that whatever is exactly at the focused distance will be represented by a sharp image on the film. Everything else – everything nearer to the camera or farther away from it – will be unsharp [ Emanuel, W. D.: Minox Guide].
The sharpness does not decrease abruptly before or after the set distance, but only gradually. When you judge something in the later image to be too blurred depends on various factors, e.g. the magnification, the viewing distance, your own visual ability or the creative intention of the photographer.
The actual setting of the distance is very simple with the Minox. You turn the distance on the distance dial to the setting mark – done. The only question is, what distance should I set? Books have been written about this and the forums are full of them. I would like to answer the question here in general terms, but firstly specifically for the Minox and secondly without giving extensive explanations that you can easily find elsewhere.
So let’s start with the simplest topic, namely the actual setting on the camera.
Page Contents
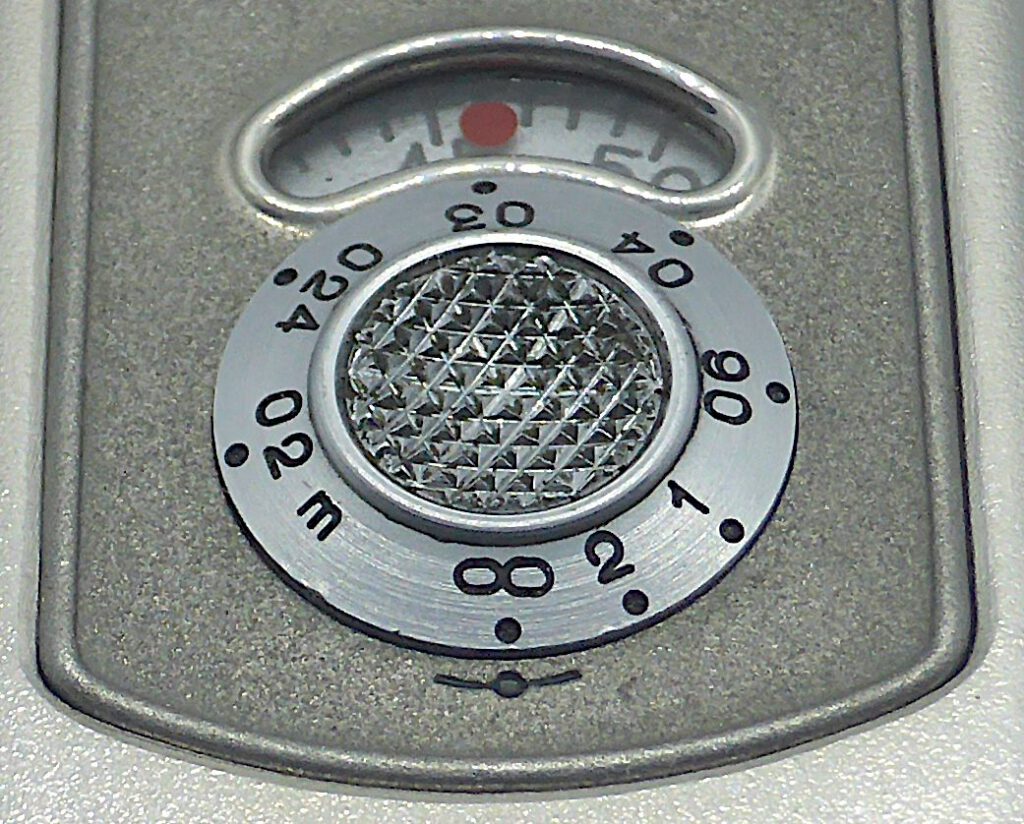
The distance dial
Turn the setting knob until the desired distance is opposite the setting mark.
It is noticeable that only 2 distances are indicated above 1 m: 2m and infinity (oo). The short distances of less than 1 m take up more than three quarters of the scale.. The scale is therefore not linear but logarithmic. This means that the middle position between 1 and 2 m is not 1.5 m but 1.33 m. We must therefore keep in mind that the average distance between two markings is always slightly shifted from the middle position to the larger value.
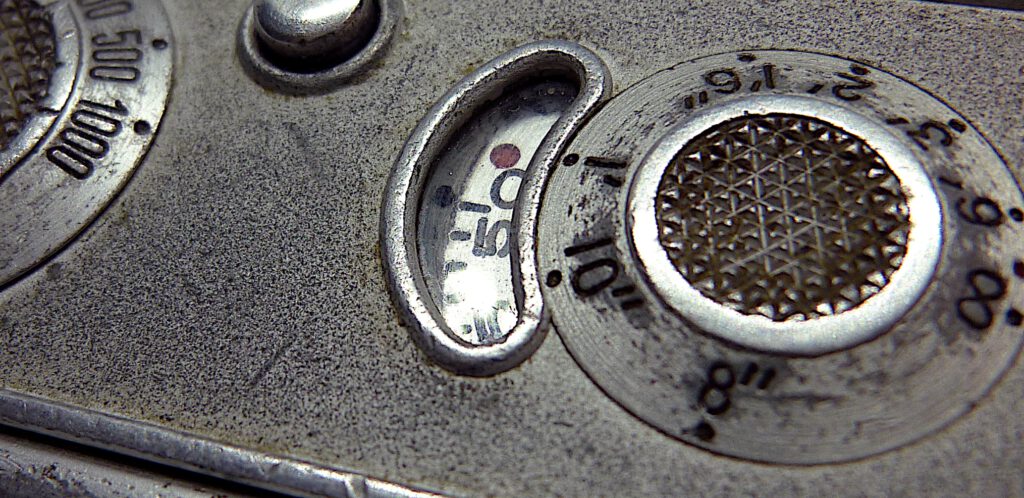
The dials with imperial units have the following divisions:
8“ (203 mm), 10” (254 mm), 1′ (305 mm), 1′ 6” (457 mm), 2‘ (610 mm), 3’ (914), 6′ (1829 mm).
Which distance?
That is the most important question of all in this context. There are many theories and discussions about this, but in the end they can be summarized as follows.
There are basically three settings for the distance:
- Focus on the subject.
- Set to infinity.
- Set to the hyperfocal distance.
We will now discuss these three options. To understand the pros and cons of these three options, we first need to look at the concept of depth of field.
Note: All of the following sample images were taken with 8×11 Minox Cameras.
Depth of field
The term is misleading because it suggests that there is a distance range within which everything is sharp. This is wrong because it is not optically possible. What we have already established above remains the case: Only the objects that are exactly as far away from the lens as I have set on the camera are in focus. All other objects are depicted more or less blurred.
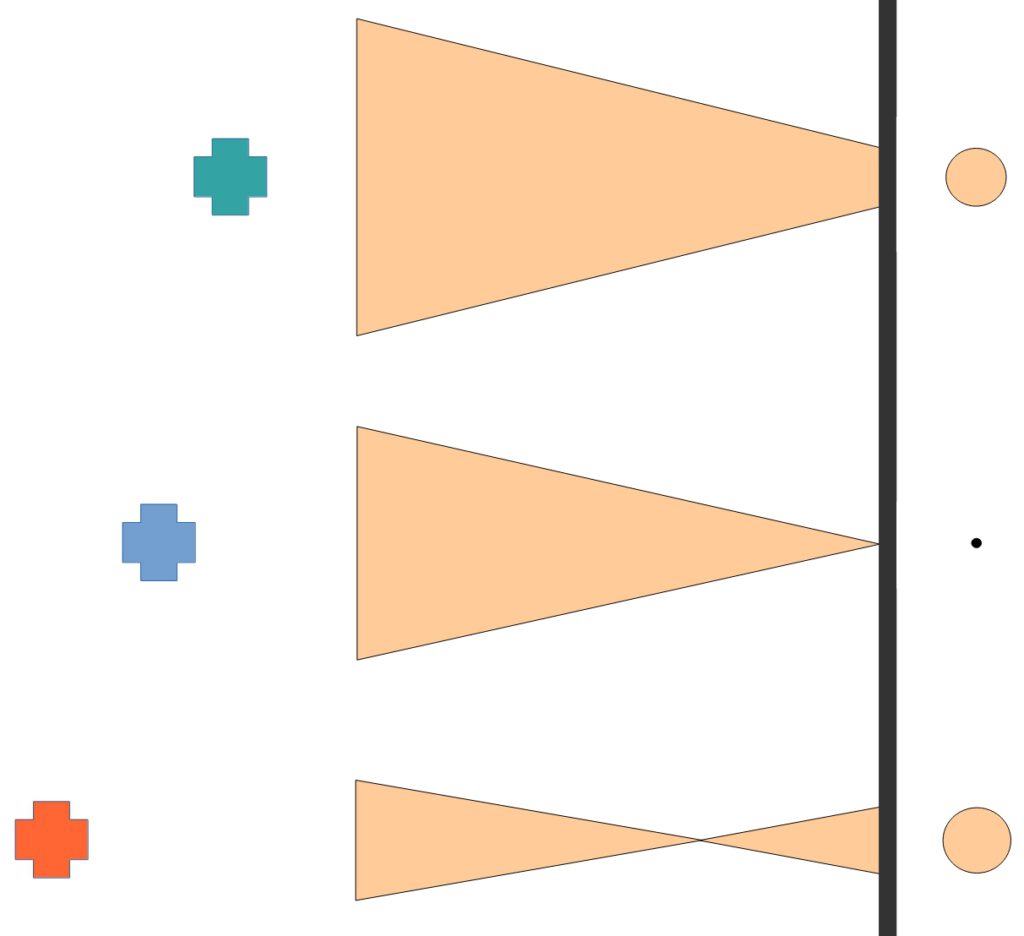
On the right we see three objects at different distances from the camera. The lens is focused on the middle blue object. This means that all points of the blue plane are shown as dots on the negative. Points on the green plane (too close) and the red plane (too far away), on the other hand, are depicted on the negative as circles (circle of confusion).
If we are generous and accept a certain amount of blur as being sharp enough, then we can speak of a distance range that is still acceptably sharp. We then call this distance range Depth of Field.
Note the raindrops at the bottom left.
But what is acceptably sharp?
There are conventions for this. Minox calls a point that is depicted on the Minox negative as a circular disk of 1/60 mm instead of a point still acceptably sharp. It is called Circle of Confusion. It is clear that this is a more or less arbitrary definition.
If I later look at my picture in postcard size from 30 cm and have normal eyesight, the area of depth of field will probably seem sharp enough to me.
It will also appear sharp to me at a size of 1.60 m x 2.00 m if I look at it from a distance of 2.5 m (image diagonal). The depth of field is therefore a pragmatic approach.
The next image shows the depth of field ranges for 1, 2 and 4 m for the Minox lens. At the end of each range, the circle of confusion on the negative is 1/60 mm. We also see that the depth of field range in front of the focusing point is shorter than behind it:
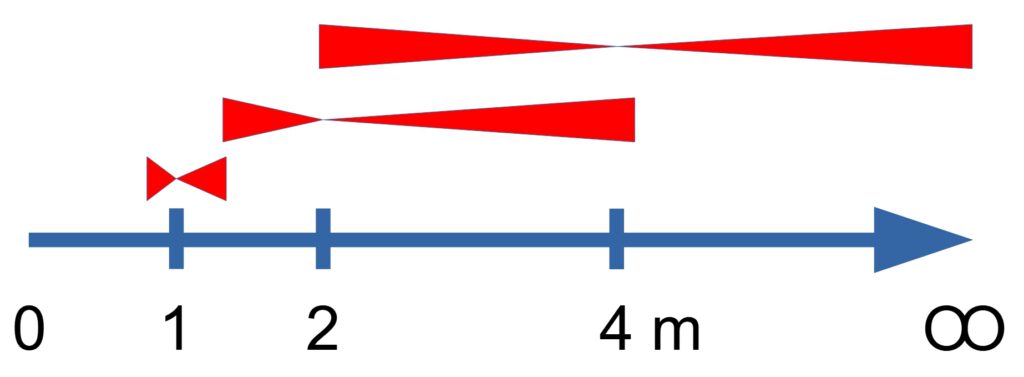
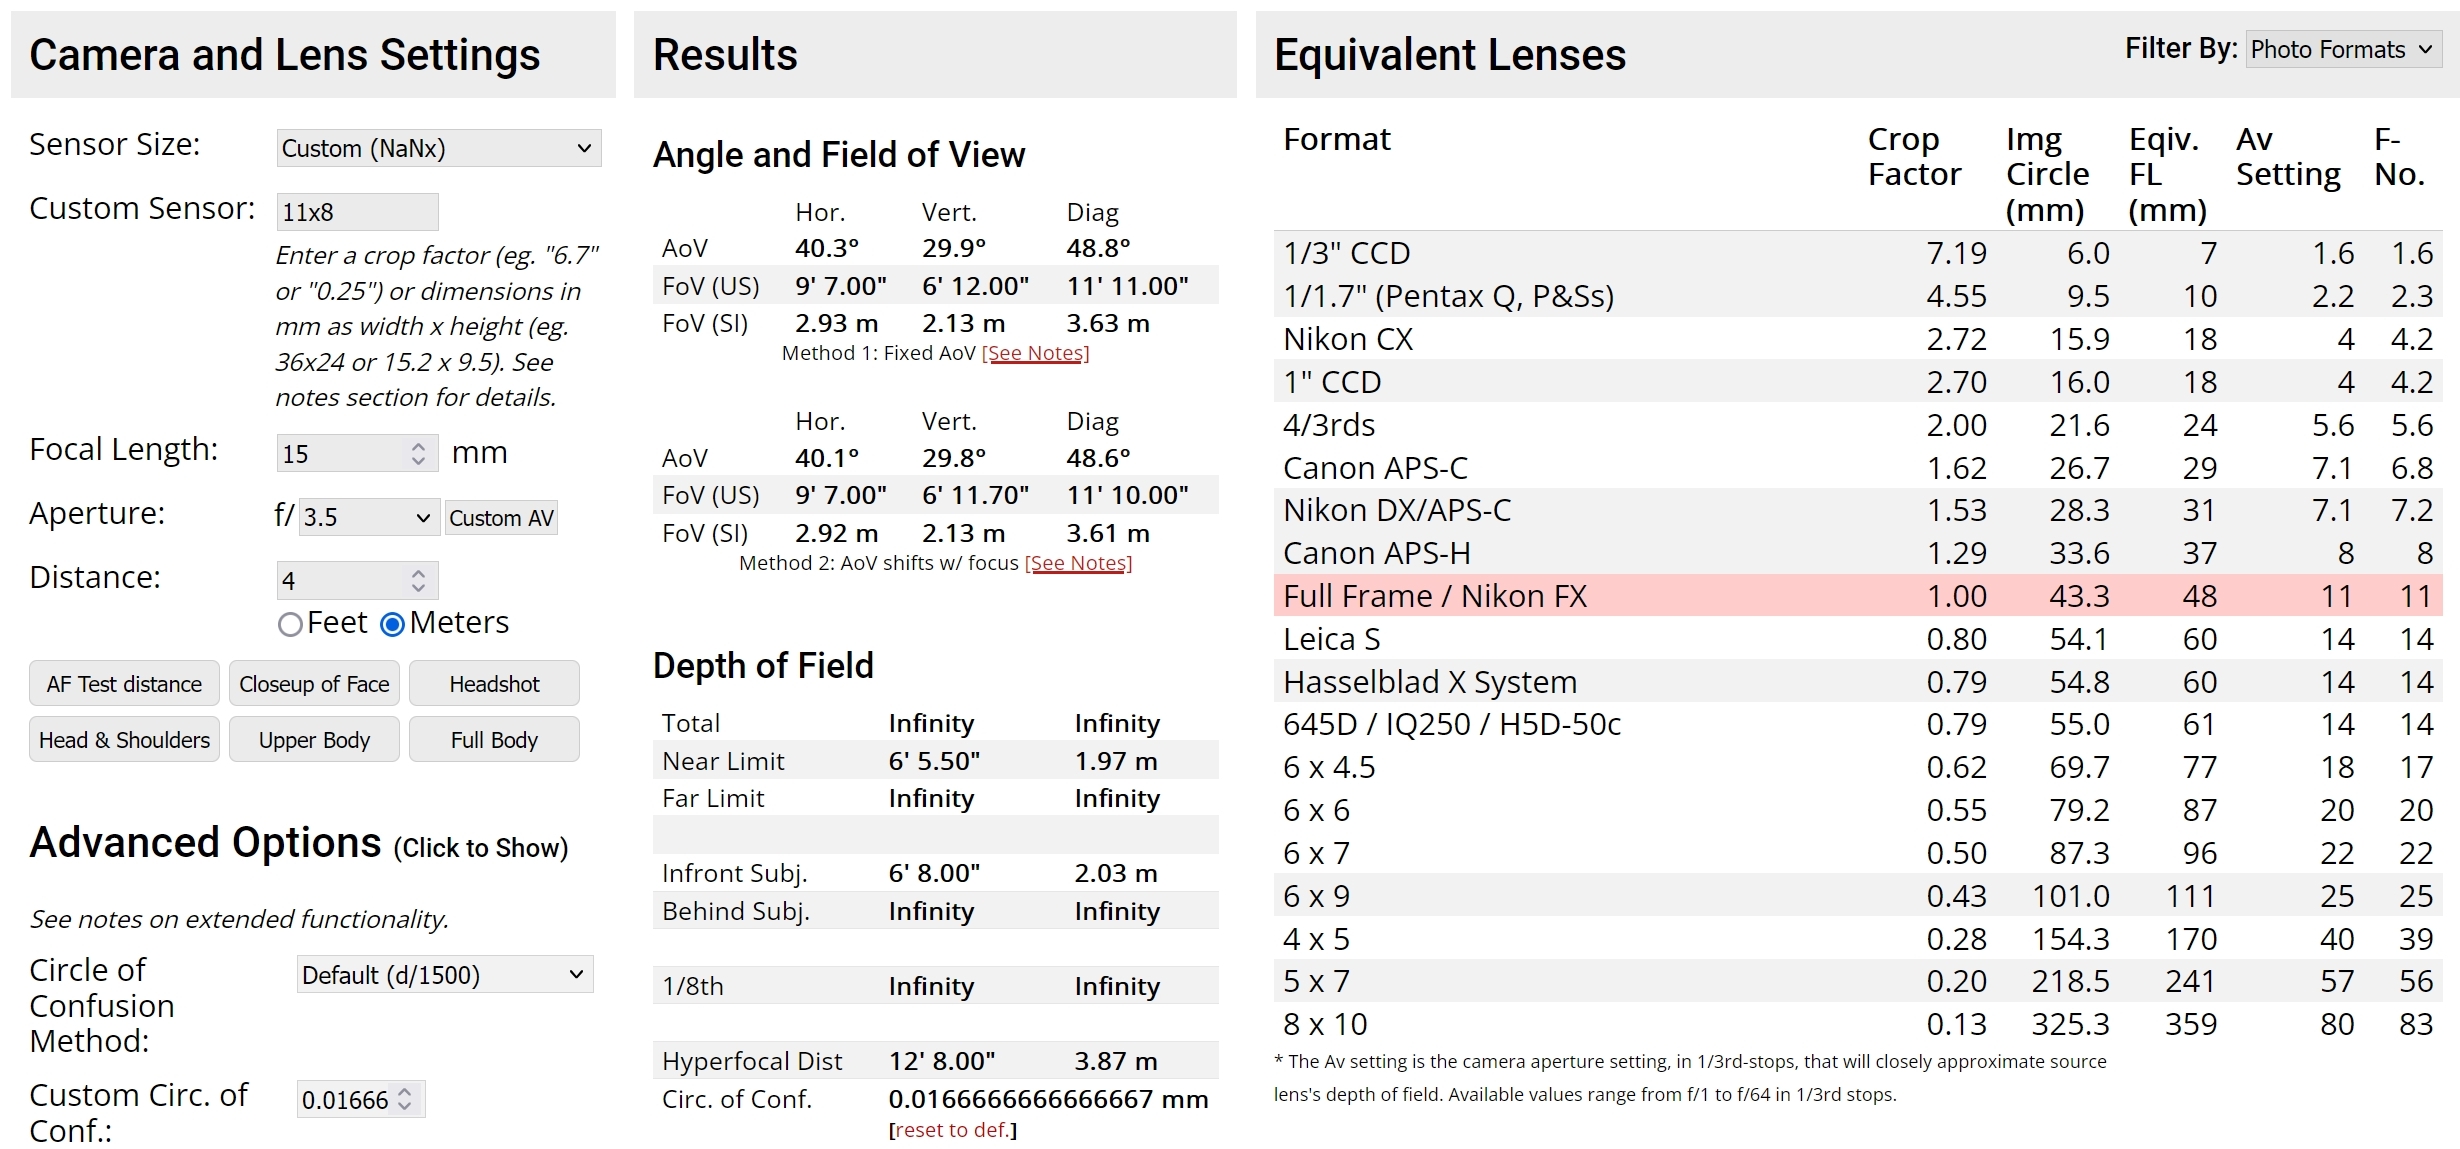
If you are interested in the exact values of the Complan lens, you can find an overview here
(Source: pointsinfocus.com):
Resolution – what can we expect?
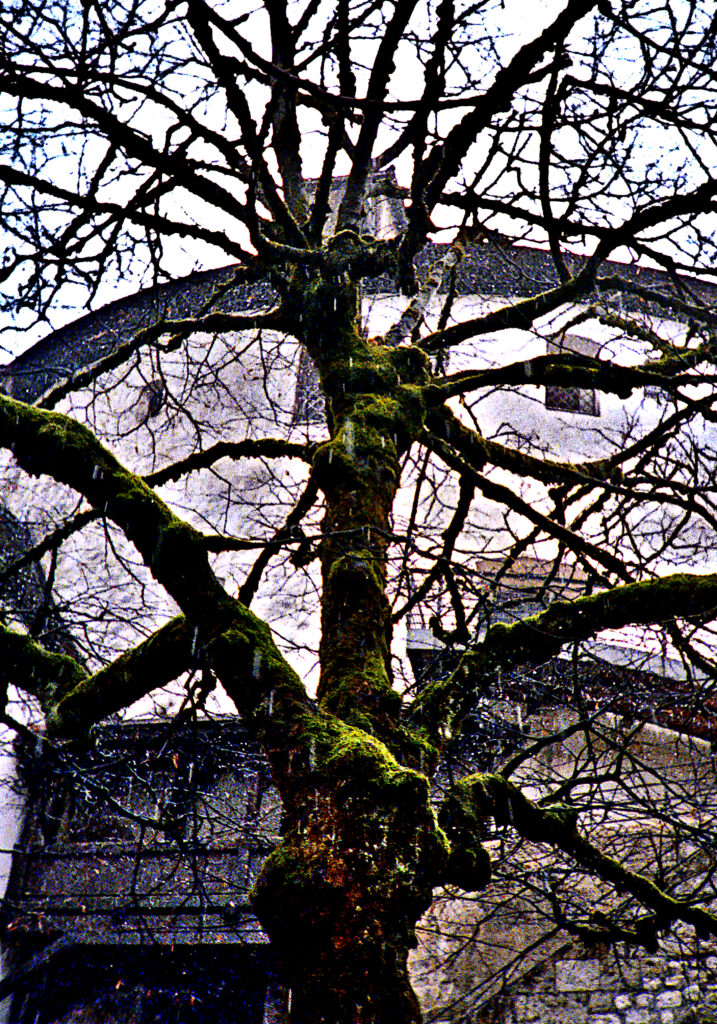
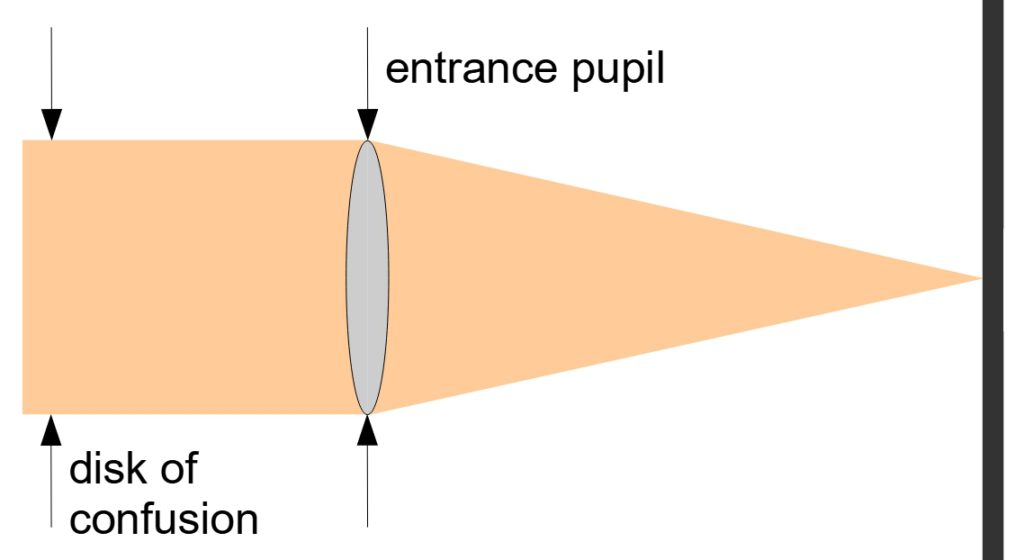
At this point, we should first ask ourselves what we can expect in terms of image sharpness. If we set the distance to infinity, this results in a disk of confusion over the entire distance range, which corresponds to the opening of the lens. [Merklinger, H.M.: The Ins and Outs of Focus]. A lens focused to infinity resolves details of the same size at any distance, namely those the size of the entrance pupil:

Minox A IIIs, CineStill50d
Click to enlarge
With Minox 8X11 cameras the effective opening of the lens is 15 mm / 3.5 = 4.3 mm. It means that all details larger than 4.3 mm are recognizable if focus is set to infinity. This applies to all objects when distance set to infinity, regardless of how far away they are from the camera.
But keep in mind that this is a theoretical value. Lens aberrations, diffraction, film grain, camera shake etc. lead to worse values in reality. However, a value of 5 mm can be used as a rule of thumb and upper limit.
For comparison: The angle of view of the 50 mm normal lens in 35 mm format corresponds to the 15 mm Minox lens. If I set a 50 mm lens to aperture 11, I get 50 mm / 11 = 4.5 mm. The Minox lens therefore corresponds to a normal lens in the 35 mm format stopped down to 11.
So we have to choose between two options:
- We get the greatest possible depth of field towards the camera at the expense of resolution at infinity (hyperfocal setting).
- The greatest possible resolution (and sharpness) at infinity is achieved at the expense of the near limit of the focus range.
Snapshot setting – the Hyperfocal Distance
According to the above definition, the Minox lens has a large depth of field, but this decreases drastically at short distances. At 2 m it is a range of 1.3 m to 4 m, while at 0.2 m it is only 2 cm in total. The range of the depth of field can be read off for each distance on the Minox via the bracket at the setting point.
The Minox guide says: “The greatest Depth of Field is obtained with the snapshot setting (small dot half way between ∞ and 2 m). You will find this setting convenient for all pictures which require quick readyness and fast shooting. “
This is how you set the hyperfocal distance of 4 m on a Minox. But what does that actually mean? All objects at a distance of 4 m are in focus. The sharpness decreases steadily in front of and behind them. From 2 m to infinity there is therefore no greater blurring on the negative than 1/60 mm. This is considered to be acceptably sharp by the Minox guide. That is why the next sentence in the guide reads: “Keep in mind that nearest object must be at least 2 m away“. Otherwise it will be displayed unacceptably blurred.
It is also important to realize that in this setting, objects at a distance of for example 2 km must be at least 2 m tall so that they can still be captured at all. In the best case.
There are actually only two reasons to set the hyperfocal distance:
- If I want to take a snapshot or if I don’t want to miss the “decisive moment” with Cartier-Bresson. This is a conscious decision, with which I forego sharpness in favor of an unrepeatable situation.
- If I absolutely want to capture everything as sharply as possible from a medium distance to infinity. For whatever reason. I’ll come back to this later.
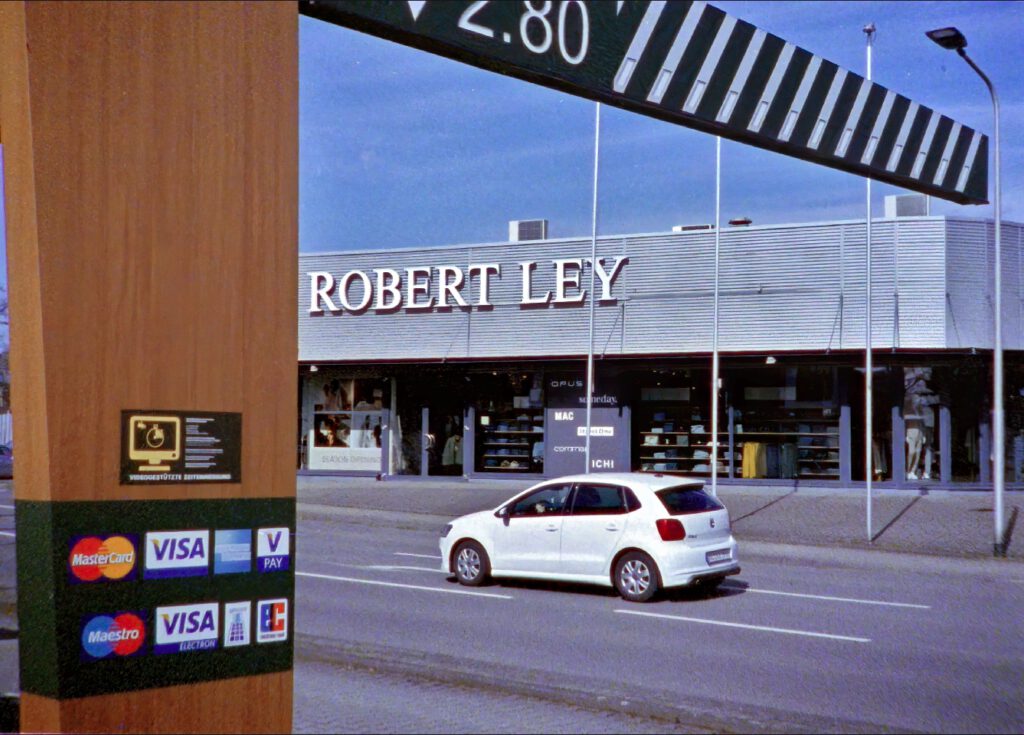
Set to infinity

If your most important objects are 10 meters or more away, you should set the Minox to infinity. Because then these objects have to be really sharp and you can’t achieve this with the hyperfocal dinstance. As we remember, when the Minox is set to 4 m (midway between 2 m and ∞, hyperfocal distance), the distant objects are still just acceptably sharp. But that is not acceptable here! Many people don’t realize this because they assume that everything within the depth of field range is in focus. But we know that this is not true.
At the ∞ setting, the distant objects are therefore sharp and the sharpness decreases further in the direction of the camera. Acceptable sharpness ends at 4 m for a Minox.
Focus on the subject!
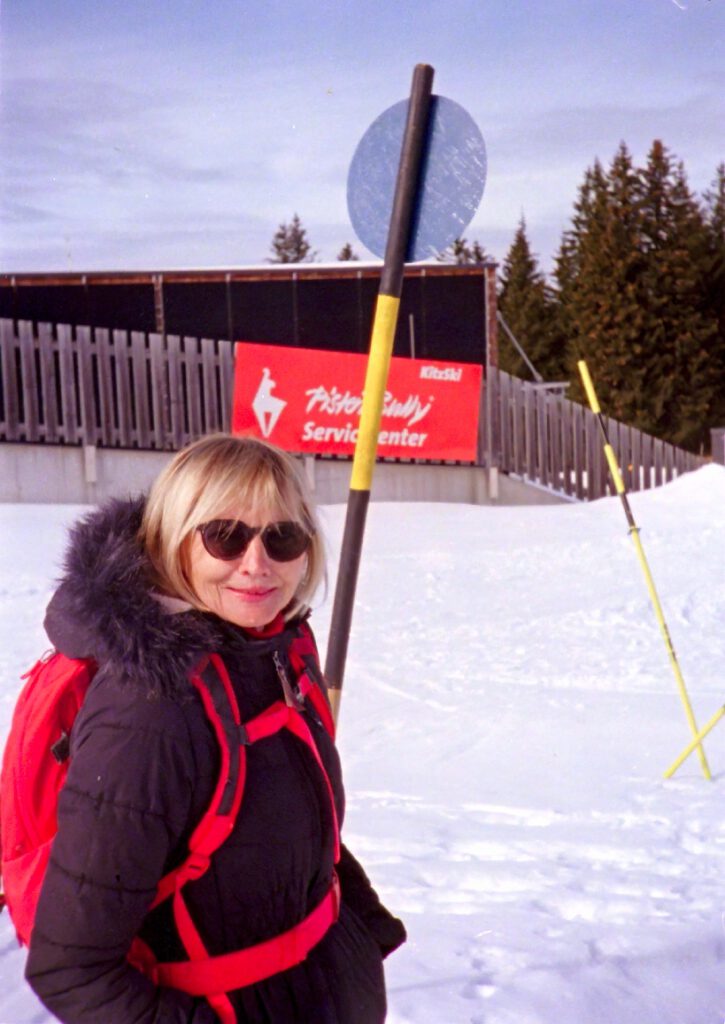
so that you can still just read the sign
To take an expressive photo, you first have to be clear about what you actually want to show. As long as you are not clear about this object, you don’t need to worry about setting the distance. In order to avoid this conceptual mental work and not have to commit themselves, many people try to make everything in the photo appear as sharp as possible.
This then leads to always taking pictures with the hyperfocal distance. The result is images that are not very expressive and that are not really sharp at the interesting points.
Good pictures require conscious decisions.
If the image statement is on the horizon, I have to set ∞. If it’s close by, then it’s 2.5 m. No compromises! You can tell from a photo whether such decisions have been made consciously.
How to determine the distance
Now that we know which object we want to focus on, we still need to know the distance to it.
A DIY rangefinder
Although the Minox does not have a built-in rangefinder, this is fairly simple. For distances below 1 m we have the measuring chain, see below. For distances greater than 1 m, we can easily build our own rangefinder. As far as I know, this idea originally goes back to Martin Tai. This DIY rangefinder is based on the same principle as the Leica and is just as quick and easy to use. It consists of a scale that we print out and stick onto our Minox:
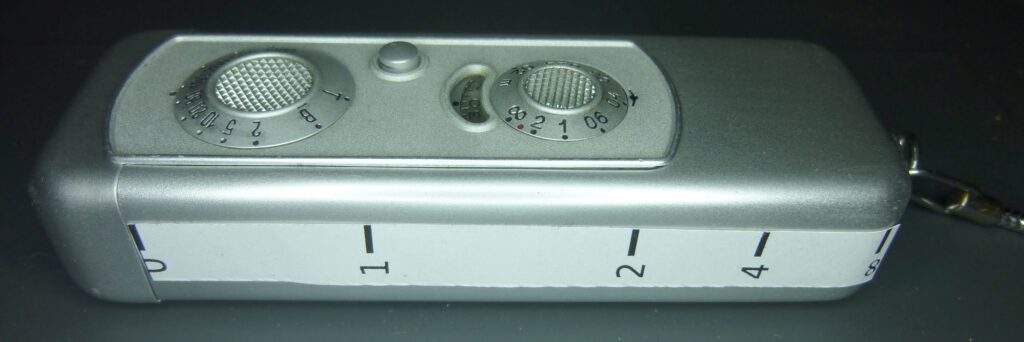
The scale represents the distance settings of the Minox in meters. To measure, hold the scale in your right hand on your outstretched arm and close your right eye. Then align the leftmost line of the scale “0” with the object. Now close your left eye and open the right eye without moving your hand and read the now shifted object on the scale. The value read or an intermediate value is the distance we need to set on the camera.
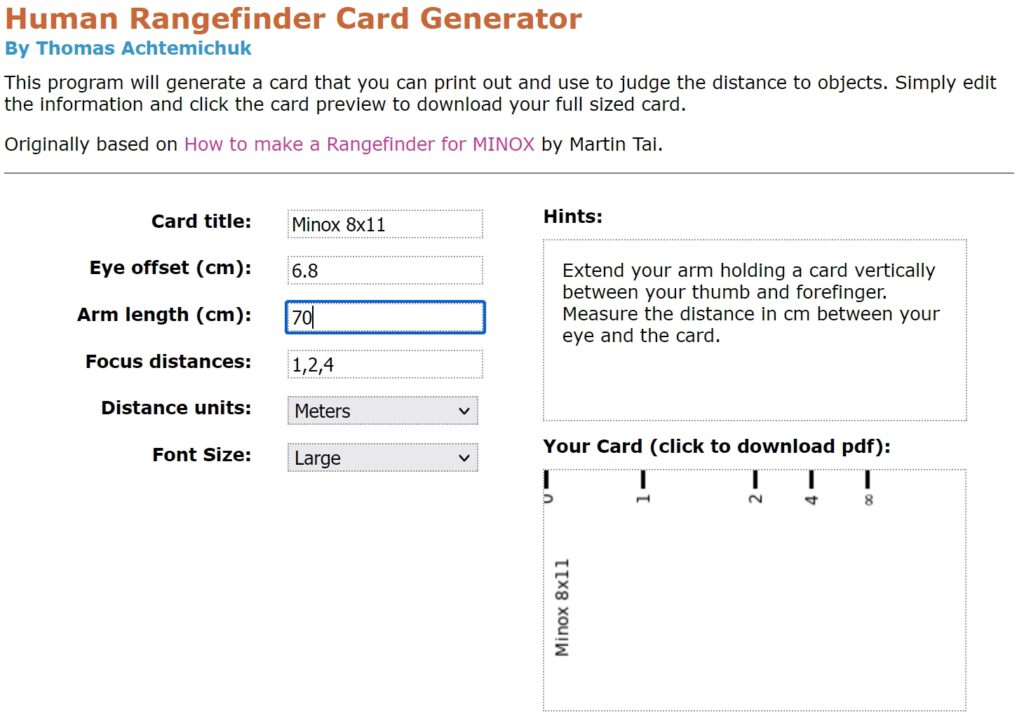
The process is amazingly accurate. However, it is based on the distance between your eyes and the length of your arms. The interpupillary distance for example can vary from 51 to 77 mm.. We therefore have to create the scale based on these values. This is very easy to do via the website of Thomas Achtemichuk. You enter your personal interpupillary distance and arm length. A PDF is then generated that you can print out. Done.
To create the card, the following values should be entered for the Minox, the interpupillary distance (“Eye offset”) and the arm length (choose Distance units “Feet” to enter imperal units):
The best way to measure the interpupillary distance is to measure it yourself in front of the mirror with a ruler. The arm length is measured from the forehead between the eyes and a card held vertically in the right hand on the outstretched arm, just as you will later hold the scale.
Click in the card area to generate a PDF that you can print out (important: 100% scale). If you don’t want to stick scale on the Minox, you can also carry the credit card-sized paper separately.
The measuring chain
Since the sharpness decreases rapidly below 1 m in front of and behind the set distance, you have to measure and adjust very precisely here. The Minox has a so-called measuring chain for this purpose. Its use is well explained in the manual, so that we can dispense with it here.
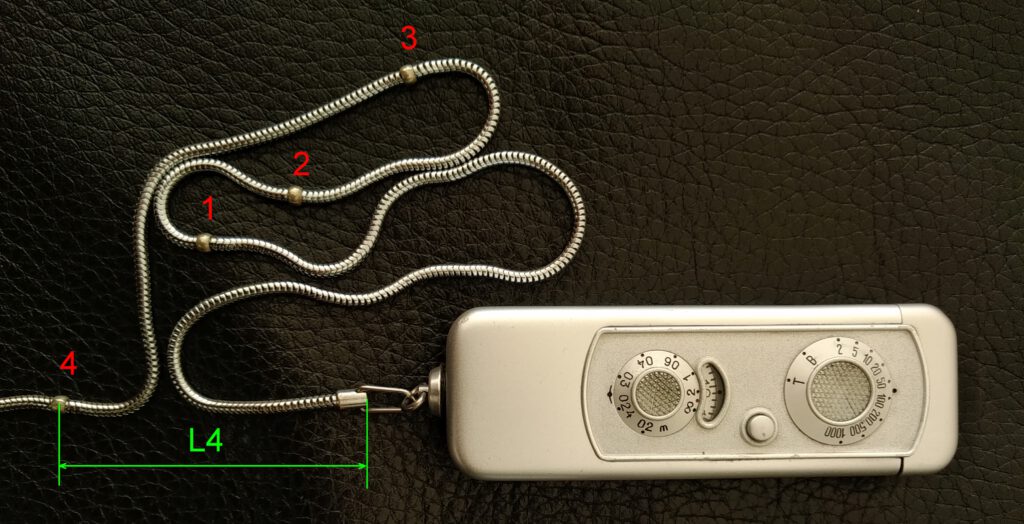
Just a note here if you use a tripod for close-ups. In this case, the measuring chain must be removed. You can then measure the distance with a ruler. Note that the distance is always measured from the front edge of the Minox. Of course you can also use the dismantled measuring chain. Compare the picture above (L4), where the chain must then be held against the front of the camera.
Use your body measurements
Steve (perkeleellinen at photrio.com) pointed out that you can also use your own arm length as a ruler. Simply measure the length once and memorize it. The arm length thus extends the range of the measuring chain. This is useful because we are in a distance range where the depth of field is low and precise adjustment is important.
Of course, you can also measure your own stride length once to cover the range from 1 m to 4 m.