Regardless of whether we have just bought a Minox or have owned it for a long time, we sometimes ask ourselves what we can do to get it back into the best possible condition.
The answer to this depends on many factors. That is precisely why I would like to present my thoughts on the matter here. It is about much more than the topic of CLA (Clean, Lube, Adjust), but of course it has something to do with it.
As is often the case in life, it helps to first be clear about the goal i.e. what I actually want to achieve with the action. This determines what would be desirable to do. But not only that, but also how much time want to invest in it and what I feel confident about doing myself. Alternatively, the question is whether someone else could do it for me and whether I have the money or want to spend it.
So there are a lot of questions. Let’s answer them one by one!
Please read our Legal Disclaimer before proceeding.
What do you expect from your Minox?
First of all, we have to differentiate whether you see the Minox purely as a collector’s item or whether you want to take photos with it.
Collectible item
As a collector, you want to look at the camera and present it. To do this, it must meet your expectations purely on the outside. In terms of functionality, it will probably be enough for you to pull the camera apart to be able to look at the lens and viewfinder. At most, you will open the film chamber to check the serial number once.
The external appearance will be all the more important to you. It does not have to be flawless, but should correspond to what it represents for you. In such cases, external cleaning and the easy sliding of the housing will be sufficient.
Camera as a tool
If you want to take photos and see your Minox as a tool for this, you are in a different dimension of maintenance. Then everything on the camera really has to work. But you don’t necessarily have to expect the camera to work as perfectly as it did on the first day. So you can perhaps live with significant deviations in the shutter speeds. However, only you can decide how high your expectations are for the functionality of the camera.
Nevertheless, all basic functions must of course be available if you really want to take photos. Unlike a collector, however, you may be able to make any compromises in terms of appearance.
Outer appearance
Preliminary consideration
As already mentioned, the appearance of the camera plays a major role for the collector. However, that doesn’t mean that it always has to be flawless. On the contrary, worn casings with clear signs of use can also be attractive and make the camera unique.
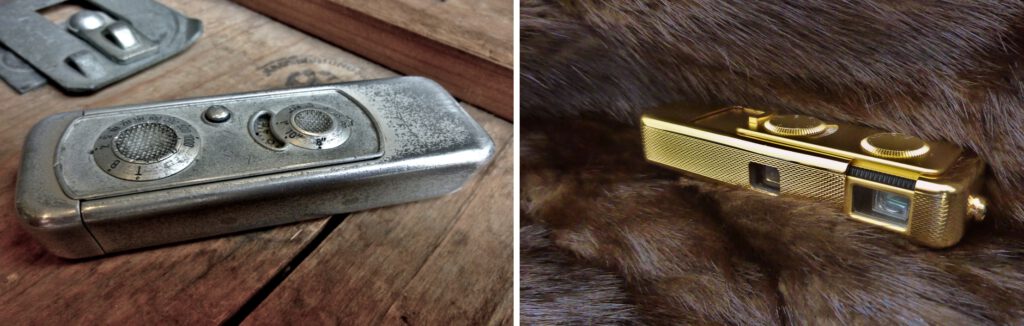
Let’s take a look at the two examples in the following pictures. On the left we see a 70-year-old Minox A IIIs with very heavy signs of use. You can see from this camera that it has not been treated gently, has seen a lot and has been used in many tough situations. In my opinion, this makes it an exceptional exemplar.
We see the extreme opposite in the picture on the right. It is a Minox AX from a special gold edition limited to 250 pieces from 1994. It is unused and flawless. A glamorous collector’s item for the display case. The fact that it also works perfectly is actually of secondary importance here.
Cleaning the surfaces
General
Due to the housing material of the Minox, signs of wear are difficult to remove. The housings are made entirely of coated metal and some have satin surfaces, so that nothing can be achieved with abrasive processes or even sanding. This would completely change the character of the surfaces. The Minox cameras with aluminum housings are anodized. This applies not only to the black housings but also to the silver ones. Rubbing too hard or sanding would remove the layer and reveal the shiny, pure aluminum. You generally don’t want that because it’s not authentic.
Minox surfaces

Riga Minox
An exception is the Riga Minox, whose case is made of uncoated stainless steel. Watch a footage (at 2:11) from the VEF housing workshop in Riga showing the finishing of the cases in the 1940s. It was done by hand on a belt sander. In theory, this could also be done to remove scratches from the surfaces. But it certainly takes courage to do this yourself with such a rare camera.
Special editions
Cleaning the surfaces of special editions such as gold, silver, titanium or chrome must be done according to the instructions in the relevant manual. I don’t want to discuss this here, as it only affects a few cameras and would go beyond the scope of this article.
Cleaning
In the Minox B user manual, Minox recommends cleaning the case with a soft eraser. In fact, I have had the best experience with this. To get into the corners and edges, you can cut the eraser accordingly. However, you can’t get everything off with it. Minox expressly advises against using liquids for cleaning because they could get into the case. I would like to disagree here. A cloth soaked in a little isopropanol will probably do no damage.
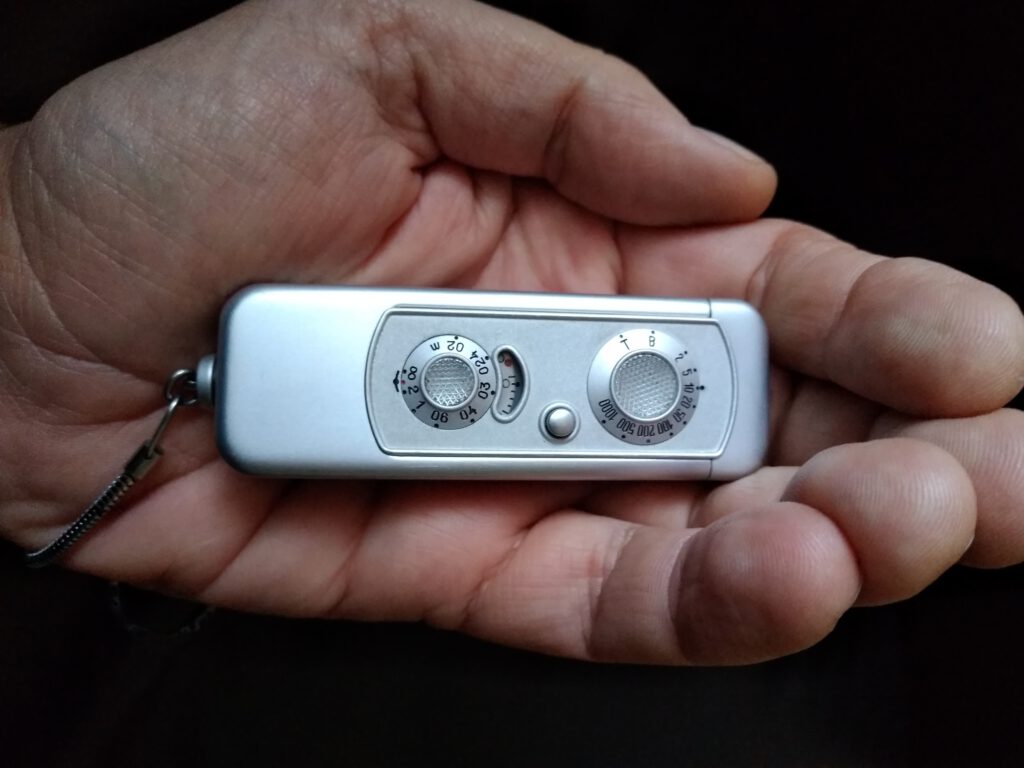
The faceted dials in particular are often quite dirty due to body fat. In my experience, they can be cleaned well with a moistened toothbrush. But you really have to be careful that no liquid gets into the case over the edges of the dials. The distance dial is particularly critical here because of its proximity to the lens.
Basic functionality
I recommend doing a quick test of the camera first. I’ve described how to do that here.
Open and close the Camera
Even with a Minox as a collector’s item, it should be possible to pull the camera apart. This gives you a clear view of the lens and viewfinder. The slider for the filters is also then accessible. Often the camera can only be pulled apart or be pushed together with a lot of force.
First of all, pulling the camera apart and pushing it together should be made easier. However, you can only directly access the sliding surfaces in question if you dismantle the housing, i.e. dismantle the bottom shell, front side and operating side.
Instead, I suggest to carefully apply lighter fuel to the horizontal gaps where the housing parts slide together. Be careful not to let too much of it get into the camera at once and possibly leave marks on the lenses. This requires some overhead work to keep the liquid flowing away from the lens. Ultimately you should be able to loosen the sticky lubricant film and partially remove it with a very fine interdental brush. The rest can be pushed off the sliding surfaces by pulling the camera apart and pushing it together several times in such a way that the friction is significantly reduced. After that, the operation should be smooth enough to work with the camera. This compromise makes it possible to avoid completely dismantling of the camera.
Cleaning the glasses
When the Minox is open, it is advisable to clean the glass surfaces of the lens and viewfinder. For this purpose, I recommend disposable lens cleaning cloths made of paper and isopropanol.
Practical use
The following maintenance work is only of interest to those who want to take photos with the Minox. For collectors, the effort and, above all, the risk of damage will not be worth it.
However, if you, like me, attach importance to the cameras being and remaining fully functional, you should think about the following work. But you should also be clear about whether you see the camera as a tool for taking photos or whether you also enjoy repairing and restoring the Minox.
If you just want the camera to work, you should consider very carefully what the scope of the CLA should be. I recommend only doing what is absolutely necessary to keep the risk of damage to a minimum. However, if you enjoy tinkering, have good eyes and a steady hand, you will have a lot of fun with the Minox CLA. An advantage of this type of camera is that you only need a few tools.
Shutter
The most common problem with Minox cameras is a resinous shutter. This is particularly common with cameras that are rarely or never used. It is therefore a fallacy to believe that cameras that are never used are always functional. On the contrary, the oil thickens and sticks to the mechanism after a few years. With cameras that are used regularly, on the other hand, the oil has no opportunity to stick anything. However, here too there is no oil for lubrication and the oil residue has accumulated on the edges of the moving parts.
It is easy to determine whether there is a problem with the shutter mechanism. The problem is most likely to occur with long shutter speeds, so first test with 1/2 second.
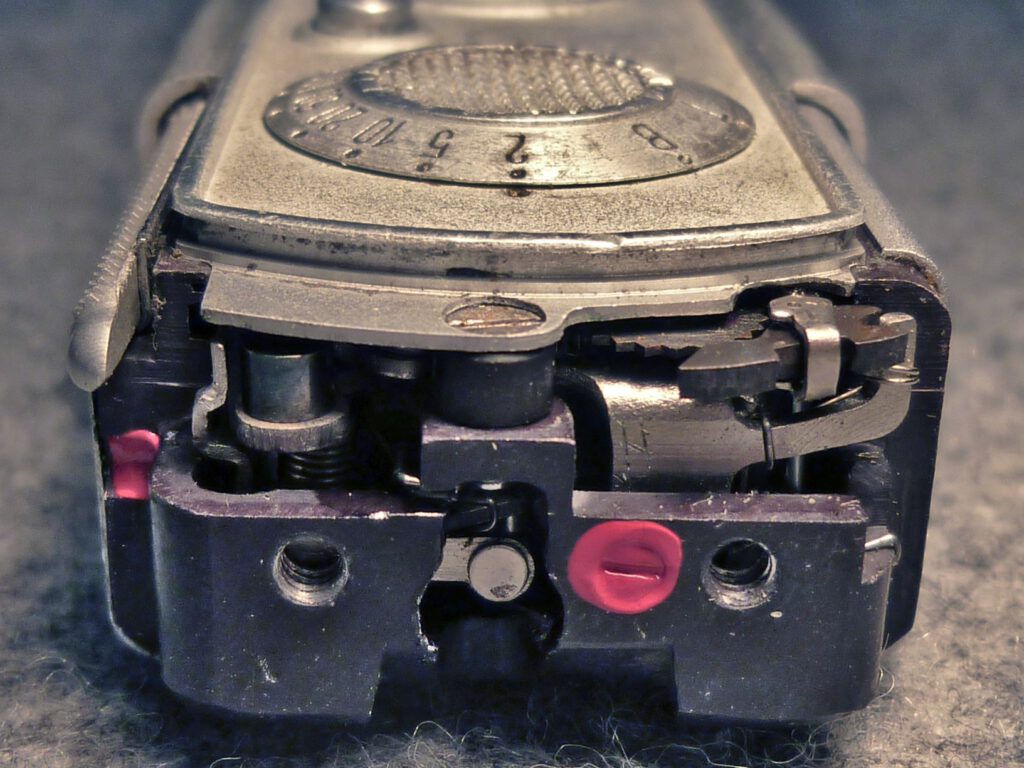
If a problem is found, it is mainly due to the bearings of the gears in the escapement. Either the oil is missing or, worse still, the resin has stuck to the bearing. The escapement on the Minox is partly easily accessible via the upper end cap, which is only attached with two screws. Read here how to open the cap. Then you have a view of the front edge of the escapement:
By patiently applying small amount lighter fuel to the bearings and gears, alternating with shooting at the slow shutter speeds, the movement will become smooth again. Then, times should be running plausibly and consistently again.
Other considerations
First, do all the tests described here. Only if a real malfunction becomes apparent is there a need for action.
Next, I would do a film test. Only this can show whether everything is really OK. To fix real malfunctions, I have descriptions here for all possible problems.
Clean and lubricate
Sliding surfaces of the housing
Above we have described a simple procedure here to make opening and closing the Minox easier. If that is not enough for you or if you want to open the housing anyway, you can do better.
To do this, at least the bottom part of the housing must be removed. Then you can reach the surfaces of the body on which the bottom part slides. Carefully clean these surfaces of any resin and put new grease on them.
Tension rod
To get a feel for what happens when opening the camera, watch this video. You can clearly see which parts are moving. The surfaces involved must slide well.
However, you have to remove the Minox’s control panel. This is a risky operation. There is a risk that the distance dial and image counter disc can fall out, which may require complex readjustment of the lens and the film feeding mechanism. Only do this if you are skilled or have a camera to practice with.
Film feeding mechanism
One additional reason why the camera is difficult to open could be that the film spool drive is resinous. The transport claw for the film cartridge then rotates with a lot of friction. To make it move smoothly again, the film spool drive must be dismantled. This is a lot of work.
The control panel must be removed first. Then the distance dial and the frame counter wheel must also be dismantled. After that the fim spool drive has to be dismantled. Reassembling it later is quite difficult. I have described the whole process here.
Escapement
The escapement can be serviced at 4 different levels of difficulty. The first level has already been described above and should be sufficient in most cases to get the shutter working again at all exposure times. If you have higher demands or if shutter speed measurements show that the times are very incorrect, you can do more.
Before you decide to clean the escapement, you should consider whether you can live with the current shutter speeds. Working on the escapement is tricky and involves risk to the camera if you have never done this before. Perhaps the better option is to make a correction table based on the shutter speed measurement and expose accordingly. For example, if I have measured 1/100 s at the 1/200 setting, I can expose at 1/100 s in the future by setting the 1/200 s setting.
The second level involves cleaning the escapement with the control plate removed. You have to be very careful that the distance dial does not accidentally fall out. Otherwise, further work will be required. In this case, you clean the escapement by carefully applying acetone or lighter fluid several times. I recommend that you then apply only a very small amount of oil to the bearing points of the gears. If in doubt, you can also do without oiling, but cleaning is important.
The third level involves removing the escapement. There is a great risk that the barrel spring inside the escapement will relax, so I do not recommend this level.
The fourth stage also includes completely dismantling the escapement and opening the barrel. This should really only be attempted if you have experience in repairing or maintaining wristwatches. All individual parts of the escapement are placed in acetone and cleaned in an ultrasonic bath, ideally. Then everything is reassembled and the bearings are oiled. The most difficult part is installing the barrel spring and pre-tensioning it after assembly.
Pressure plate
Please read our Legal Disclaimer before proceeding.
To clean the pressure plate, open the film chamber. Take a sticky note and put the sticky side into the slot in front of the pressure plate. Then tap the Minox on a surface so that the dust settles on the sticky side. Then turn the sticky note over and do the same on the other side.
If you want to thoroughly clean the pressure plate and the light tube, you can remove the back cover without any great risk and then easily remove the pressure plate. The entire area can then be dusted with lint-free cotton swabs. The pressure plate can be wiped down with a damp isopropanol. The viewfinder is then also accessible for cleaning.
Extensive repairs
I have described the most important repairs to an 8×11 Minox in detail, with lots of pictures and videos, here.